Thursday, December 9, 2021

Purple and Silver Birthday Card using DIY Stencils

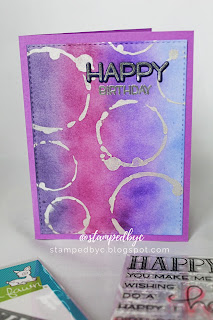
As promised, I'm sharing with you a birthday card I made using once of the stencils I DIY'd using my Silhouette Cameo. 

The splotches on the stencil were the perfect highlight to my card.


I used Tim Holtz Distress Inks (Dusty Concord, Wilted Violet, Seedless Preserves, and Shaded Lilac) to create my own background.  I'm not very good at blending, but I'm working on it.  You'll probably see more blended backgrounds on my next cards because I'm trying to get tons of practice, so thank you for your patience with me. :)

The white cardstock was die cut using Simon Says Stamp's Stitched Rectangles die.  I pounced Platinum Planet from Tsukineko's Brilliance ink through the stencil.  

I used Lawn Fawn's Happy, Happy, Happy stamp set and coordinating die to cut out the "Happy."  I cut it in four layers of cardstock to "pop" up the sentiment.  The words were heat embossed using Stampin' Up's Silver embossing powder.


Thanks for looking, and have a great day!

DIY Stencils Using Cricut or Silhouette

 Stencils are definitely on trend right now, and there are many options available on the market.

However, if you're looking for a specific stencil and can't find it, or if you're just trying to stretch your crafting budget, then this hack can definitely help you!

If you have an electronic cutting machine (like a Cricut or a Silhouette), you can use these bad boys to cut any stencil that your crafty heart desires.

To cut this actual stencils, I used my Silhouette Cameo.  However, I'll show you how to do this with a Cricut using Design Space.

You'll need your Cricut Explore Air (or Cricut Maker), a 12x12 Cricut cutting mat (light grip or standard grip) and 6x6 square of acetate.

1.  Launch Design Space.  Click on "Image."

2.  On the Search bar, type "Stencil."


3.  Choose a stencil image that you like and click on it.

4.  Click "Add to Canvas."

5.  Once the image is on the canvas, click on it to resize it.

6.  Make sure the size says 6x6.

7.  Click "Make It."

At this point, Design Space will prompt you to connect and turn on the power to your Cricut (if you haven't done so already).  On the Cricut, select "Light Chipboard (0.327mm)" as the material.  I know you're really cutting acetate and not light chipboard, but this will allow the Cricut to cut the acetate well.

Let the machine do its magic, and ta-da!  You have your very own stencil/s!


On my next post, I will show you some of the cards I've made with these stencils.

Thanks for looking, and have a great day!
Wednesday, December 8, 2021

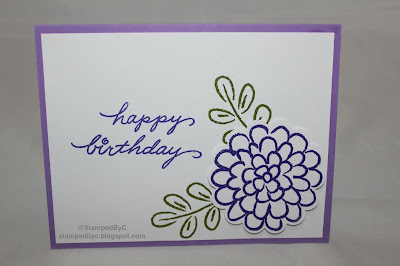
Embossed Purple Flower Birthday Card

I always find myself needing birthday cards.  With a big family and many friends whom I don't see as often as we typically would, birthdays always come up sooner than I expect.

Going through my old stamp sets, I found this beautiful Stampin' Up set (Flower Fest).  The images were just begging to be embossed, and embossed them, I did.

Using Versamark ink, I stamped the images and then embossed them using Stampendous embossing powder in Violet and Olive.  I punched the flower image using the coordinating scalloped circle punch, and popped it up on some foam tape.

The sentiment was from Stampendous (Happy Messages) and was stamped in beautiful Grape Crush ink by Catherine Pooler.  I just love how vibrant it looks in real life.  The photo really does not do it justice.


What do you do with your old stamp sets?  Do you purge your sets or do you continue to use them?  I love that I'm still able to use my old sets.

Thanks for looking, and have a great day!

Tuesday, December 7, 2021

Candy Cane Tags

My 9-year old wanted to give candy canes to all of his classmates for Christmas.  I am generally averse to all these sugar, but it's the holidays and I figured we can all use some candy canes this time of the year.

We got 2 boxes of candy canes from Michael's (Sour Patch flavored, of course).

Then, I got started with making these tags.  I cut out 23 tags using a Hero Arts Nesting Tags die out of kraft cardstock, and white stitched labels using a Simon Says Stamp Stitched Rectangles die.

I stamped a green (Catherine Pooler Grass Skirt) Christmas tree using an image from Stampin' Up's Scentsational Season.  I think this is a retired stamp set. :(

The "Season's Greetings" sentiment again came from "More Merry Messages," also from Stampin' Up.

The "To" and "From" were from an old Papertrey Ink stamp set (Boxes, Bags, and Tags), and they were the perfect size for my white stitched labels.

My son will write his classmates's names on the label, then we will use the sparkly red ribbon to tie the tags on the candy canes.

Thanks for looking, and I hope your day is as sweet as a candy cane!

Monday, December 6, 2021

Red, White, and Green Christmas Card

So excited to share this card with everyone today.

I'm a little late to the holiday card-making party, but I thought I can still make some cards to get back into the swing of things.  Starting with this one. :)

While waiting for my new stamps to arrive, I used my good old Stampin' Up stamp sets:  Ornament Keepsakes and More Merry Messages.

I stamped these on white cardstock using my new awesome Catherine Pooler inks:  Spruce, Eucalyptus, and Rockin' Red.  It was my first time trying out these inks (needed to update my ink pads, too), and I was blown away!  Super crisp images, and all you need is a little tap.  

I embossed the ornaments with Versamark ink and Stampin' Up Clear embossing powder, then cut them out using the coordinating Framelits dies.

I looped some black and white twine around the ornaments, popped them up with some foam tape, and and mounted these on dark green card base.

The sentiment was stamped with my go-to black ink (Memento Tuxedo Black), and I'm glad it has not let me down.

I'm entering this card to Sunday Stamps Winter Wonder Challenge, using 3 colors from their palette and a neutral of our choice.

Thanks for looking and have a great day!

It's Been 6 Years...

 ...since my last post.

I started this blog many years ago as a way to share my creations and connect with other crafters like myself -- card makers, scrapbookers, and bakers.  

While I was still stamping and baking, life had become quite hectic and there was little time to do much else aside from life, family, work, friends.  My craft room became our guest room, then it became my office, then just storage for stuff that I can't find room for.  You get the idea.

Over Thanksgiving, I decided to re-organize my craft room, played with some of my stuff, and before I knew it, I'm back!

I'm so excited that I'll get to share what I make again.

After 6 years, I'm back.  And I hope I'm here to stay!

Thanks for visiting! :)

Tuesday, March 3, 2015

"Dream" Graduation Card

Since I got this stamp set several months ago, I've been itching to use it.  I love its simplicity, and the possibilities it offers.


I stamped the feathers on black cardstock with Versamark, and embossed with white embossing powder, and voila! -- my own patterned paper!


I used this to make this graduation card for a friend who will be completing her advanced degree in a few months.


I just stamped and embossed the sentiment in watercolor paper using Versamark and white embossing powder, and then die-cut the feathers in  using the corresponding dies .  I colored the feathers in two shades of purple using Tim Holtz Distress Markers (I recently got the set and I'm loving it!!!).

Here is a complete list of products that I've used, with links to where you can buy them:
Black cardstock (my stash)
Watercolor paper (Strathmore Watercolor Paper)
Stamp set (Lawn Fawn Dream stamp set)
Dies (Lawn Fawn Lawn Cuts - Dream)
Versamark watermark ink (Tsukineko)
Black ink (Stazon Jet Black Ink)
White embossing powder (Stampendous White Opaque)
Tim Holtz Distress Marker (Shaded Lilac)
Tim Holtz Distress Marker (Seedless Preserves)
Embossing gun (Nicole)
Big Shot die cut machine (Sizzix)

I am entering this card to the Simon Says Stamp Wednesday Challenge (Anything Goes).

Thanks for looking, and have a great day!