Showing posts with label card. Show all posts

Sunday, January 23, 2022

Silver and White Card - Take 2

Remember my post yesterday, when I said that the silver and white challenge was challenging?  I was happy with my entry, but thought -- can I do a different take on this?  Maybe try to use different shades of silver on my card?

Here's what I managed:

Since I didn't have many shades of silver ink, I improvised by using white shimmer cardstock and used different shades of gray ink (supplies list are at the bottom of the post).

I used the embossing folder and layering stencils from Altenew's Craft Your Life Project Kit this month (Feathered Lilies) for this card.  The Altenew embossing folders are thicker than the regular embossing folders that I had, so I had to figure out the correct "sandwich" for my die cut machine.   

I used the one of the cutting plates, the Altenew embossing folder with the paper inside, and then this mat before running it through the machine.

I used these small stencil brushes to dab the ink through the stencils.

I then heat embossed the "Hello" sentiment (from the Altenew Feathered Lilies stamp set) using embossing ink and embossing powder.

This will be my second entry to the Color Hues The Color Challenge for this week.


Supply List (affiliate links -- I get a small commission if you purchase through my links, and this helps support my blog.  Thank you so much!)

Saturday, January 22, 2022

Hello Rose Card

As part of my crafty haul last December, I purchased several Craft a Flower die sets from Altenew.  They had so many to choose from, it was hard to decide which ones to get.  However, this is one of the no-brainers -- I knew I just had to get was the Rose Layering Die Set.

I used the dies to make a yellow rose for this clean and simple card.


I know I've said this before, but yellow just makes things feel so cheery.  I love a reason to use it on my card.  I'm glad CAS Colours & Sketches decided to use these colors for the challenge:  Daffodil Delight, Mango Melody, and Candy Apple Green.

I die cut the pieces of the rose and adhered them with wet adhesive.  I like wet adhesive for layering delicate layers like this because it has a little more "give" -- I can fiddle with the pieces around a bit before  "committing" to the placement. 

I used the Ellen Hutson's Essential Squares for Stitching to frame my rose and put yellow cardstock behind the dots.  I heat embossed the "Hello" sentiment from Altenew's Feathered Lilies stamp set using green embossing powder.  I used the same wet adhesive for the leaves on the card.  I popped the layered die cut rose on foam tape to give it some dimension.

Supply List (affiliate links help support my blog at no cost to you.  Thank you!)

Friday, January 21, 2022

Silver and White Congratulations Card

This one is really a challenge for me.  This week, Color Hues The Color Challenge posted a challenge on their blog to create a card using only silver and white (and maybe some neutrals).  My “challenge” was how to create contrast between these two colors, so that each one is represented in my card.

It’s part of their new release.  When I saw these, I thought:  I am so dead.  Because I can’t resist large bold letters.  Large bold letters in a cover plate?  I’m sold.  So now I’m a proud owner of this die (along with a few others).  Heh.

This is the result:


I used the cover plate die twice on my die cut machine:  once on silver cardstock, once with white cardstock.  I used 80lb white cardstock here for the die cutting.  I used every other letter and adhered them on black and silver cardstock.

The black card is perfect for graduation.  The silver card is perfect for a wedding (or an engagement)!


I used the following supplies (these are affiliate links -- if you make a purchase through them, I get a small commission at no cost to you.  Thank you for supporting my crafting blog!):

Monday, January 17, 2022

Color Block Sentiment Card

Today I wanted to share with you a card I made using (almost) all the sentiments from the Concord and 9th All the Hellos stamp set.


The sentiments in this set are big and bold and perfect for using in this color block A2 card.  I chose a white cardstock on white card base to make the sentiments pop.  I die cut it with the largest rectangle die from this set for a fun little detail and red and purple ink from Catherine Pooler to stamp these images using a stamp positioner.  You can create this card without a stamp positioner, but having one will definitely help you with the layout of the card.  And if you need to re-stamp something for some reason (heh -- guilty!).    

Here are some of the supplies I used in this project (affiliate links -- thank you for supporting my blog).  Thanks for looking, and have a great day!


If you prefer to order from Amazon because you have Amazon Prime shipping, here are two excellent dye inks that will give you crisp and beautiful stamped images (or sentiments).  I've had great experience with them (my earlier cards where from this brand of inks).  I'm linking the red and purple below, but they have a whole line of inks as well:

Sunday, January 16, 2022

Cute Lawn Fawn Birthday Card

I'm back again, this time with another mini slimline card for the Lawn Fawnatics Challenge Blog. The theme for the challenge is "Let's Celebrate!"

I decided on a birthday card because I always need a lot of birthday cards, and I think this card is a cute addition to my stash:

I created the background by die cutting the cardstock with the stitched mini slimline die from Crafty Meraki, lightly blending Tim Holtz blue distress ink, and using the Lawn Fawn confetti stencils on the background with two other shades of blue Tim Holtz distress ink.  On white cardstock, I stamped the images using Copic-safe ink, and colored them with Copic markers.  I'm still working my coloring/blending skills, but I'm sure I'll get there. :D  The smaller images from these Lawn Fawn stamp sets and coordinating dies are perfect for beginners to Copic coloring.  Also, these images are from 2 separate stamp sets -- I'll link the specific ones below.

I heat embossed the sentiment "Have a Wild Birthday" using embossing ink and black embossing powder.

I used the coordinating dies to cut out the images on my die cut machine.  I think it's really fun that the jungle animals are wearing party hats and the elephant looks like he's holding the frosting back for the cupcake.

I popped them images up with foam tape, and stuck them on the background, and then I have my "Let's Celebrate" card!

Supplies are below (affiliate links - thank you for supporting my blog at no cost to you), and thanks for looking!  Have a great day!

Saturday, January 15, 2022

My First Mini Slimline Card!

When I started my crafting journey, the cards that I made were in size A2 (5 1/2x4 1/4 inches), A7 (5x7 inches), and the mini square note cards (3x3 inches).

Right now, we have slimline and mini slimline cards, which fit in the #10 and #7 envelopes, respectively.  I was a little hesitant to try making these sizes, because I'm not used to them, but no better time than the present to try, right?

So, here you go, my first mini slimline card.


It's a clean and simple card that is embossed using Couture Creation's World Map embossing folder.  I bought this at my local scrapbook store so many years ago.  I tried to search for this folder to link down below, but I think it's been discontinued.  I am linking a similar product here and down below instead.

I cut the white cardstock using the largest mini slimline die, stuck it between my embossing folder and ran it through my die cut machine, then heat embossed the "Hi" sentiment using red embossing powder.  I cut a little die cut heart out of red cardstock, stuck everything on Kraft cardstock that is 1/8 inch bigger than my embossed mat, and now it's a perfect card to say "Hi!" across the miles.

I'm entering this into the Simon Says Stamp IG Challenge.  The challenge this month is to use an embossing folder.

Oh, also, you can now find me in IG as @StampedByC.  Please stop by my IG and say hi!

I used the following supplies on my card (affiliate links support my blog at no cost to you):


Thanks for your support and thanks for looking!  Have a great day!

Friday, January 14, 2022

Watercolor Background

 I wanted to try my hand at creating a "watercolor background" but only on a portion of the card -- to create a focal point or to highlight a sentiment.  Here I used a painted 3 colors of ink using a water brush on watercolor paper.

From black cardstock, I die-cut 4 layers of the sentiment, "Happy" and adhered them together for dimension.  After making sure that the background is dry, I heat embossed the "Birthday" sentiment using black embossing powder and embossing ink.  

I used a black card base for a dramatic effect.

I am entering this card to the CAS Colours and Sketches Challenge.  The challenge this week is to focus on a central sentiment.

I used the following supplies (these are affiliate links -- if you purchase through my links, I earn a small commission to support my blog at no cost to you):


Thanks for looking, and have a great day!

Tuesday, January 11, 2022

CAS Floral Card

Happy new year!

I'm starting the new year with this clean and simple card that I made using pink, light violet, and red:

I diet cut the flowers and leaves from pink, light violet, and red cardstock.  I die cut a circle in my card front made of kraft card stock and used a black cardstock to mat that thin space between the 2 to create an outline.  I used liquid adhesive to adhere the small die cuts on the paper because it is more forgiving. I can move it around a little bit before it sets, which gives me a little bit more time to arrange the die cuts just the way I want. :)

I used my dry adhesive (tape runner) to adhere the larger pieces to the kraft card base.

I love the how card turned out!  Here's a close-up view: 


This was supposed to be entered into the CAS Colours and Sketches Challenge Blog.  Challenge #451 is to create a card using colors similar to Highland Heather, Petal Pink, and Poppy Parade, but I didn't get to create this post and link it in time.  I figured I'd share it with all of you anyway.

I used the following supplies to create my card:

Die set (flowers and leaves) - the one I used is discontinued, but this is a link to something that is similar

Circle die - you can also use this die if you want to take advantage of your Amazon Prime or use your Amazon account.  Just cut a smaller and a bigger circle and use the smaller circle to mat the flowers and leaves die cuts

Stitched die for card mat - you can also use this die if you want to take advantage of your Amazon Prime or use your Amazon account.

Thinking of You sentiment

Black ink

Die cut machine

Liquid adhesive 

Dry adhesive (tape runner)

Thanks for looking, and have a great day!

Sunday, December 26, 2021

It's a Party!

To me, nothing says "Party!" like glitters.  Tons and tons of glitters.  So I made this sparkly shaker birthday card using Pinkfresh Studio's Pop Out Sunburst stamp for double the fun.  As soon as I saw this stamp, I was intrigued by the possibilities!  I can create a rainbow sun ray background, or do alternating colors.  In this case, I stamped every other sun ray with Versamark and then used embossing glitter for the shine!

The sentiment is from this gorgeous Waffle Flower stamp and die set, first stamped using Tsukineko Tuxedo Black ink, then in Catherine Pooler Something Borrowed ink.  Coincidentally, it's from Catherine Pooler's "Life of the Party" collection. ;)  

I am entering this in the Simon Says Stamp Monday Challenge Blog, where the theme this week is "Let's Party!!!"

I used the following supplies:

Pinkfresh Studio Pop Out Sunburst

Waffle Flower Oversized Happy stamp and die set

The above are affiliate links, and I get a small commission at no cost to you if you purchase the supplies through my links.

Thanks for looking, and have a great and festive day!

From Our Home to Yours...

...belated Merry Christmas!  

I made this holiday card before Christmas, but the hustle and bustle of holiday preparations pushed posting this to the back burner for a bit.

First, I created dots for the background using Hero Arts Chevrons stencil.  This is a pack of 2 stencils, and I love those dots! I can definitely see myself using these in many cards in the future!  I used Catherine Pooler inks and pounced them through the stencil.  Then I cut the die from gold foil cardstock, and heat embossed the sentiment using gold embossing powder.

The die is actually a set of three dies from Hero Arts, but I used just one of the dies instead.

I'm entering this card into the Hero Arts Stay Crafty Challenge #30.  The challenge this month is to use circles in the card.  I hope the stenciled big dots in the background meet the criteria.

The supply list is below:

Hero Arts Tri-fold Village Fancy Die - this is on sale right now for $5 off!

Hero Arts Chevron Stencils 2-Pack

The above are affiliate links and I get a small commission when you purchase through my links, at no cost to you.

I hope that you spent your holidays surrounded by love and happiness, with loved ones, friends, and anyone/anything that makes you happy. :)

Thanks for looking, and have a great day!

Sunday, December 12, 2021

Striped 2-in-1 Birthday Card

I recently got an order from The Stamp Market, and it included this amazing Birthday Cover Plate die.  It's perfect for making quick cards, while still looking very polished and pretty.

I decided to step it up by cutting strips of different colored cardstock and sticking them on a background, then run the sandwich with the Birthday cover plate die through my Big Shot.

Now I have a 2-for-1 card!


I love, love, love monochromatic cards!!!

Thanks for looking, and have a great day!

Wednesday, December 8, 2021

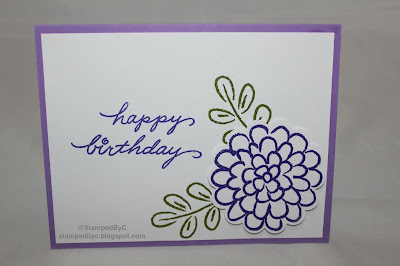
Embossed Purple Flower Birthday Card

I always find myself needing birthday cards.  With a big family and many friends whom I don't see as often as we typically would, birthdays always come up sooner than I expect.

Going through my old stamp sets, I found this beautiful Stampin' Up set (Flower Fest).  The images were just begging to be embossed, and embossed them, I did.

Using Versamark ink, I stamped the images and then embossed them using Stampendous embossing powder in Violet and Olive.  I punched the flower image using the coordinating scalloped circle punch, and popped it up on some foam tape.

The sentiment was from Stampendous (Happy Messages) and was stamped in beautiful Grape Crush ink by Catherine Pooler.  I just love how vibrant it looks in real life.  The photo really does not do it justice.


What do you do with your old stamp sets?  Do you purge your sets or do you continue to use them?  I love that I'm still able to use my old sets.

Thanks for looking, and have a great day!

Monday, December 6, 2021

Red, White, and Green Christmas Card

So excited to share this card with everyone today.

I'm a little late to the holiday card-making party, but I thought I can still make some cards to get back into the swing of things.  Starting with this one. :)

While waiting for my new stamps to arrive, I used my good old Stampin' Up stamp sets:  Ornament Keepsakes and More Merry Messages.

I stamped these on white cardstock using my new awesome Catherine Pooler inks:  Spruce, Eucalyptus, and Rockin' Red.  It was my first time trying out these inks (needed to update my ink pads, too), and I was blown away!  Super crisp images, and all you need is a little tap.  

I embossed the ornaments with Versamark ink and Stampin' Up Clear embossing powder, then cut them out using the coordinating Framelits dies.

I looped some black and white twine around the ornaments, popped them up with some foam tape, and and mounted these on dark green card base.

The sentiment was stamped with my go-to black ink (Memento Tuxedo Black), and I'm glad it has not let me down.

I'm entering this card to Sunday Stamps Winter Wonder Challenge, using 3 colors from their palette and a neutral of our choice.

Thanks for looking and have a great day!

Tuesday, March 3, 2015

"Dream" Graduation Card

Since I got this stamp set several months ago, I've been itching to use it.  I love its simplicity, and the possibilities it offers.


I stamped the feathers on black cardstock with Versamark, and embossed with white embossing powder, and voila! -- my own patterned paper!


I used this to make this graduation card for a friend who will be completing her advanced degree in a few months.


I just stamped and embossed the sentiment in watercolor paper using Versamark and white embossing powder, and then die-cut the feathers in  using the corresponding dies .  I colored the feathers in two shades of purple using Tim Holtz Distress Markers (I recently got the set and I'm loving it!!!).

Here is a complete list of products that I've used, with links to where you can buy them:
Black cardstock (my stash)
Watercolor paper (Strathmore Watercolor Paper)
Stamp set (Lawn Fawn Dream stamp set)
Dies (Lawn Fawn Lawn Cuts - Dream)
Versamark watermark ink (Tsukineko)
Black ink (Stazon Jet Black Ink)
White embossing powder (Stampendous White Opaque)
Tim Holtz Distress Marker (Shaded Lilac)
Tim Holtz Distress Marker (Seedless Preserves)
Embossing gun (Nicole)
Big Shot die cut machine (Sizzix)

I am entering this card to the Simon Says Stamp Wednesday Challenge (Anything Goes).

Thanks for looking, and have a great day!

Wednesday, February 18, 2015

Sponged Dry Embossed Card

Hi, everyone!

During my break at work today, I started imagining card ideas, and thought, "Wouldn't it be great if I can add a touch of color to dry embossed images?"

Hmmm.  Why not?  I couldn't wait to try it out when I got home (and of course, I was also working late today, of all days!).

I am so excited, I  just couldn't wait to share this card with all of you.  I snapped a photo as soon as I finished the card, I don't think the ink was even dry yet...


I ran my embossed my cardstock with an embossing folder and Big Shot, and used a sponge dauber and some distress inks to color the embossed images.


My sentiment is from Simon Says Stamp.


Not bad for my first try, right?  This card reminds me of spring, which is around the corner (I have to keep telling myself that, especially since we are buried in snow and it's freezing cold here).

I am entering this card to the following challenges:


I used these products (with links to where you can buy them) on my card:
White cardstock (Georgia Pacific)
Spring Tulip embossing folder (Darice)
You stamp set (Simon Says Stamp)
Memento Tuxedo Black ink (Tsukineko)
Worn Lipstick distress ink (Ranger)
Mustard Seed distress ink (Ranger)
Mowed Lawn distress ink (Ranger)
Sponge dauber (Tsukineko)

Thanks for looking, and have a great day!