Showing posts with label cricut. Show all posts

Thursday, December 9, 2021

Purple and Silver Birthday Card using DIY Stencils

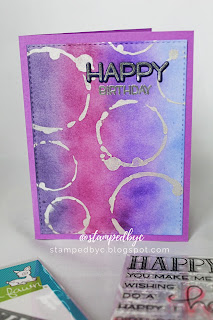
As promised, I'm sharing with you a birthday card I made using once of the stencils I DIY'd using my Silhouette Cameo. 

The splotches on the stencil were the perfect highlight to my card.


I used Tim Holtz Distress Inks (Dusty Concord, Wilted Violet, Seedless Preserves, and Shaded Lilac) to create my own background.  I'm not very good at blending, but I'm working on it.  You'll probably see more blended backgrounds on my next cards because I'm trying to get tons of practice, so thank you for your patience with me. :)

The white cardstock was die cut using Simon Says Stamp's Stitched Rectangles die.  I pounced Platinum Planet from Tsukineko's Brilliance ink through the stencil.  

I used Lawn Fawn's Happy, Happy, Happy stamp set and coordinating die to cut out the "Happy."  I cut it in four layers of cardstock to "pop" up the sentiment.  The words were heat embossed using Stampin' Up's Silver embossing powder.


Thanks for looking, and have a great day!

DIY Stencils Using Cricut or Silhouette

 Stencils are definitely on trend right now, and there are many options available on the market.

However, if you're looking for a specific stencil and can't find it, or if you're just trying to stretch your crafting budget, then this hack can definitely help you!

If you have an electronic cutting machine (like a Cricut or a Silhouette), you can use these bad boys to cut any stencil that your crafty heart desires.

To cut this actual stencils, I used my Silhouette Cameo.  However, I'll show you how to do this with a Cricut using Design Space.

You'll need your Cricut Explore Air (or Cricut Maker), a 12x12 Cricut cutting mat (light grip or standard grip) and 6x6 square of acetate.

1.  Launch Design Space.  Click on "Image."

2.  On the Search bar, type "Stencil."


3.  Choose a stencil image that you like and click on it.

4.  Click "Add to Canvas."

5.  Once the image is on the canvas, click on it to resize it.

6.  Make sure the size says 6x6.

7.  Click "Make It."

At this point, Design Space will prompt you to connect and turn on the power to your Cricut (if you haven't done so already).  On the Cricut, select "Light Chipboard (0.327mm)" as the material.  I know you're really cutting acetate and not light chipboard, but this will allow the Cricut to cut the acetate well.

Let the machine do its magic, and ta-da!  You have your very own stencil/s!


On my next post, I will show you some of the cards I've made with these stencils.

Thanks for looking, and have a great day!

Wednesday, February 11, 2015

Class Valentines and Teacher Gifts

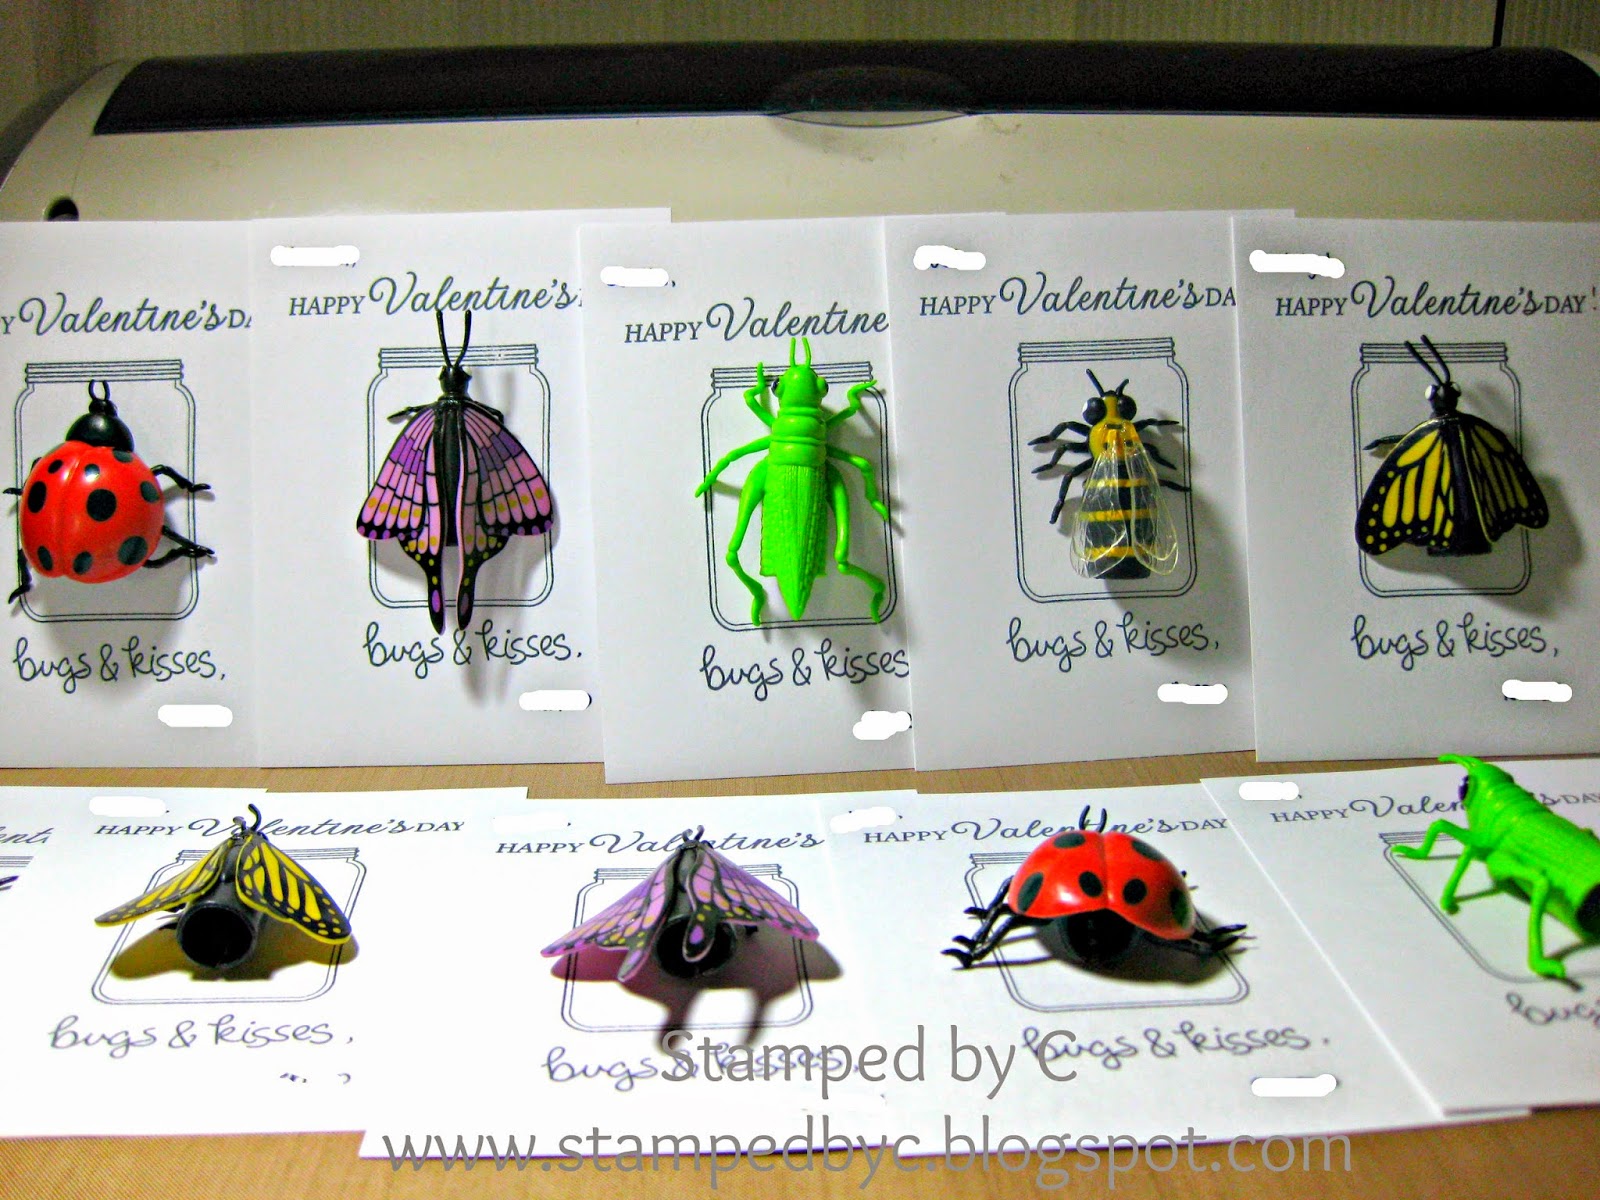
Valentine's day is 4 days away, and I've already finished r's Valentines for his classmates, and for his teachers.

I'm sharing them with you today, because I'm proud of the fact that I did not have to wait until the last minute to work on them.

I got this idea here, but modified it so that I can use the stamps that have on hand (and have been dying to use).


I ordered my bugs online.  You can get them here or here (it comes in packs of 12).  I love that they are finger puppets.  r is actually loving bugs right now, so I hope his classmates are, too.  I hope none of them will get scared by the bugs (gulp).

I stamped the jar stamp on a sheet of white cardstock, stamped "Happy Valentine's Day" and "Bugs and Kisses," wrote each child's name, and signed r's name at the bottom.  I then stuck each bug with a glue dot.  Easy-peasy.

r's class is smaller this year, just 11 kids (including r), so I made 11 of these cards.  I always make one for r, and sign it as "From Mommy and Daddy."


Of course, we wanted to give a small gift to r's teachers, too.  They work with him and his classmates tirelessly throughout the year.

I bought a huge bag of Swiss Delice dark chocolates, and put them in these boxes, that I made with my Cricut.


I used the Artiste cartridge, which is available at Close to My Heart through a consultant.  I cut a 2.5 inch box (that's the biggest box that I can cut out of a 12x12 cardstock, using the "Fit to Page" option).  I used clear acetate under the window, and then used the shape that was cut out of the lid's window as my tag.  I used some twine to hold the box together, and to attach the tag.

If you can't find the Artiste cartridge, you can also try Tags, Bags, Boxes and More 2.  They have a lot of boxes in that cartridge that will work just fine.


Each box held 24 chocolate pieces.

They are so cute!  I can't believe I haven't tried to make these small boxes using my Cricut before!

I am entering this project at the Fantabulous Cricut challenge blog.  The challenge this week is to create something with a Valentine theme using any Cricut cartridge.

I used these supplies for r's Valentine cards for his classmates (as well as links to where you can find them):
White cardstock (Georgia Pacific)
Filled with Love stamp set (Simon Says Stamp/Mama Elephant) - it also comes as a set (with coordinating dies)
Celebrate Everyday stamp set (Hero Arts)
Bugs and Kisses stamp set (Lawn Fawn) - also available as a set (with coordinating dies)
Tuxedo Black ink (Memento)
Glue Dots

I used these supplies for the Valentine teacher gift boxes (as well as links to where you can find them):
Dark and light pink cardstock (my stash)
Cricut Artiste cartridge (Provocraft) - for the box
Cricut Expression (Provocraft)
Acetate sheet - for the window
Quick Dry Adhesive (Scotch) - I used this for gluing down the sides of the boxes
ATG adhesive (Scotch) - I used this to attach the acetate sheet to the window on the box lid
Twine
Crop-a-dile (We R Memory Keepers) - I used this to punch a small hole on the tag to slide the twine through

Thanks for looking, and have a great, fun-filled, love-filled Valentine's day!

Saturday, February 7, 2015

Beer Birthday Card

I can't believe it's February already!!!

This Saturday, my sister-in-law's boyfriend will be celebrating his birthday, so I made him -- a cake!!!

Just kidding.  Of course, I made him a card.

I typically struggle with masculine cards (I lack inspiration!!!), but I think I got this down pat.  He likes to drink beer, so I thought this the perfect card for him:


I cut the mug twice, once in acetate, and once in medium yellow cardstock, to give the illusion of glass.  It's hard to see in the photo, but you can sort of see the outline of the "glass" mug here:


I covered the beer froth in Stickles, to mimic the bubbles.  I know, it looks kind of glittery rather than frothy, but I think he will get a kick out of it.


I used these materials/supplies for this card:
Cricut Expression (I'm tempted to upgrade to an Explore, but I just can't let go of my very first E!)
Everyday Pop-up Cards (Cricut cartridge)
Bright yellow, medium yellow, and light yellow cardstock (my stash)
Black and white cardstock (my stash)
Sentiment (Happy Hour stamp set, Stampin' Up!)
Memento Tuxedo Black Ink - love, love, love this ink pad
Spots and Dots (Cuttlebug embossing folder)
Stickles
Sizzix Big Shot
Foam tape
ATG gun

Thanks for looking, and have a great day!  Cheers! ;p

Sunday, December 21, 2014

Organization: Cricut Cartridges

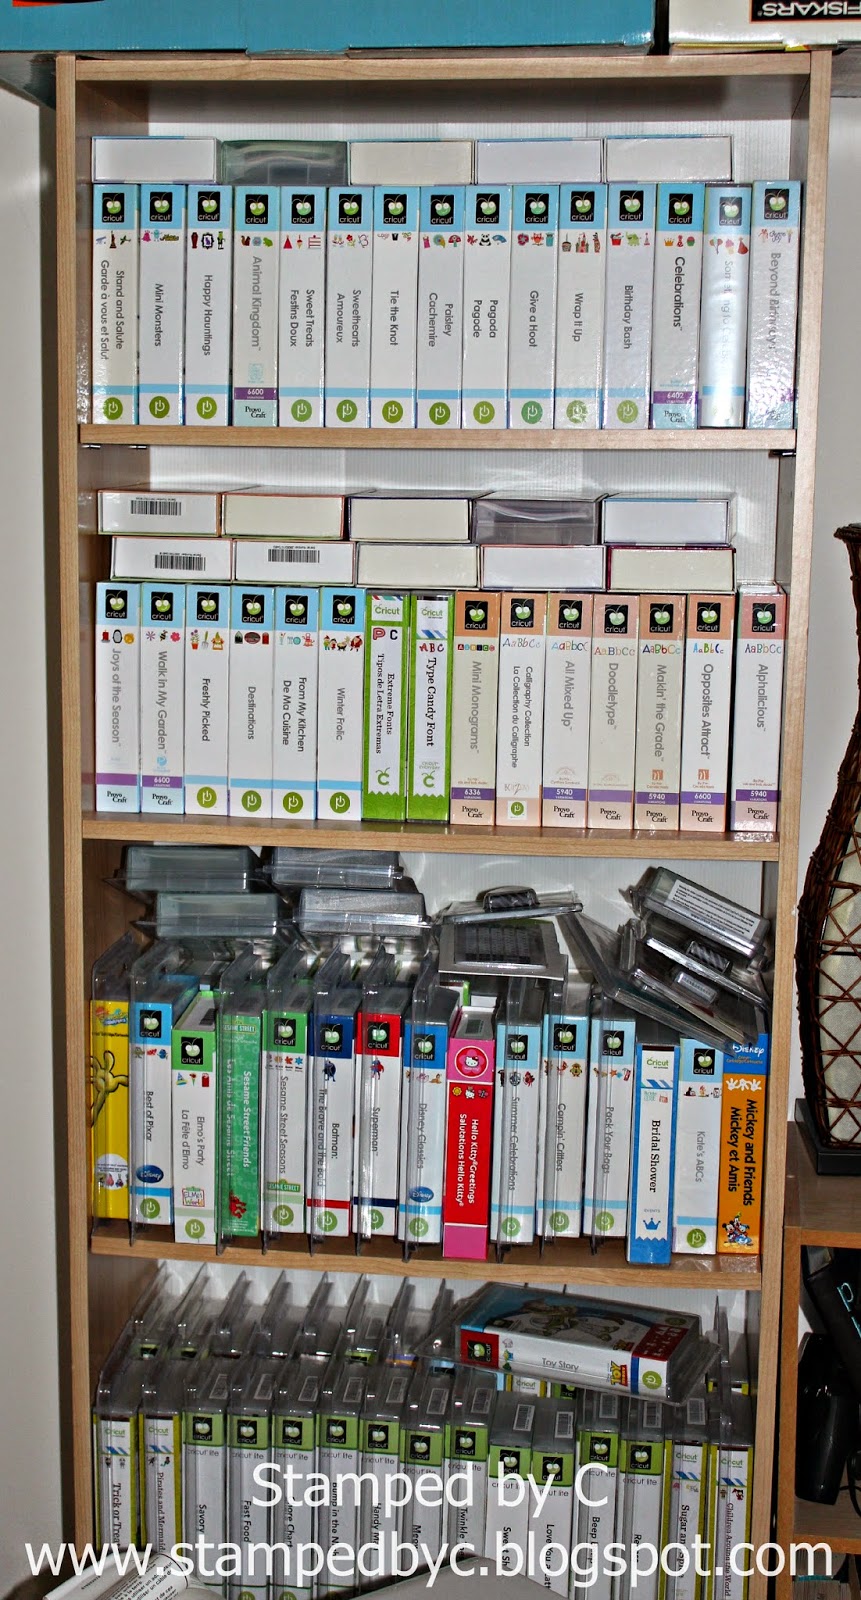
I started "officially" crafting after watching a few Cricut videos on YouTube.  That was 4 years ago.  After watching many more videos in YouTube, buying a Cricut, cartridges, and other craft-related supplies, I realized that when I sit down to do a project, I spend more time trying to remember where things are, than actually creating.  Partly because I think I have too much stuff for my needs right now (gasp!!!), but also because I don't get to craft often, that I tend to forget what I do and don't have.

I noticed that most of my craft room "real estate" was taken up by my Cricut cartridges.  I have over 150 of them, and all of them are still in their original boxes.  And some are even unopened.  Here, take a look:


I searched the Internet for Cricut cartridge organization ideas, and stumbled upon this method.  She created little cardboard containers for each cartridge, then organized them on boxes.  You can check out her blog post and video here.  

It was genius.  I cut the SVG file of the cartridge "containers" (also on her blog) on white cardstock using my Silhouette Cameo.  It wasn't too bad -- it took me probably a whole night to finish cutting and assembling all of the "containers."  I also made labels using my label maker (font is "Small").  And I stocked up on refills, although I think I ended up using a little less than 2 label refills for this project.


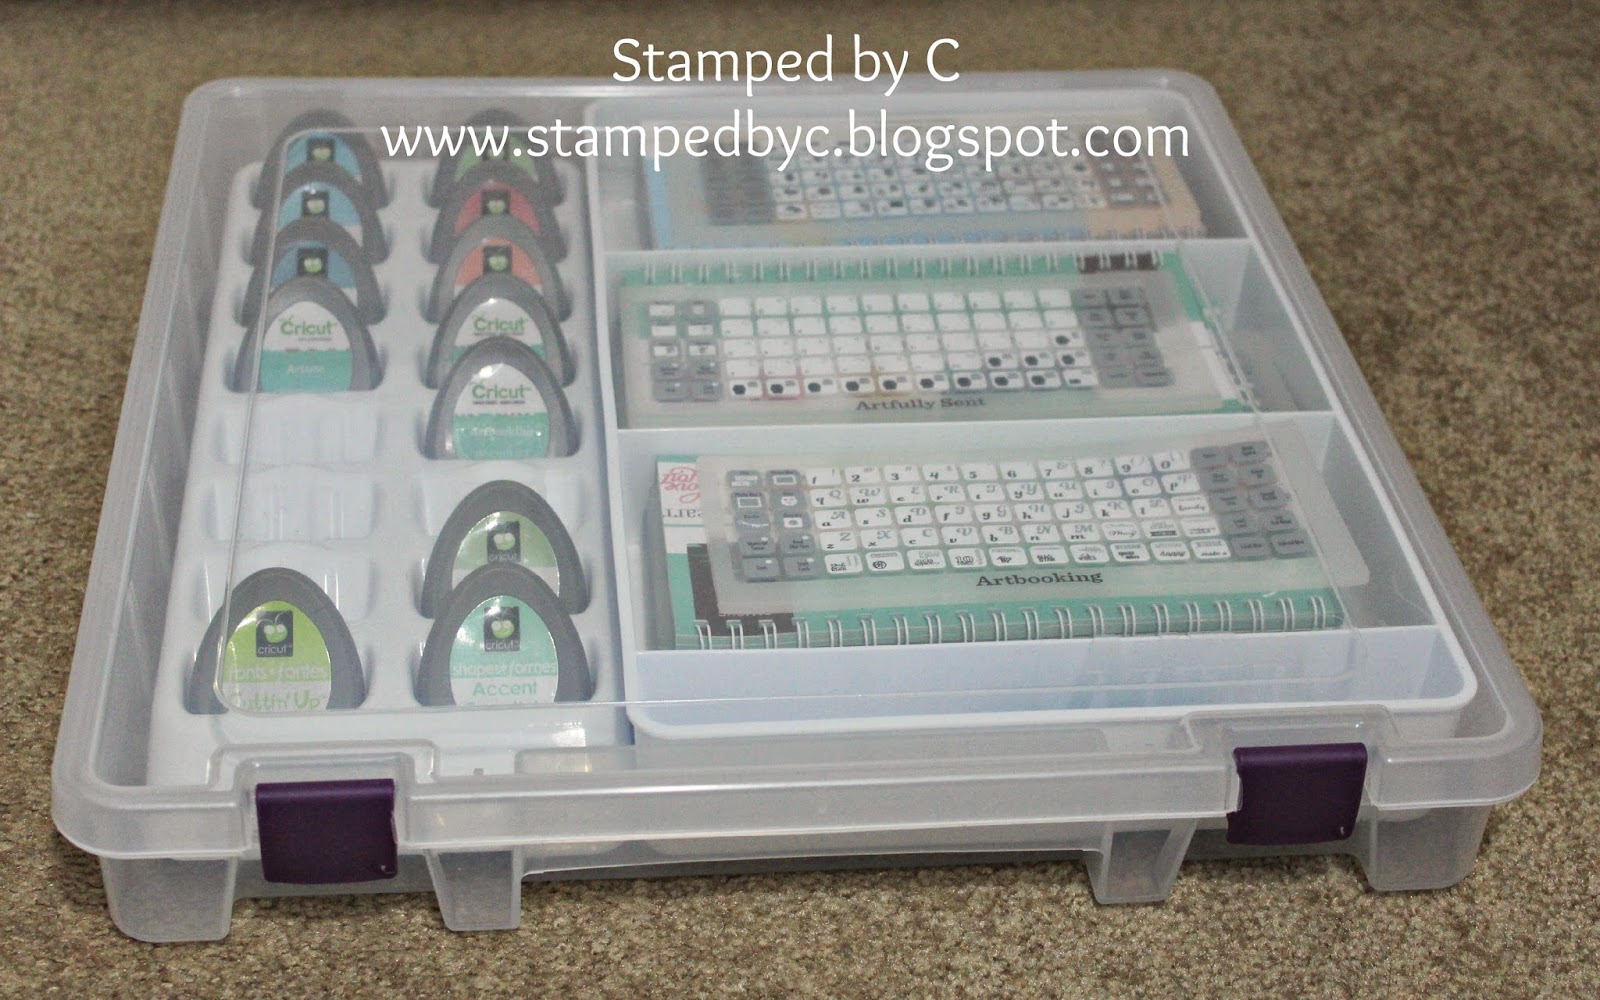
The hardest part for me was throwing away the original cartridge boxes (seriously, but please don't judge).  I got over that initial hesitation, however, and the results were well worth it.  I was able to fit 84 cartridges in a box, which I got here.  From occupying a nearly a full shelf in my craft room to this:

I kept the handbooks and overlays in these boxes, which I got here.  I triedd to fit the same number of handbooks and overlays in each box (84 each).  It was great that I had a mix of different cartridges, with Lite handbooks.


And then for my active project (I am currently working on r's baby book), I'm keeping all the cartridges, handbooks, and overlays in this box.


I'm so happy that I found this method of storing cartridges.  Now I know exactly what I have, and can easily reach for what I need.

Give this method a try, and let me know what you think.

Thanks for looking, and have a great day!

Thursday, June 12, 2014

r's Elmo-themed 2nd Birthday Party

r turned two last May -- hurray, we're at terrible terrific two's!

He loves Elmo, and so we decided to host an Elmo-themed birthday party for him and his friends.  Everyone had a great time!

I started brainstorming party ideas in March, so you can imagine me going crazy about party details, decorations, etc.  R, my husband, pretty much gave me all the freedom to decide on things I liked for the party, which I thought was nice of him.  He only told me to "not go too crazy," which I promised I wouldn't.  Famous last words.

Here's the invitation we sent out to r's friends:


I chose a simpler design this year, compared to last year's invitation, so it was much easier to mass produce.

And then, the party decorations.

I made this Elmo "Happy Birthday" banner using my Cricut and Silhouette Cameo cutting machines.
The banner and the letters were cut with the Cricut.  The medallions were cut with the Silhouette.  We're not allowed to hang or stick anything to the party room's walls/furniture, etc., so I planned to put this banner on the sweets table, together with letters of r's name, and the number "2."


These letters and number are 3D boxes, which I got from the Silhouette store.  I loved how they are able to stand by themselves.  After the party, I planned to use these as decor in r's bedroom.

Here's a photo of the sweets table:
r's birthday cake is not in the photo, because I was still picking it up. :p

I made these chocolate cupcakes and topped them with Elmo's icing decoration (from Wilton).

We also had Elmo chocolate lollipops, chocolate-covered Oreo's with Elmo's face, and Dorothy marshmallows.  I got the idea for the Dorothy marshmallows in Pinterest.

Unfortunately, I was not able to take close-up photos of the other treats, but you can see them a little bit (at least, I hope you can) on the photo of the sweets table.

And no, we did not just feed the guests dessert. :p  We also had Caesar salad, vegetables and dip, chips and spinach dip, cheese and crackers, Dorothy goldfish crackers, four different kinds of pizza (since half of the guests were at the picky-eater age), three-cheese tortellini, roasted chicken, and fruits.  We served water, pop, and juice for drinks.

I don't have a photo of the individual tables, but each table was covered in red table cloth, with a Dorothy the Goldfish centerpiece, again, thanks to Pinterest.

And then we had the goody bags.  I printed each guest's name on a label with an Elmo clip art, and attached it to white paper bags from Michael's.

I made these Elmo water bottles using red water bottles from Michael's, and stickers of Elmo's face (that I made myself):

I also included in the goody bags:  a small red beach ball, bubbles, and Playdoh.

And then we gave each guest a party hat.  I got this idea from Pinterest.

We also gave the guests some crayons and Elmo coloring sheets while waiting for the program to start.

And then, the guest of honor arrived, and he played and danced with r and his friends.

By the end of the party, we were all pretty tired, but so happy, since everyone had a blast!  It made all the prepations and hard work all worth it.

Thanks for looking, and have a great day!
Wednesday, June 11, 2014

Flower Birthday Card

I'm baaaccck!!!  I've been gone for a while (wow, really?), and I'm pleasantly surprised that readers are still stopping by my blog.  I really, really appreciate that, so thank you very much.

My mother-in-law will be celebrating her birthday this Saturday with a picnic for the whole family, and I forced by husband to let me my husband asked me to make her a card. :p

She loves flowers and her garden, so I pulled out my Cricut and Walk in My Garden cartridge, and made her this:


Here is a closer view of the sentiment and the flowers.

I used the following to make the card:
Walk in My Garden Cricut cartridge
Turqouise and kraft cardstock (Recollections)
Yellow, orange, green cardstock (my scraps)
D'vine Swirls embossing folder (Cuttlebug)
Teeny Tiny Wishes stamp set for sentiment (Stampin' Up)
Word Window punch (Stampin' Up)
Stampin' Dimensionals (Stampin' Up)

I'm pretty happy with the card, and I hope my mother-in-law likes it, too. :)

Thanks for looking, and have a great day!

Thursday, December 19, 2013

Candy Cane Holder

Six days before Christmas!!!

For R's and my co-workers, and for r's classmates, I decided to give candy canes as a little gift for Christmas.  Although I think it's perfectly okay to just hand out candy canes to everyone, the papercrafter in me could just not pass up the chance to make something cute and papercraft-y to hold the little treats.


I made these candy cane holders out of the folded ornament card from Joys of the Season Cricut cartridge, at 3 inches.  I cut the actual card, and also the shadow of the card, to create a red border around the candy cane holder.


I stamped the image from Tags Til Christmas stamp set (Stampin' Up) in navy blue ink.  I think it's perfect for my ornament.


I punched the hole for the ribbon using my Crop-a-dile.

I used the following products for this project:
White and red cardstock (The Paper Comapany)
Night of Navy ink (Stampin' Up!)
Tags Til Christmas stamp set (Stampin' Up!)
Crop-a-dile
Silver ribbon (my stash)

I'm entering this project to this week's Fantabulous Cricut challenge, which is to make anything but a card (holiday edition).

Thanks for looking, and please stay tuned for more quick and easy Christmas projects.  Have a great day!

Friday, December 13, 2013

Angel Holiday Card

I am on a cardmaking roll this week -- but would you believe me if I told you that I just finished my Christmas cards this week?  Gasp.

In any case, I finished them, and I'm dashing to the post office today to mail them.

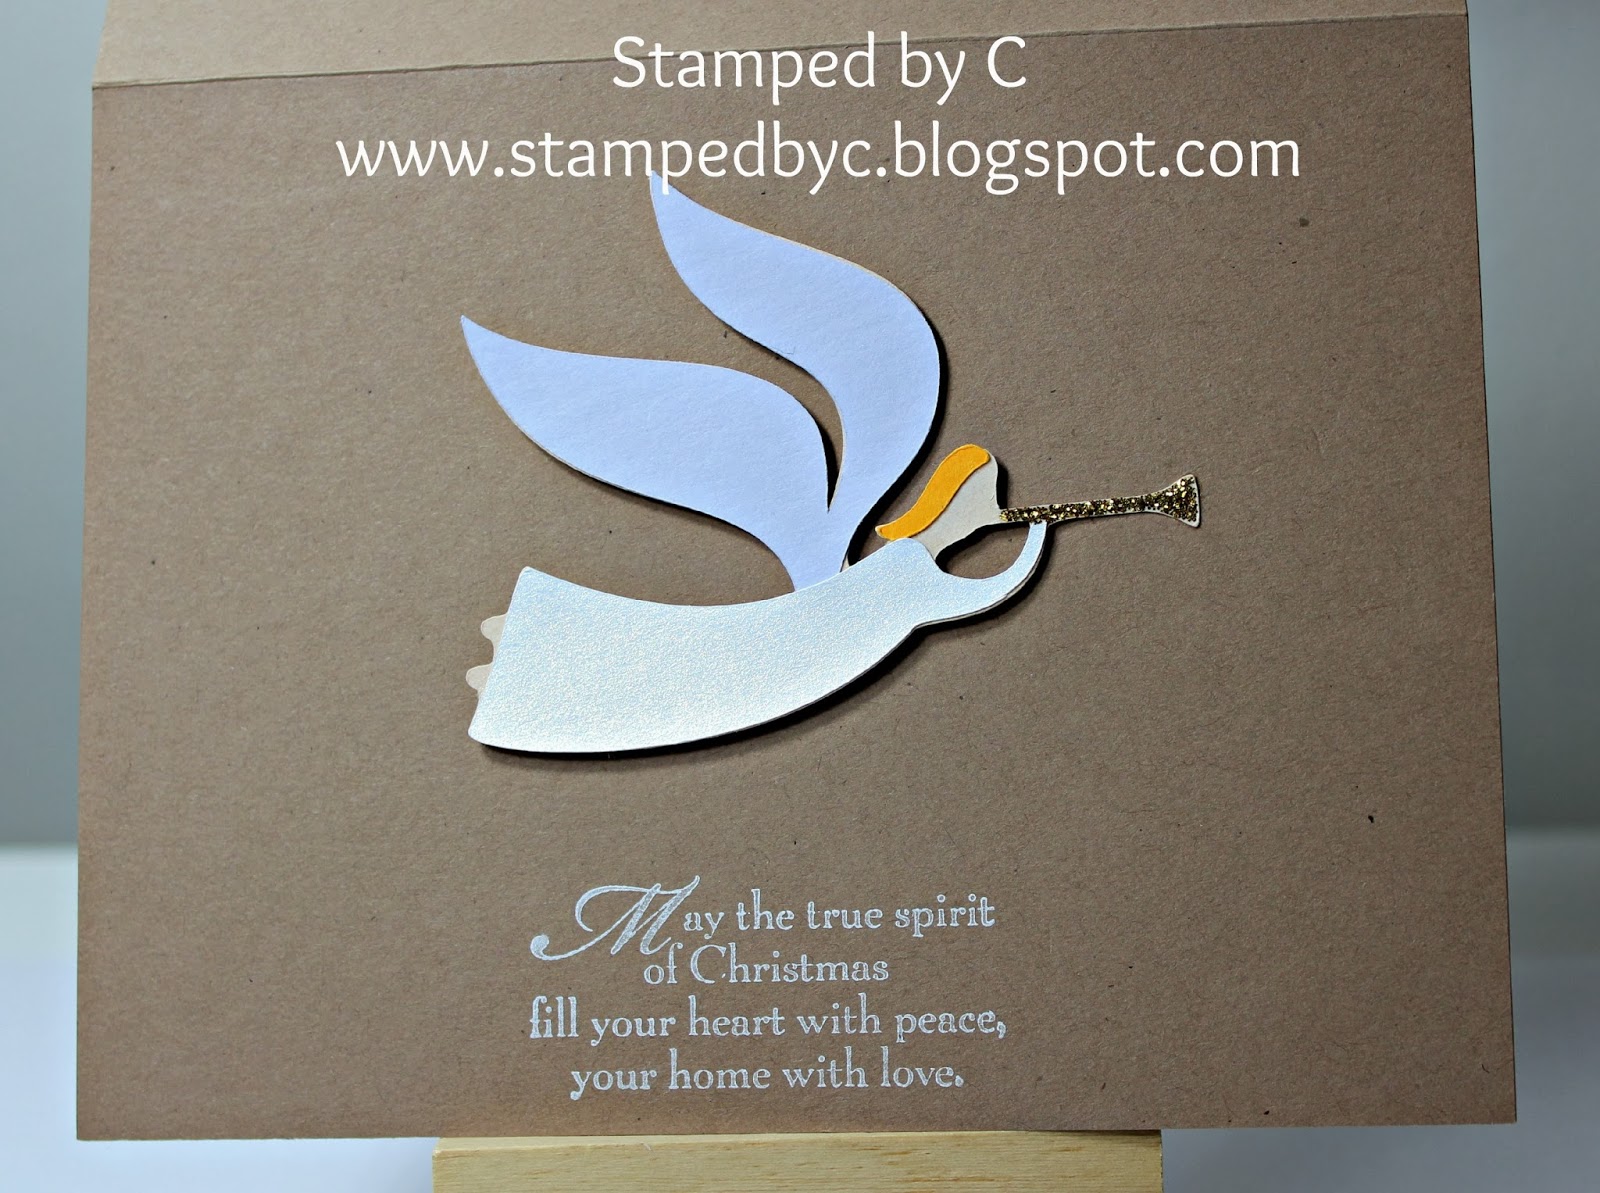
I chose this card to mass-produce, because I thought the angel was relatively simple to piece together, and I love window cards.


Again, the angel was pretty simple to put together.  I think. :p


I know it's not conventional holiday colors, but the message was definitely in the spirit of the holiday.


Here is the list of products I used:
Kraft cardstock (Recollection)
Shimmery white cardstock (Jo-ann's -- I don't know if they still sell it in the stores; I got mine 5 years ago)
Cricut cartridge (Joys of the Season)
Tsukineko Brilliance Moonlight White pigment ink
Stampin Up Oval Framelits (for the "window" of my card)
Stampin Up stamp (Snow Swirled)
Gold Stickles for the trumpet
Stampin Dimensionals

I'm entering this card to this week's Fantabulous Cricut Challenge.  The challenge this week is holiday cards.  Perfect!

Happy Winter Card

It's been snowing hard these past few days, so we can definitely feel that it's winter.  I'm not a winter person, because I get cold easily, but it doesn't stop me from watching all of the fun winter activities from inside our house.

I made this card for the Crafty Cardmakers challenge this week, which is to create a "winter fun" card, but it should not be a Christmas or New Year card.  I think it's a great challenge, and I really had to think to come up with this:


I'm not sure if you can tell from the photo, but I used shimmering white paper for my base.


This is how the card looks when it's opened (it opens at the slope):


I cut the sledding boy using my Cricut (I love his facial expression -- doesn't that say "winter fun?").  I popped him on some Stampin' Dimensionals and stuck him on the slope, so he looks like he's sledding down from it.

I cut the slope using a die from Papertrey Ink.  The sentiment is stamped in Bahama Blue ink on two layers of square cardstock (punched with two nesting Stampin' Up square punches).

The "snow" on the background is made from Stampin' Up's Dazzling Diamonds.

Here is a list of products I used:
White shimmer cardstock (JoAnn's -- I don't think they carry this anymore)
Blue, red, kraft, ecru, and black cardstock (The Paper Studio)
Cricut cartridge (Winter Frolic)
Papertrey Ink die (In the Meadow -- for the slope)
Memento Bahama Blue ink
Stampin' Up Happy Winter stamp set (for the sentiment)
Stampin' Up Dazzling Diamonds
Stampin' Dimensionals

I hope everyone has a happy and safe winter!  Thanks for looking, and have a great day!

Thursday, December 12, 2013

One is Fun Birthday Card

Hi, everyone!  I hope everyone is having a great week so far.  One more day and it's Friday!

And one more day, and it's almost my niece's birthday!  One of my nieces is turning one on Saturday, and we're going to a birthday party!  Here is the card I made for her, to come with our gift:


I'm entering this card to this week's Less is More challenge:  to use a metallic element plus one color on the card.

Since it's my niece's first birthday, I cut the number one with my Cricut in light pink cardstock, then used a darker pink cardstock for contrast.


Here is my metallic element, silver glimmer brads from Stampin' Up, on each end of my sentiment banner:


I embossed the light pink card mat using with the Happy Birthday embossing folder from Cuttlebug.

Do you think it's still a clean and simple card?  I think so, and I hope the Less is More challenge hosts agree. ;)  Check out the rest of the cards here

Here are the products I used for this card:
Light and dark pink cardstock (The Paper Company)
White cardstock (scraps)
Cricut catridge (Mini Monograms for the cirles and number)
Cuttlebug embossing folder (Happy Birthday)
Memento Rose Bud ink
Sentiment stamp from Pink by Design (Age is a Number)
Stampin' Up glimmer brads
Stampin' Dimensionals

Thanks for looking, and have a great day!


Thursday, December 5, 2013

Blue and Silver Christmas Card

I broke out my Cricut again this week so that I can join in the fun at the Fantabulous Cricut challenge.  The challenge this week is "beyond red and green."  The challenge is to make a Christmas card using any other color, aside from red and green.

I decided to use blue and silver for my card.  I made a window card out of blue cardstock (cut from Cricut Christmas Cards cartridge -- I cut the decorated edge at the bottom of the card off so that my card base will stand flat).  I covered the window with acetate, although it may be hard to see that in the photo.


The word "Merry" is cut from Joys of the Season Cricut cartridge on dark blue cardstock.  The sentiment "Merry Christmas" is from Stampin' Up's Teeny Tiny Wishes stamp set, stamped on dark blue ink on white cardstock.  The white cardstock was punched with Stampin' Up's Word Window punch.  The same dark blue cardstock was punched using the Modern Label punch, also from Stampin' Up.

Here is the inside of the card:


I cut the tree from the Joys of the Season cartridge on white cardstock.  I inked up the edges using silver ink (Inkadinkado), and drew ornaments using silver and dark blue Stickles.  I also used the same silver Stickles to color the star and the tree trunk.  The tree was popped up using Stampin' Dimensionals.

Full supply list:
Turquoise, dark blue, and white cardstock (Recollections)
Silver and dark blue Stickles
Teeny Tiny Wishes stamp set (Stampin' Up)
Night of Navy ink (Stampin' Up)
Acetate
Word Window punch (Stampin' Up)
Modern Label punch (Stampin' Up)
Cricut cartridges (Christmas Cards, Joys of the Season)

Does the card look Christmas-y enough, even if I didn't use any red or green on it?  What do you think?

Thanks for looking, and have a great day!