Showing posts with label treats. Show all posts

Wednesday, February 11, 2015

Class Valentines and Teacher Gifts

Valentine's day is 4 days away, and I've already finished r's Valentines for his classmates, and for his teachers.

I'm sharing them with you today, because I'm proud of the fact that I did not have to wait until the last minute to work on them.

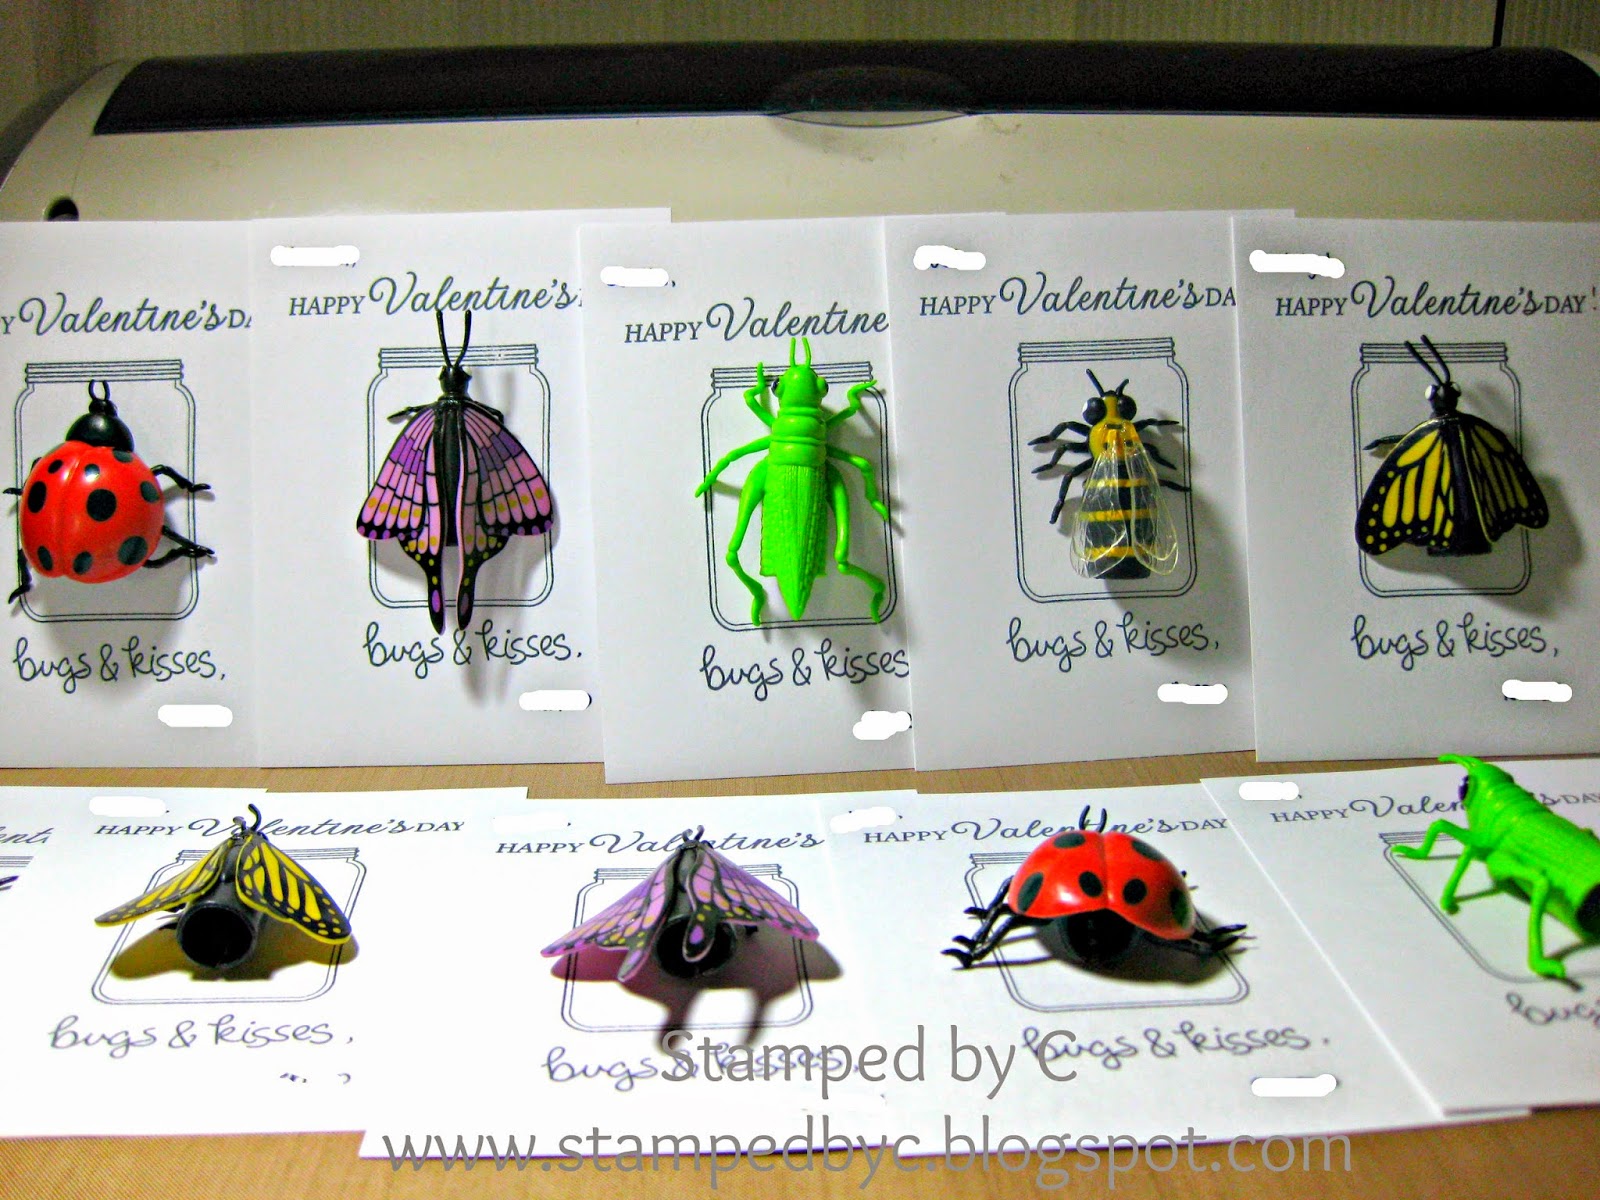
I got this idea here, but modified it so that I can use the stamps that have on hand (and have been dying to use).


I ordered my bugs online.  You can get them here or here (it comes in packs of 12).  I love that they are finger puppets.  r is actually loving bugs right now, so I hope his classmates are, too.  I hope none of them will get scared by the bugs (gulp).

I stamped the jar stamp on a sheet of white cardstock, stamped "Happy Valentine's Day" and "Bugs and Kisses," wrote each child's name, and signed r's name at the bottom.  I then stuck each bug with a glue dot.  Easy-peasy.

r's class is smaller this year, just 11 kids (including r), so I made 11 of these cards.  I always make one for r, and sign it as "From Mommy and Daddy."

Of course, we wanted to give a small gift to r's teachers, too.  They work with him and his classmates tirelessly throughout the year.

I bought a huge bag of Swiss Delice dark chocolates, and put them in these boxes, that I made with my Cricut.


I used the Artiste cartridge, which is available at Close to My Heart through a consultant.  I cut a 2.5 inch box (that's the biggest box that I can cut out of a 12x12 cardstock, using the "Fit to Page" option).  I used clear acetate under the window, and then used the shape that was cut out of the lid's window as my tag.  I used some twine to hold the box together, and to attach the tag.

If you can't find the Artiste cartridge, you can also try Tags, Bags, Boxes and More 2.  They have a lot of boxes in that cartridge that will work just fine.


Each box held 24 chocolate pieces.

They are so cute!  I can't believe I haven't tried to make these small boxes using my Cricut before!

I am entering this project at the Fantabulous Cricut challenge blog.  The challenge this week is to create something with a Valentine theme using any Cricut cartridge.

I used these supplies for r's Valentine cards for his classmates (as well as links to where you can find them):
White cardstock (Georgia Pacific)
Filled with Love stamp set (Simon Says Stamp/Mama Elephant) - it also comes as a set (with coordinating dies)
Celebrate Everyday stamp set (Hero Arts)
Bugs and Kisses stamp set (Lawn Fawn) - also available as a set (with coordinating dies)
Tuxedo Black ink (Memento)
Glue Dots

I used these supplies for the Valentine teacher gift boxes (as well as links to where you can find them):
Dark and light pink cardstock (my stash)
Cricut Artiste cartridge (Provocraft) - for the box
Cricut Expression (Provocraft)
Acetate sheet - for the window
Quick Dry Adhesive (Scotch) - I used this for gluing down the sides of the boxes
ATG adhesive (Scotch) - I used this to attach the acetate sheet to the window on the box lid
Twine
Crop-a-dile (We R Memory Keepers) - I used this to punch a small hole on the tag to slide the twine through

Thanks for looking, and have a great, fun-filled, love-filled Valentine's day!

Thursday, December 19, 2013

Candy Cane Holder

Six days before Christmas!!!

For R's and my co-workers, and for r's classmates, I decided to give candy canes as a little gift for Christmas.  Although I think it's perfectly okay to just hand out candy canes to everyone, the papercrafter in me could just not pass up the chance to make something cute and papercraft-y to hold the little treats.


I made these candy cane holders out of the folded ornament card from Joys of the Season Cricut cartridge, at 3 inches.  I cut the actual card, and also the shadow of the card, to create a red border around the candy cane holder.


I stamped the image from Tags Til Christmas stamp set (Stampin' Up) in navy blue ink.  I think it's perfect for my ornament.


I punched the hole for the ribbon using my Crop-a-dile.

I used the following products for this project:
White and red cardstock (The Paper Comapany)
Night of Navy ink (Stampin' Up!)
Tags Til Christmas stamp set (Stampin' Up!)
Crop-a-dile
Silver ribbon (my stash)

I'm entering this project to this week's Fantabulous Cricut challenge, which is to make anything but a card (holiday edition).

Thanks for looking, and please stay tuned for more quick and easy Christmas projects.  Have a great day!

Thursday, October 31, 2013

Halloween Treat "Pumpkins"

Halloween is finally here!

I've been planning and planning for Halloween for weeks -- nothing major, just costumes, and treat bags.  As much as I would love to host a party to have an excuse to make cute and yummy Halloween treats, I couldn't because of time and health issues.  R had been fighting off this awful cough and cold for the past two months, and his doctor believes it's a bug.  Well, the bug jumped ship to r and me, and he has croup, and I have the adult version of it (if there is such a thing).

Since r's classmates are under 18 months old, I had to be creative with their treat bags.  The bag should be visually appealing, and the treats should be what they can safely eat (read:  store-bought, nut-free).

Take a look.

Inside each treat bag is a pack of goldfish crackers (cheese), goldfish crackers (vanilla, fudge brownie, or s'mores), vanilla wafers, and a cereal bar.  I wanted to include a small bottle of 100% fruit juice for babies, but it won't fit in the bag.  Boo.


The pumpkins are orange paper bags from Michael's.  I stamped a jack-o-lantern face in black ink on the front of the bag.


The green leaves were made with 4x5 pieces of green cardstock folded in half, and punched with a Fiskars punch.


I taped this to the bag, and attached a green ribbon for the handle.  I attached a tag saying "Trick or Treat" and then "To/From."


All the stamps I used were from Papertrey Ink.

All parents/families are invited to r's school's Halloween parade, and then to the class party later.  We're bringing these treat bags for r's classmates.


I hope they like these.  And I hope you do, too.
Happy Halloween!

Wednesday, May 15, 2013

It's a Mickey Mouse Birthday Party!

Hi, everyone!  I know I've been gone a while, and rather than explain what I've been up to, I thought I would just show you.

March and April had been hectic -- we went to my niece's Christening, my husband's goddaughter's Christening, and my sister-in-law's sister-in-law's (not a typo, she is really my sister-in-law's sister-in-law) wedding.  And then, May crept in, and DS (dear son) is almost one year old!

That is what I've been up to -- the weeks leading up to his birthday party last Sunday, Mother's Day, were spent prepping and planning.

First, DH (dear hubby) and I had to decide on a theme.  Actually, DS decided on the theme for us.  While at Toys R Us, he grabbed a Mickey Mouse toy at the store and never let go.  We took it as a sign that he would like a Mickey Mouse party. :p  He also bops his head to the Mickey Mouse Clubhouse Hot Dog song (it's quite catchy -- you should take a listen) every time we play it for him.  So, a Mickey Mouse party it is!

After drafting the guest list -- DH and I come from big families, and extended families, and we knew we wanted all of them, and our friends, to join us in celebrating DS's first year -- we had to agree on the invitation.

Ahem.  After nights of brainstorming, this is what I came up with:
Front of invitation

Inside of the invitation.  It's hard to see well on the photo, but it's a pop-up invitation.

Mickey up close

Making ~40 of these invitations took me three weekends.  I could only work on them on weekends, because of my work schedule.

Then came decorations:  I we decided to stick to Mickey Mouse's colors for the decorations (black, red, yellow, and white).  By this time, I was on a roll.  My head was spinning with ideas, and I was bouncing them off DH one on top of each other.  He made the smart decision and decided to leave the decisions about decorations (and all things party-related) to me.  He took over baby-sitting and household chores (including laundry and dishes) while I was in my birthday party planning-possessed state.

We covered tables in red, white, and yellow table covers.  I made Mickey Mouse centerpieces for each of the tables, and attached three balloons (red, white, and yellow) to each of them.
(please ignore the bottle of pop on the table)

I also made a Mickey Mouse banner from black and white cardstock to hang over the dessert table.  The banner was attached to each other using red, white, and yellow ribbons.
(in case you were wondering, there was a "Y" in "Birthday;" it was just hiding behind the balloons)

For the birthday boy's seat, we brought with us a mini-high chair (the one that you strap into a chair) and decorated it.
He didn't really stay on the seat for too long.  There was too much going on around him, and he wanted to be part of the excitement.

For our young guests, I made goody bags out of paper bags. I filled them with toys and things (stickers, tattoos, scrapbook, markers, balls, etc.) that I picked out, based on each guest's age.  I printed labels with a Mickey Mouse clip art, and a message from the birthday boy.

I also made the two larger stand-up Mickeys.  Here is a photo of one of them (the one on the goody bag table):

I did not, however, make this Mickey:
He came from Party City. ;)

I also made most of the items on the sweets table (please see the photo with the Mickey Mouse banner above).  Among the treats I made were:  chocolate covered Oreos, chocolate-dipped Rice Krispies treats, chocolate cupcakes in baby food jars, and the candy tubes (sans toppers).

All in all, it was a great party.  We all had a great time.  However, between preparing for the party for days, hauling everything from our home to the place we rented for DS's party and back, setting up and cleaning up (our families helped us out -- aren't they awesome?), and taking care DS, DH and I were exhausted.  After weeks of breathing and living Mickey, I was over-Mickeyfied.  If I see another Mickey Mouse again, it will be too soon.

The next morning, I got a phone call from my sister-in-law (whose sister-in-law got married last month, remmeber?):  "Hey, C!  Guess what?  For A (my niece)'s birthday, we're having a Minnie Mouse party!!!"

Tuesday, February 12, 2013

All Set for Valentine's Day!

But super late (again) for Mojo Monday.

I made this card for my son's day care teachers, based on this sketch from Mojo Monday (Mojo 279):


I will give the card with a chocolate bar.

I am happy to report, though, that as this post's title says, I am ready for Valentine's day.  Or at least, for my son's Valentine's day in day care.  His teachers were kind enough to distribute a class list, and I made these for his classmates:


Since his class is the youngest in day care, and none of them can't have candy yet, I decided to make Valentine treat bags by wrapping up a Gerber baby food in a cello bag, and adding a topper.

So on Thursday, February 14, aside from carrying my son and his lunch bag to day care, I will also be carrying a bag with all these treats for his teachers and classmates:


I hope they like the treats.  I can't wait until Thursday to see how he and his classmates will be celebrating Valentine's day.  And I can't wait until he's a little older, and he and his classmates can have real treats!

Thanks for looking, and have a great day!

Wednesday, December 19, 2012

Happy Birthday, Mom!

Yesterday was my Mom's 63rd birthday.

We celebrated her birthday last Saturday, with a catered dinner with family.  Preparing for the party was definitely hard work, but I'm glad Mom had a blast.

I baked her a cake.  Only a few people know this, but before I got into paper-crafting, I loved to bake.  I still love to bake, but I don't love the clean-up that comes with it.  With paper-crafting, I still get the creative satisfaction, with a lot less clean-up (although my husband will disagree, especially if I'm working on a big project).

I don't have a photo of the cake because I was hoping to snap a quick one during the party, and of course, we got so busy chatting with everyone and playing with the babies (my Mom's side of the family had been really blessed with little ones this year), that the cake was gone before I knew it.

I also made these for the guests:


I've been itching to use the It's a Wrap Occasions stamp set (Wood:  123590; Clear:  123592) since I got it several months ago.  It's going to be one of my favorite stamp sets -- I have a feeling you'll be seeing more of these wrapped nuggets in the future. ;)

I have to say, I really love how it stamps crisply and cleanly on Whisper White cardstock (100730) in Riding Hood Red ink (126968).  I used the Top Note Bigz die (113463) on my Big Shot (113439), and voila -- an instant topper!  I added a flower (from the Button Buddies stamp set -- Wood:  122735; Clear:  122737) stamped on Whisper White cardstock (still using the same Riding Hood Red ink) and punched out with the 1-3/4 scallop circle punch (119854).

The sentiment is from A Word For You stamp set (Wood:  117032; Clear:  120528).

I made 28 of these treat bags for our guests to take home.

Thanks for looking, and have a great day!

P. S.  All the products I listed above (aside from the candy and the treat bag) are available at my Stampin' Up! store.

Tuesday, December 11, 2012

Christmas Treats

Christmas is only two weeks away, and I wanted to show my co-workers how much I appreciate all the nice things they did for me all year with a little gift.


I made little treat tubes using 1x8 cellophane bags (124134) and filled them with candy.  I then sealed the tops of the bags using toppers made using the 25 and Counting stamp set (Wood:  123792; Clear:  123794).  I stamped the images using Cherry Cobbler (126966), Riding Hood Red (126968), Garden Green (126973), and Always Artichoke (126972) classic ink pads on scraps of Whisper White cardstock (100730).  I used my 1 inch square punch (124094) to punch out the images and then adhered them on a base of Cherry Cobbler (119685), Riding Hood Red (111348), Garden Green (102584), and Always Artichoke (105119) cardstock.

Here's a closer look at the treat tubes and their toppers:


I will put these treat tubes on tall clear vases and leave them at each co-worker's desk on Dec. 20th (I am off on Dec. 21st).  I think these treat tubes will make nice presents, and I hope my co-workers will like them!

All of the products I used for these treat tubes (except for the clear vases and the candy) are available at my Stampin' Up! store.

Thank you for looking, and have a great day! :)

P. S.  While I was making these tubes, I was thinking of my 2-1/2 year old niece, who is just learning to say what Santa says on Christmas.  When prompted, she will say, "Ho! Ho! Ho!  Merry Christmas!" and then giggle, and that puts a smile on my face. :)

Thursday, November 29, 2012

Baptism Favors

My son is now 6 months old, and we just got him baptized a few weeks ago, when my Dad was visiting us.  After the ceremony, we celebrated his baptism with a luncheon at a restaurant with family and friends.

Everything (except for the candy inside the box) was handmade by me.  I made 91 of these favors especially for the event.


What?  91???  Was I crazy?  Not really. :)  I wanted to make sure I had enough favors for each guest.  I did not want them to miss out on the yummy treats, and I wanted to thank them for coming to the baptism.

The favors were very easy to make.  I used my Big Shot (113439) and Stampin' Up!'s Pillow Box die (retired) to cut Window Sheets (114323).  I assembled the pillow box and held it securely with Sticky Strip (104294).

The belly band was made with 3/4 inch Marina Mist cardstock (119682), which was crimped using the Paper Crimper (retired) and trimmed to fit snugly around the middle of the box.  I stamped "thanks" from the very versatile Fabulous Phrases stamp set (Wood:  117002; Clear:  120501) using Early Espresso ink pad (126974) on Whisper White cardstock (100730).  I punched out the sentiment with the Large Oval punch (119855) and layered it over Early Espresso cardstock (119686) that was punched out using the Scallop Oval punch (119856).  The ovals were popped up using Stampin' Dimensionals (104430).

Quick tips on making a lot favor boxes:
1.  Have all the "components" pre-cut and ready to go.
2.  Assemble each "component" step-by-step.  I finished all the boxes first (left one flap open so I could fill them with the goodies).  I crimped all the belly bands, stamped all the sentiments, and layered my ovals.
3.  I used a measuring spoon to get equal amounts of each color into the box, and laid it carefully flat after I've sealed the flap to prevent the treats from mixing into each other (and ruining the effect I was aiming for).

I really enjoyed making these favor boxes.  All products (except for the retired items) are available for purchase from my Stampin' Up store.  Please click on the link on the top right corner of the page to shop now.

Thanks for looking, and have a great day! :)
    

Wednesday, March 14, 2012

Sour Cream Containers Treat Boxes

Hi, everyone!  Happy Wednesday!

Last Thursday, we had a party at work to celebrate our hard-working staff.  We also celebrated a coworker's birthday.  I made a sponge cake for my coworker, and these treat boxes for our staff.

Believe it or not, this was a last minute idea -- not because I did not want to give them anything, but because I was not sure if I will have time to make them a small gift, given that I had to bake and frost a from-scratch cake.

I love sour cream containers, and these were perfect because  they were super quick and easy to make.


Can you guess what's inside the containers?  Yup -- Starbursts.  I love Starbursts and I'm proud of myself for exercising enough self-control to not eat the whole bag. :p

Here are more shots of the containers and the tags I made for them:


I'm glad I made these, because I had a blast making them and watching everyone shake their boxes to guess what was inside.

I used these Stampin' Up products to make these super cute sour cream containers:
Tagtastic stamp set (Hostess, Wood:  122745; Clear:  122747)
Chocolate Chip classic ink pad (100908)
Whisper White card stock (100730)
Everyday Enchantment DSP (Sale-a-bration:  126154)
Extra Large Tag punch (119866)
Crop-a-dile (108362)
Crimper (101618)
Sticky Strip (104294)
1/8 inch brown ribbon (non-Stampin' Up)

All Stampin' Up products used in this project can be purchased here.  Please click on "Shop Now" on the top right part of the page.

Thanks for looking!

P. S.  I was not able to take a photo of my sponge cake, because it disappeared pretty quickly (I have such awesome coworkers -- they make me feel great whenever I bake them something).  It was a sponge cake with whipped cream frosting, and strawberries and chocolate syrup on top.  Yummy!

Tuesday, February 14, 2012

Hot Cocoa Slider

Happy Valentine's Day!

My husband gave me the most beautiful bouquet of flowers for Valentine's Day. :)  I was really happy that I wanted to share the happiness with my neighbors.  I decided to give them a little Valentine treat.

I made several of these hot cocoa sliders for me to give them.


I used these Stampin' Up products:
Espess Yourself stamp set (retired)
Fundamental Phrases stamp set (retired)
Chocolate Chip classic ink pad (100908)
Chocolate Chip cardstock (102128)
Pretty in Pink cardstock (100459)
Brights Patterns Designer Series Paper stack (117155)
Whisper White 5/8" satin ribbon (114616)
Crop-a-dile (108362) to punch a hole
Perfect Polka Dots Textured Impressions embossing folder (117335)
Big Shot Die-Cutting Machine (113439) used with the embossing folder

You can get these products here.

Thank you for looking!

Monday, February 13, 2012

Door Hanger Treat Holder

I made this for my husband's co-worker, who's been really nice and helpful to us.  We thought this would make her smile on Valentine's day, when she sees this hanging on her office door.

I got the idea from Paul of Crafty Blogocks.  I modified Paul's design a little bit to accommodate the office door knob, though. :)


Instead of an oval for the door knob, as Paul showed, I used a circle because their office has a round door knob.  I also cut a slit on the right side of the door hanger, so that my husband can hang it on the office door.

I used these products from Stampin' Up:
Button Buddies stamp set (Wood:  122735; Clear:  122737)
Melon Mambo classic ink pad (115656)
Pretty in Pink cardstock (100459)
Basic Black cardstock (121045)
Whisper White cardstock (100730)
Brights Patterns Designer Series Paper Stack (117155)
Circle Scissor Plus (112530)
2 3/8 Scallop Circle punch (118874)

All products are available here.  Once the link opens, click "Shop Now."

Chocolate is Cadbury Flake, which is one of my favorite chocolates of all time.  It's a milk chocolate that flakes when you bite into it -- so good!

Thanks for looking!

Sunday, February 12, 2012

Thank You Gifts

I was in charge of organizing a Healthy Athletes screening for Special Olympics, and I wanted to give a little something to the volunteers who helped us screen the atheletes who participated in the event.

I thought these Hershey's Nuggets would be perfect.  After all, nothing could be better than chocolate, right?  I made 40 of these for each of the volunteers.


I used the following supplies from Stampin' Up:
Pretty Postage stamp set (Wood:  123095; Clear:  123097)
Word Play stamp set (Wood:  120308; Clear:  120651)
Whisper White cardstock (100730)
Pretty in Pink cardstock (100459)
Night of Navy cardstock (100867)
Melon Mambo classic ink pad (115656)
Night of Navy classic ink pad (102977)
Small Flat Cello Bags (103104)

All products are available here.  Once the link opens, click "Shop Now."

Thanks for looking!