Showing posts with label christmas. Show all posts

Sunday, December 26, 2021

From Our Home to Yours...

...belated Merry Christmas!  

I made this holiday card before Christmas, but the hustle and bustle of holiday preparations pushed posting this to the back burner for a bit.

First, I created dots for the background using Hero Arts Chevrons stencil.  This is a pack of 2 stencils, and I love those dots! I can definitely see myself using these in many cards in the future!  I used Catherine Pooler inks and pounced them through the stencil.  Then I cut the die from gold foil cardstock, and heat embossed the sentiment using gold embossing powder.

The die is actually a set of three dies from Hero Arts, but I used just one of the dies instead.

I'm entering this card into the Hero Arts Stay Crafty Challenge #30.  The challenge this month is to use circles in the card.  I hope the stenciled big dots in the background meet the criteria.

The supply list is below:

Hero Arts Tri-fold Village Fancy Die - this is on sale right now for $5 off!

Hero Arts Chevron Stencils 2-Pack

The above are affiliate links and I get a small commission when you purchase through my links, at no cost to you.

I hope that you spent your holidays surrounded by love and happiness, with loved ones, friends, and anyone/anything that makes you happy. :)

Thanks for looking, and have a great day!
Saturday, December 18, 2021

Cards from DIY Stencils

As promised, here are some cards I made using the DIY stencils I shared in my previous post.

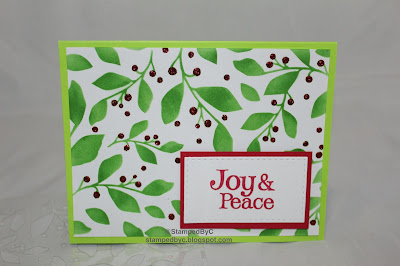
First up is this stenciled green Christmas card:


I used a brush to apply Catherine Pooler's Grass Skirt on white cardstock die cut with Simon Says Stamp Stitched Rectangles die using the leaf and berry stencil that I made.  I applied Red Stickles on the berries and gave it time to dry.  This was the hardest part -- you can tell patience is not my strongest point.  However, I've ruined many cards by smearing wet Stickles, so I definitely gave it my best.

While waiting, I stamped the "Joy and Peace" sentiment on white cardstock using Catherine Pooler's Rockin' Red, which I mounted on red cardstock.  The sentiment came from an old Hero Arts set called December.

Once the Stickles was dry, I popped up the sentiment on foam tape.


This is not the traditional Christmas colors (or leaves and berries, for that matter), but once the sentiment and red Stickles were on the card, it looked really cheery and festive. :)

My second card is another Christmas card:


I used the DIY stencil I made to emboss a snowy background for my snowman.  I pressed the Versamark ink pad through the stencil and embossed it with white embossing powder.

I stamped and colored by snowman using the Lawn Fawn Frosty Friends stamp set and cut it out using the coordinating die.  I cut out some snowy hillside using Lawn Fawn Sitched Hillside Borders out of white cardstock for my snowman to stand on.

I colored the images with Copic markers.

So what do you think?  Not too shabby for DIY stencils, right?

I hope you give making your own stencils a try and share with me what you've created in the comments below.

Thanks for looking, and have a great day!

Tuesday, December 7, 2021

Candy Cane Tags

My 9-year old wanted to give candy canes to all of his classmates for Christmas.  I am generally averse to all these sugar, but it's the holidays and I figured we can all use some candy canes this time of the year.

We got 2 boxes of candy canes from Michael's (Sour Patch flavored, of course).

Then, I got started with making these tags.  I cut out 23 tags using a Hero Arts Nesting Tags die out of kraft cardstock, and white stitched labels using a Simon Says Stamp Stitched Rectangles die.

I stamped a green (Catherine Pooler Grass Skirt) Christmas tree using an image from Stampin' Up's Scentsational Season.  I think this is a retired stamp set. :(

The "Season's Greetings" sentiment again came from "More Merry Messages," also from Stampin' Up.

The "To" and "From" were from an old Papertrey Ink stamp set (Boxes, Bags, and Tags), and they were the perfect size for my white stitched labels.

My son will write his classmates's names on the label, then we will use the sparkly red ribbon to tie the tags on the candy canes.

Thanks for looking, and I hope your day is as sweet as a candy cane!

Monday, December 6, 2021

Red, White, and Green Christmas Card

So excited to share this card with everyone today.

I'm a little late to the holiday card-making party, but I thought I can still make some cards to get back into the swing of things.  Starting with this one. :)

While waiting for my new stamps to arrive, I used my good old Stampin' Up stamp sets:  Ornament Keepsakes and More Merry Messages.

I stamped these on white cardstock using my new awesome Catherine Pooler inks:  Spruce, Eucalyptus, and Rockin' Red.  It was my first time trying out these inks (needed to update my ink pads, too), and I was blown away!  Super crisp images, and all you need is a little tap.  

I embossed the ornaments with Versamark ink and Stampin' Up Clear embossing powder, then cut them out using the coordinating Framelits dies.

I looped some black and white twine around the ornaments, popped them up with some foam tape, and and mounted these on dark green card base.

The sentiment was stamped with my go-to black ink (Memento Tuxedo Black), and I'm glad it has not let me down.

I'm entering this card to Sunday Stamps Winter Wonder Challenge, using 3 colors from their palette and a neutral of our choice.

Thanks for looking and have a great day!

Monday, December 22, 2014

Christmas Cards and Tags

I'm interrupting the organization theme of my posts to share with you my Christmas card this year.  I know, I can't believe I'm posting it just three measly days before Christmas.  I also can't believe I've forgotten to post it before.

Anyway, here it is:


This year, I decided that I wanted to simplify my card-making process, so I chose to mass-produce a single card design (see last year's card, gift card holders for teachers and coworkers, and tags).  This will serve as our Christmas card and our gift card holder this year.

This card is my interpretation of a card I saw at the crop I attended.  I only saw a peek of it (the lady next to me was mass-producing them) because I was busy making my own project, but I'm fairly satisfied with how it turned out.

Here is a closer view of the ribbon, the snowflake (it was so hard to capture it well on camera, since it's shiny surface was reflecting light like crazy) and the embossing:


And here is the inside of the card:


I also made some tags for my husband's and my presents to our coworkers.  Again, I decided to simplify by using and coloring a single stamp for our tags:


Please excuse the smear of ink on the bottom of this photo.  I saw this while I'm posting this photo.  I was able to change the tag before giving it to the recipient, but I didn't have time to take a photo).

Products Used:
Snow Swirled (Stampin' Up!)
Tags Til Christmas (Stampin' Up!)
Greetings of the Season (Stampin' Up!)
Stampin' Write Markers (Stampin' Up!)
Black embossing powder (Stampin' Up!)
Snowflake embellishment (Jo-ann's)
Black and white twine (my stash)
Red, white, shimmer, kraft, black cardstock (my stash)

Thanks for looking, and have a great day!

Friday, December 20, 2013

More Christmas Gift Card Holders!

All of you must think I'm a lousy gift-giver, since I'm giving out gift cards instead of a more personal, thoughtful gift.  But, my "giftees" (is there such a word?) all asked for gift cards for Christmas, so I'm more than happy to oblige.  After all, there are cute ways to give out gift cards, too, right?


Again, this is not my original idea -- I CASE'd (copied and shared everything) this card from this blog.  When I saw the photos of her gift card holders, I just thought they were so cute.  I'm glad she posted instructions on how to recreate them.


The outer pocket that holds the gift card and it's holder is cut out of red cardstock.  I used patterned paper as a mat on the front, to jazz it up a bit.  I'm not sure if you can see it on the photos, but the Christmas trees have glitter on them, which I thought was so pretty.

The actual gift card holder is made of green cardstock, and it slides into the outer pocket.  I cut it out with my Big Shot.


I then stamped my image on white cardstock, punched it out with a circle punch, layered it over a red scallop circle, and finally popped it over the green cardstock gift card holder.  I think the white, red, and green made a nice contrast.


Here are the products that I used to make these gift card holders:
Red and green cardstock (Recollections)
White cardstock (Georgia Pacific)
Patterned paper (DCWV)
Cottage Ivy ink (Memento)
Oh, Dear! stamp set for the Christmas tree (Stampin' Up)
Two Tags Die (Stampin' Up)
1-3/8" circle punch (Stampin' Up)
1-3/4" scallop circle punch (Stampin' Up)

Thanks for looking, and have a great day!

Santa Gift Card Holder Tutorial

While I was browsing through cards online for inspiration, I saw a cute Santa card that I wanted to recreate.  Unfortunately, I could not find the photo again.  So, this is not my original idea, but I wanted to share my take on it.


It's cute, and simple, and is perfect to hold a gift card for each of r's daycare teachers.

These are what you need to get started:


White, yellow, red, black cardstock (Recollections)
1-3/8" square punch (Stampin' Up)
1/2" circle punch (Stampin Up)

I intially wanted to use a smaller square punch for the inside of Santa's buckle, but it looked small around the "waist" so I used this instead:


I cut my card base (red) at 4-1/4" x 5-1/2" for an A2 sized card.  I cut a 2"x2" square out of yellow cardstock for the buckle.  I cut a 1-1/2" x 4-1/4" black strip of cardstock for the belt, and punched the inside of the buckle in black cardstock, using Stampin' Up's 1-3/8" square punch.  I then punched out 1/2" circles out of black cardstock for the buttons.


To assemble the card:
1.  Attach the black square to the yellow square of cardstock, making sure that the black square is more or less centered, for the belt buckle.
2.  Attach the black strip of cardstock to the red card base.
3.  Attach the belt buckle (see Step 1) to the belt, again making sure that the buckle is more or less centered.
4.  Attach two black circles for the buttons.

Ta-da!


See how nicely a gift card fits on the inside of the card.  I adhered a white card mat to the other half of my card for the message.


Quick, simple, easy, and cute!  I hope you try this.

Thanks for looking, and have a great day!

Friday, December 13, 2013

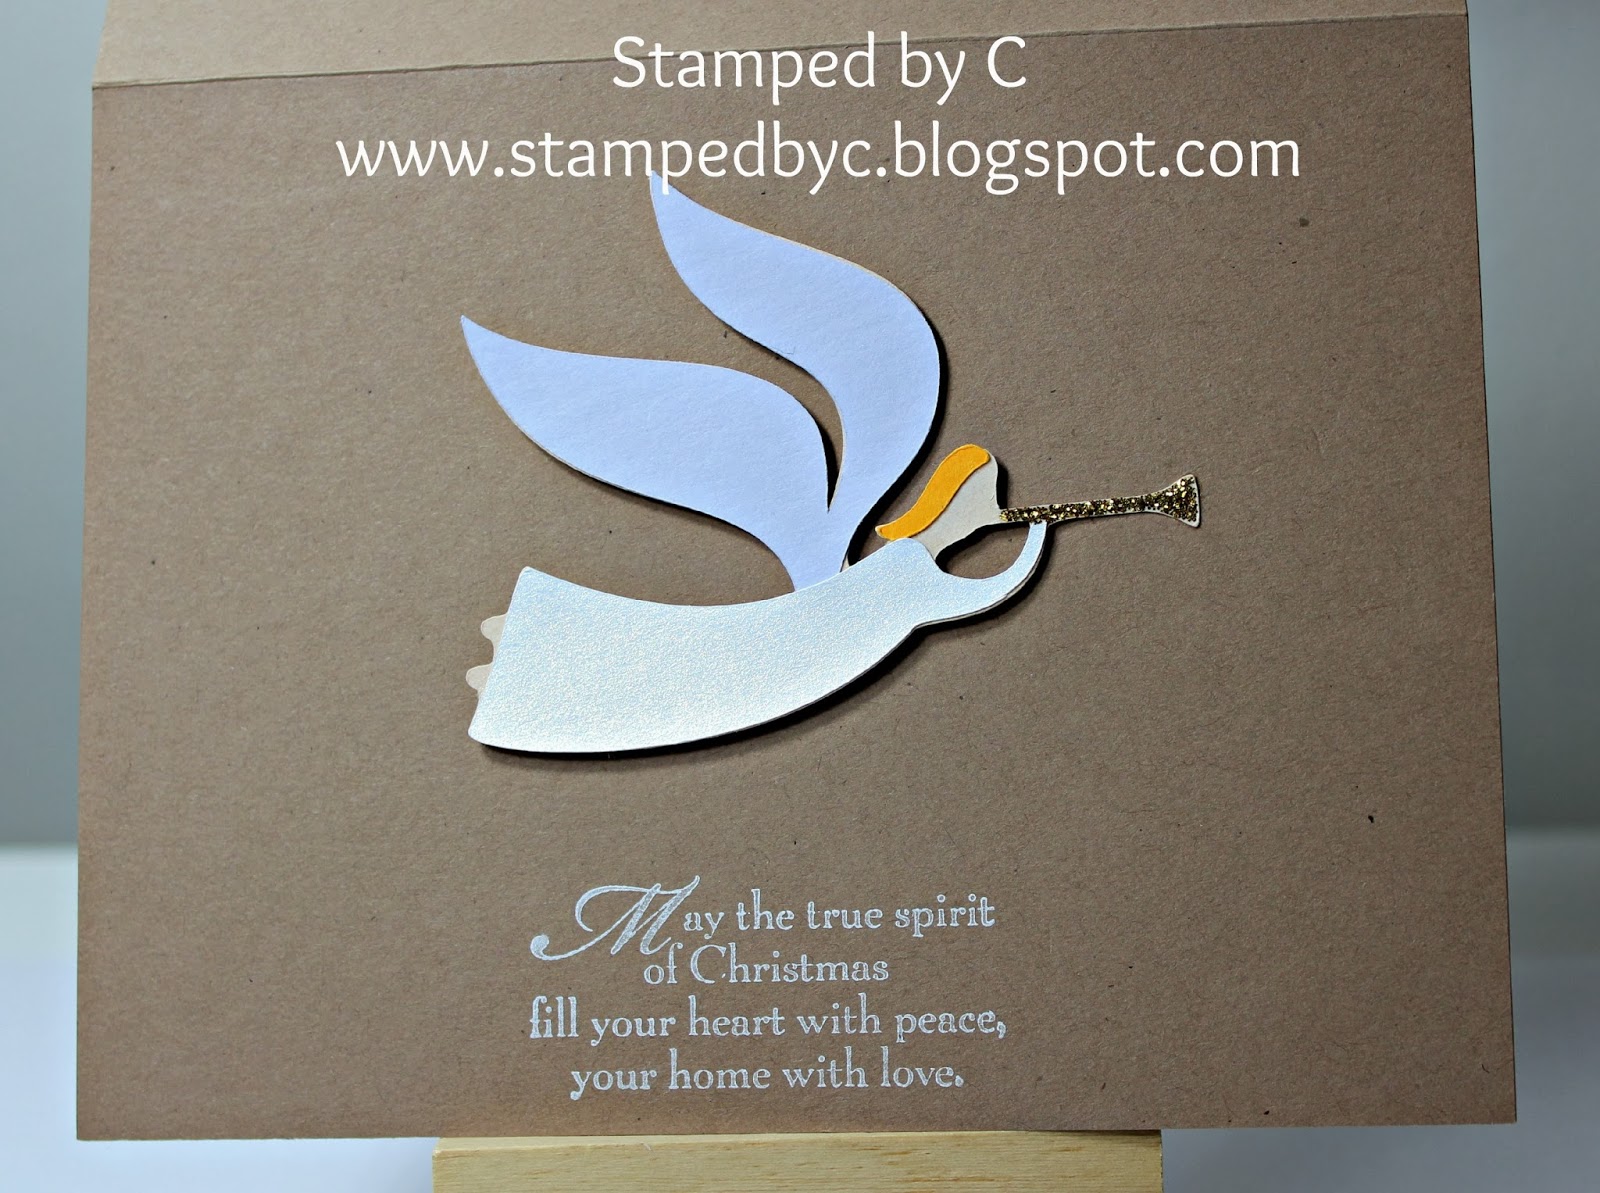
Angel Holiday Card

I am on a cardmaking roll this week -- but would you believe me if I told you that I just finished my Christmas cards this week?  Gasp.

In any case, I finished them, and I'm dashing to the post office today to mail them.

I chose this card to mass-produce, because I thought the angel was relatively simple to piece together, and I love window cards.


Again, the angel was pretty simple to put together.  I think. :p


I know it's not conventional holiday colors, but the message was definitely in the spirit of the holiday.


Here is the list of products I used:
Kraft cardstock (Recollection)
Shimmery white cardstock (Jo-ann's -- I don't know if they still sell it in the stores; I got mine 5 years ago)
Cricut cartridge (Joys of the Season)
Tsukineko Brilliance Moonlight White pigment ink
Stampin Up Oval Framelits (for the "window" of my card)
Stampin Up stamp (Snow Swirled)
Gold Stickles for the trumpet
Stampin Dimensionals

I'm entering this card to this week's Fantabulous Cricut Challenge.  The challenge this week is holiday cards.  Perfect!

Thursday, December 5, 2013

Blue and Silver Christmas Card

I broke out my Cricut again this week so that I can join in the fun at the Fantabulous Cricut challenge.  The challenge this week is "beyond red and green."  The challenge is to make a Christmas card using any other color, aside from red and green.

I decided to use blue and silver for my card.  I made a window card out of blue cardstock (cut from Cricut Christmas Cards cartridge -- I cut the decorated edge at the bottom of the card off so that my card base will stand flat).  I covered the window with acetate, although it may be hard to see that in the photo.


The word "Merry" is cut from Joys of the Season Cricut cartridge on dark blue cardstock.  The sentiment "Merry Christmas" is from Stampin' Up's Teeny Tiny Wishes stamp set, stamped on dark blue ink on white cardstock.  The white cardstock was punched with Stampin' Up's Word Window punch.  The same dark blue cardstock was punched using the Modern Label punch, also from Stampin' Up.

Here is the inside of the card:


I cut the tree from the Joys of the Season cartridge on white cardstock.  I inked up the edges using silver ink (Inkadinkado), and drew ornaments using silver and dark blue Stickles.  I also used the same silver Stickles to color the star and the tree trunk.  The tree was popped up using Stampin' Dimensionals.

Full supply list:
Turquoise, dark blue, and white cardstock (Recollections)
Silver and dark blue Stickles
Teeny Tiny Wishes stamp set (Stampin' Up)
Night of Navy ink (Stampin' Up)
Acetate
Word Window punch (Stampin' Up)
Modern Label punch (Stampin' Up)
Cricut cartridges (Christmas Cards, Joys of the Season)

Does the card look Christmas-y enough, even if I didn't use any red or green on it?  What do you think?

Thanks for looking, and have a great day!

Wednesday, December 4, 2013

Christmas Sparkle Card

Hi, everyone!  I hope you all had a great holiday.

This week's theme at the Less is More blog is "Sparkle."

Here is my interpretation of the challenge:


The sparkle elements are the Christmas trees, which I embossed in gold glitter.


The sentiment "Merry Christmas" is stamped in red ink, and then stamped offset in Versamark.  I then used clear embossing powder for that shadow effect.

Here is a list of the materials that I used for this card:
Kraft card base (Recollections)
Very Vanilla card stock (Stampin' Up)
Tree (Happy Winter, Stampin' Up)
Merry Christmas sentiment (Greetings 4 U, Stampin Up)
Versamark ink
Riding Hood Red ink (Stampin' Up)
Clear embossing powder (Stampin' Up)
Gold embossing glitter (Stampendous)

I'm entering this card to the Less is More Week 148 challenge.  The rest of the entries are here.

Edited to add:
I'm also entering this card to the Crafty Cardmakers challenge, at the suggestion of Viv, the challenge host. :) (Thanks, Viv!).  Check out the other awesome clean and simple cards here.

Thanks for looking, and have a great, and sparkling, day!

Tuesday, January 22, 2013

Better Late Than Never

...or so they say.

I promised to share the card I gave to family and friends this year, and I'm just now getting around to posting it.  I'm so sorry.  With the start of the new year, my husband and I had to make alternate babysitting arrangements for our 7-month old son (more on that next post).

In any case, I have a few minutes today, so I thought I can finally make good on my promise to share my Christmas card.

Here are what I used to make my card:
Baja Breeze cardstock (111352)
Whisper White cardstock (100730)
Delightful Dozen stamp set (Wood:  122650; Clear:  122652) - I love, love, love this swirl stamp
Greetings of the Season stamp set (Wood:  128030; Clear:  128033) - now retired, from the 2012 holiday catalog
Everything Eleanor stamp set (Wood:  124162; Clear:  124164)
Ornament punch (119847)
Baja Breeze Classic ink pad (126960)
Island Indigo Classic ink pad (126986)
Basic Black Classic ink pad (126980)
Basic Black Stampin' Write marker (100082)
Rhinestones Basic Jewels (119246)
Stampin' Dimensionals (104430)
Snail adhesive (104332)

All these products are available at my Stampin' Up store.

Thanks for looking, and have a great day!

Tuesday, December 11, 2012

Christmas Treats

Christmas is only two weeks away, and I wanted to show my co-workers how much I appreciate all the nice things they did for me all year with a little gift.


I made little treat tubes using 1x8 cellophane bags (124134) and filled them with candy.  I then sealed the tops of the bags using toppers made using the 25 and Counting stamp set (Wood:  123792; Clear:  123794).  I stamped the images using Cherry Cobbler (126966), Riding Hood Red (126968), Garden Green (126973), and Always Artichoke (126972) classic ink pads on scraps of Whisper White cardstock (100730).  I used my 1 inch square punch (124094) to punch out the images and then adhered them on a base of Cherry Cobbler (119685), Riding Hood Red (111348), Garden Green (102584), and Always Artichoke (105119) cardstock.

Here's a closer look at the treat tubes and their toppers:


I will put these treat tubes on tall clear vases and leave them at each co-worker's desk on Dec. 20th (I am off on Dec. 21st).  I think these treat tubes will make nice presents, and I hope my co-workers will like them!

All of the products I used for these treat tubes (except for the clear vases and the candy) are available at my Stampin' Up! store.

Thank you for looking, and have a great day! :)

P. S.  While I was making these tubes, I was thinking of my 2-1/2 year old niece, who is just learning to say what Santa says on Christmas.  When prompted, she will say, "Ho! Ho! Ho!  Merry Christmas!" and then giggle, and that puts a smile on my face. :)