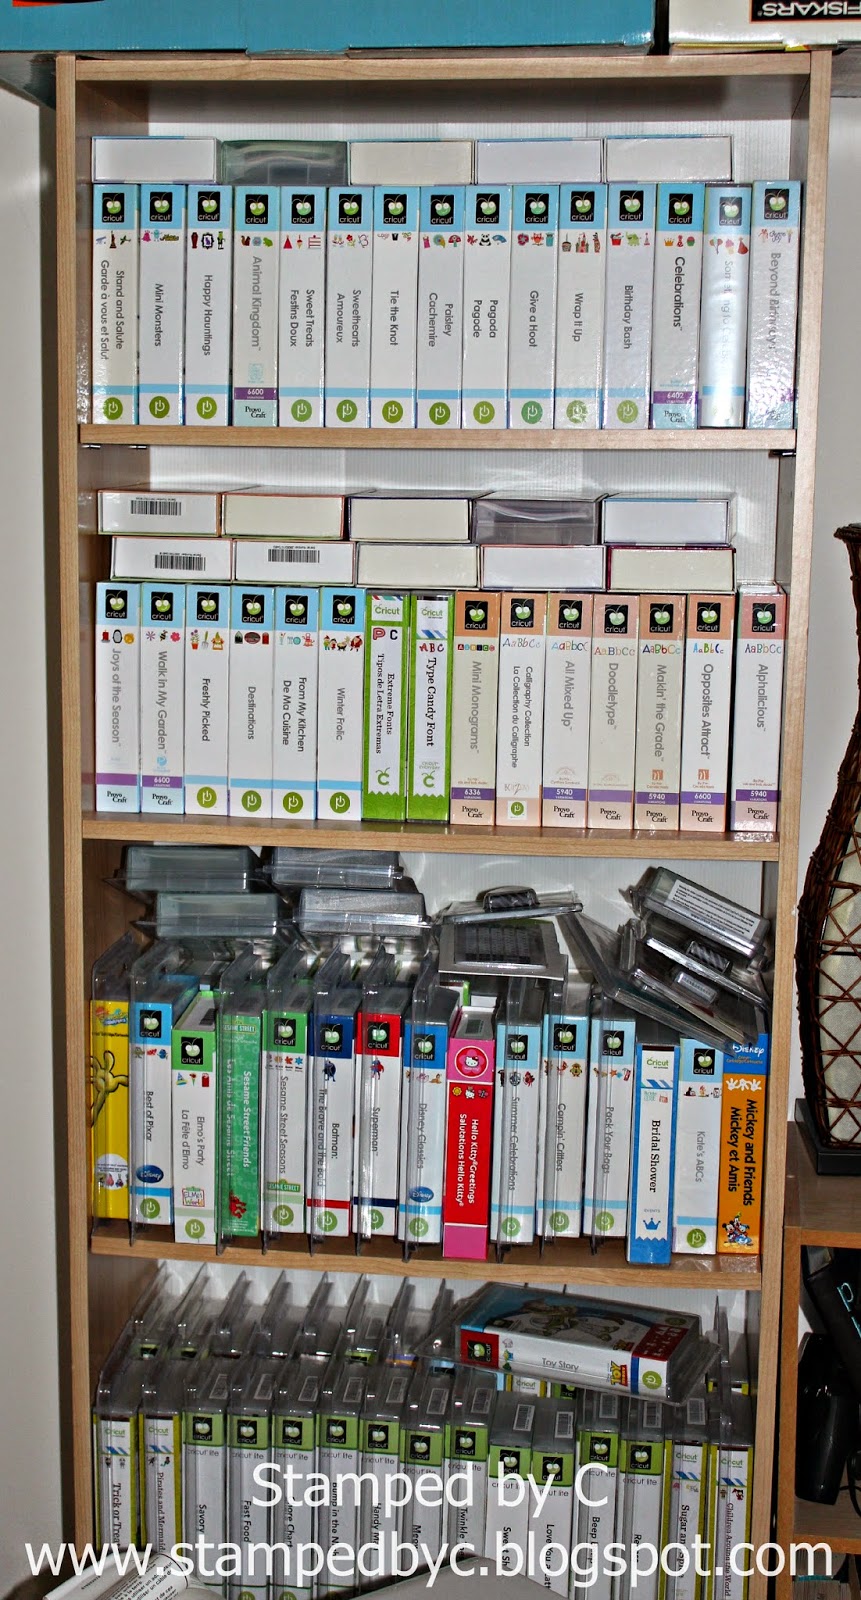
Showing posts with label organization. Show all posts

Sunday, January 4, 2015

Organization: Planner Pages

As promised, I'm sharing with you today what's inside my planners.  I use the Junior size Arc planner that I got from Staples.

My Work Planner
I keep my work planner fairly simple, because I need to be able to find things in it quickly.  I also carry it with me always.

On the left, I have the 2015 calendar.  On the right, I have my birthday and anniversary list.


Then I have the monthly calendar (or the month-at-a glance).  If you notice, the months are left blank, because these were from the Unplan pages that I was talking about in my last post.  I had previously printed out a several of these pages, so I am going to use them up before I switch to the monthly pages from the 2015 bundle.


I use the monthly calendar to jot down meetings, appointments, projects and deadlines, as well as days off (or days that I've called in sick).  I never used to track my vacation and sick days (I've always just trusted on the fact that our unused vacation days roll over to the next year, but our work decided to stop the "roll over" recently -- boo!).  

For specifics on scheduled meetings/appointments/projects and deadlines, as well as for daily goal-setting (to-do lists), I use the week on two pages spread:


I only keep around three months of weekly pages at a time, so as not to overfill my planner.

For any notes that I have to write, and for my brain-dump, I use these pages that came with the planner when I bought it:


Lastly, I keep my work contacts on these pages:


So, there you have it -- my work planner.  Let's take a look at my personal planner now.

My Personal Planner
I use my personal planner mostly track finances, and to write out lists.

My first page is a 2015 calendar:


I use these monthly pages to write down bill payments (amount and due dates).  Once I've paid off a bill, I check it off with a pen (it gives me satisfaction to do that ;p).  I also write down reminders for me to put some money to my savings account every month.  I know it's easy to set up recurring electronic transfers, but I think it's more fun for me to actually transfer the money (makes me more excited to save).  As weird as that may sound, it does work for me.


There are mortage payment and car payment printables as well, and I use that for those purposes, but I had forgotten to take a photo.  For the other debts that I had to pay down (financing from the furniture store, student loan, etc), I use this page:


Also, shortly after Thanksgiving, I decided to do 52-week savings challenge.  That means that I put aside the equivalent of the week in dollar amount to a savings account.  For example, for Week 1, I put $1, for Week 2, $2, for week 3, $3, and so on (so the savings add up).  I reversed it, though, and started putting $52 on the first week, then $51 on the second week, and so on.  That is to take advantage of this "motivation" that I'm still feeling early in the challenge.  However I do it, I still end up with $1,378 (or somewhere in the ballpark of it) by the week of Thanksgiving in 2015.  And what will I do with the money?  Black Friday shopping for crafty stuff, of course!

But I digress (sort of).  I use this to stay on track with the 52-week (reverse) challenge:


Okay, on to fun stuff: I list down books that I want to read on this page:


Then, to reward myself on days when the going gets tough, I buy one or two books for my Kindle reader (for iPhone and iPad) from Amazon.

And then I list the books that I've read on this page.  I rate the books by shading the hearts.


Lastly, I use this page for my craft wish list:


There is also a page for "Things I Need" but I chose not to use it, because, if you can't already tell, I lose all objectivity when it comes to craft-related purchases.  Meaning, I always feel that I need everything that I want to purchase.

If you notice, I don't have a specific cleaning list, grocery list, and meal planning pages, although those are also included in the bundles that I purchased.  It's because I haven't decided on whether I'll be using them, or using a different planning system altogether (more about it in a future post).

Again, I bought these pages here.

So there you have it -- my work and personal planners.

Thanks for looking, and have a great day!

Organization: Sharing My Planner

When I was a student, I carried a planner with me everywhere.  It was nothing fancy -- just a monthly calendar, and a weekly calendar -- so I can keep track of my homework, projects due, and upcoming exams.

When I graduated from school, I kissed my planner goodbye.  It was taking too much real estate in my purse.  Besides, I had a smart phone, and I could keep track of everything there.  For the most part, though, I only kept meetings and appointments in my phone.  I kept track of my bills and payments, etc. in my memory.

Fast forward several years later, and here I am,   Relying on my mental capacity worked for me for a little bit, and then I had r, and all of a sudden, I was trying to remember my personal and work schedules, and R's and r's schedules as well.  I needed a more systematic approach to keeping track of everything, especially as I took on more responsibilities at work, too.

I searched high and low for a planning system that I could work with, and finally chose these Arc planners (both in Junior size) from Staples:

My work planner

My personal planner

I chose the discbound system mainly because of its flexibility.  I can switch out the discs to accommodate more (or less) pages in my "planner," as my needs change.  My work planner has the 1.25-inch discs, and my personal planner has the 2-inch discs:


I also chose to print my own planner inserts/pages, instead of buying the ready-made ones at the store.  I bought my planner inserts here.  I purchased both the Unplan pages, and the 2015 bundle.  The Unplan pages had no dates in them, so I could definitely just keep printing more forever (well, in theory, I could).  The 2015 bundle were more structured, had pre-printed pages, and had more "categories."  Both sets of pages complemented each other nicely, although the monthly and weekly pages (if I remembered correctly) were pretty similar.  It was well worth it, though.  I loved the pretty colors, it made me more excited to actually use my planner.

I'll share more about what's inside these planners in a future post.

Thanks for looking, and have a great day!

Tuesday, December 23, 2014

Organization: Wood Mounted Stamp Sets

After Cricut cartriges and punches, I decided it was time to organize my wood-mounted stamp sets.  I didn't think I really had lot of them, since I tend to buy the clear-mount (Stampin' Up!), or the clear photopolymer stamp sets (from other companies), but after finishing organizing them, I did have more than I thought (does this sound familiar?).

Moving on, I needed a uniform way to store my stamp sets.  I originally kept them in their Stampin' Up! clamshell, or in their original boxes (for other companies), but because the boxes have different  sizes, it was really hard to store them.

I liked the idea of the Stampin' Up! cases (for wood-mounted stamps), but I couldn't wait for the longer time it took to place an order (in my previous experience, it took maybe 7-10 working days for me to receive an order).  I needed something that was readily accessible, or at least will get here in a shorter time than that.

Enter these boxes.  They fit the bill perfectly!  They were uniform in size and accessible.  And they came in this carrying case, so I can pack up some of my wood-mounted stamps and take them to crops with me if I wanted to (and you can bet I will be going on more crops in the future, after going to my first one!):


I labeled each individual box with the stamp set's name, using my label maker and paper refills.


And if I had a larger stamp set that won't fit in one box, I just split the set into two boxes.


I really love this method.  If you're looking for a way to organize and store your wood mount stamps, please give this a try.

Thanks for looking, and have a great day!

Monday, December 22, 2014

Organization: Punches

I guess I am in an organizing kick lately.  After sharing with you how I organized and stored my Cricut cartridges, handbooks, and overlays, I am now sharing with you how I organize my punches.

I own a variety of punches (old Stampin' Up! whale style and the new Stampin' Up! locking punches), and storing them in a way that still makes them really accessible has been the bane of my crafting existence.  I really wanted to use the Ikea Bygel rails that most crafters have been using to keep their punches, but my hubby is not very keen on the idea of me drilling holes on my craft room's wall.

After a lot of thought, I came up with this:


I purchased an Ikea table top and drilled holes on the underside of the table for the shorter Bygel rails.  Then I propped the whole table top against the wall, and -- voila! -- instant "wall" storage for my punch.  I was tempted to use the longer table top for this project, but I thought about how heavy it might get, and it may topple over.  

I keep my punch storage behind the door of my craft room, where it's out of the way, but still accessible when I need it.  I've also been very careful to lock the door to the craft room so r cannot get inside and get hurt if the punches fall over.

It's been working great so far, but if I outgrow this system, I just have to talk my husband into letting me drill holes on the wall.  And then I can use the table top as another desk in the craft room!

Thanks for looking, and have a great day!  

Sunday, December 21, 2014

Organization: Cricut Cartridges

I started "officially" crafting after watching a few Cricut videos on YouTube.  That was 4 years ago.  After watching many more videos in YouTube, buying a Cricut, cartridges, and other craft-related supplies, I realized that when I sit down to do a project, I spend more time trying to remember where things are, than actually creating.  Partly because I think I have too much stuff for my needs right now (gasp!!!), but also because I don't get to craft often, that I tend to forget what I do and don't have.

I noticed that most of my craft room "real estate" was taken up by my Cricut cartridges.  I have over 150 of them, and all of them are still in their original boxes.  And some are even unopened.  Here, take a look:


I searched the Internet for Cricut cartridge organization ideas, and stumbled upon this method.  She created little cardboard containers for each cartridge, then organized them on boxes.  You can check out her blog post and video here.  

It was genius.  I cut the SVG file of the cartridge "containers" (also on her blog) on white cardstock using my Silhouette Cameo.  It wasn't too bad -- it took me probably a whole night to finish cutting and assembling all of the "containers."  I also made labels using my label maker (font is "Small").  And I stocked up on refills, although I think I ended up using a little less than 2 label refills for this project.


The hardest part for me was throwing away the original cartridge boxes (seriously, but please don't judge).  I got over that initial hesitation, however, and the results were well worth it.  I was able to fit 84 cartridges in a box, which I got here.  From occupying a nearly a full shelf in my craft room to this:

I kept the handbooks and overlays in these boxes, which I got here.  I triedd to fit the same number of handbooks and overlays in each box (84 each).  It was great that I had a mix of different cartridges, with Lite handbooks.


And then for my active project (I am currently working on r's baby book), I'm keeping all the cartridges, handbooks, and overlays in this box.


I'm so happy that I found this method of storing cartridges.  Now I know exactly what I have, and can easily reach for what I need.

Give this method a try, and let me know what you think.

Thanks for looking, and have a great day!

Wednesday, November 19, 2014

Packing for a Two-Day Crop - Part 1

Since signing up for a crop a few days ago, I thought about how I'm going to have everything ready in time.

I want to share with you my thought process, and I'm hoping that it will help first-time crop-pers, and maybe even seasoned crop-pers, in figuring out what to bring.

Plan your project.  Since I have taken a crafting hiatus, I really have no on-going projects right now.  I've Googled tips on how to plan for a crop to make the most out of my time there, and saw that most experienced crop-pers plan their pages and their layouts in advance (if they are scrapbooking) or their card projects (if they are card-making).

I know I'm going to be working on r's baby scrapbook, but since I signed up late for this crop, I will not have the time to plan layouts, paper packs, embellishments, and photos for each page.  I've managed to choose some photos I've managed to scrapbook, and will bring what I need for them.

Make a list.  I'm a fan of making lists (I stick it in my planner and check things off as I go).  For this crop, I've made a list of things to bring, which I will share with you in more detail in my next post.  In order to avoid bringing my whole craft room with me, I focused on things that I think I will need to complete r's baby scrapbook.  Making a list helps me figure out what supplies I already have, and what supplies I need to buy.

Buy the things you need.  With little time left until Friday afternoon (when the crop begins), and with little time to go to the craft store (gasp!!!), I turn to the ever trusty Amazon.  With the supplies that I do have in abundance, I needed to buy:

I could not believe that I had no alphabet stamps for labels, journals, etc!!!  I've been eyeing this set from Lawn Fawn for a while, but am resisting the urge to buy all the alphabet stamps they have available (and trust me, they have plenty).  Does that sound familiar?  Needing to buy one thing, and then ending up buying ten times more than you originally planned to do?


I am bringing a paper trimmer, but I plan to use this to trim photos.  I have a full sized trimmer that I use for photos in the craft room but I wanted a smaller, more portable one for crops.  The trimmer I have had been discontinued, but I think this may be similar (maybe a little smaller).


I saw this at one of the Youtube videos that I've been watching (you can search "How to pack for crops" in Youtube).  The lady in the video said she uses this for trash at her table in a crop, so she won't need to keep getting up, especially if the trash can is in the other side of the room).  This folds down, so it's very compact and lightweight. 


I'm planning to bring a few Cricut cartridges with some "baby" images.  They will have Cricut machines at the crop, but since they may not have the cartridges that I will need for r's scrapbook, I've decided to just bring my own.  I'm going to take the cartridges out of their boxes for the crop, since packing them in their boxes will take up so much room.  Unfortunately, my Gypsy had died on me -- that would have been ideal for this crop.

The best part -- I have Amazon Prime!  I've had it since I gave birth to r, and it was very, very convenient.  My orders get to my door in two days, free!  Woo-hoo!

Pack your things in bags/containers that will do the job.  Even if I'm trying to keep the supplies that I'm bringing to a manageable amount, I still have a lot of supplies and things that I will be bringing with me.  I think it will be important that my things are organized, so I know where to find them in my bag.  I have this bag:
      
It is the Big Mama of scrapbooking/craft bag, but it's sturdy, holds a lot, has a lot of compartments, and it rolls.  I think it will do the job very nicely.

I will also be bringing with me this caddy, for my tools and my most reached-for things:


Having a game plan/strategy for this crop is helpful.  I feel like I am more prepared (all things considered), and hopefully have a decent chance at getting tons of scrapbooking done.

I'll share more photos of what I've packed in my next post.

Thanks for looking, and have a great day!!!

Sunday, February 26, 2012

Keeping Track of Punches

Hello, again, everyone!

In line with my Labeling Punches post that I shared yesterday, I also wanted to share how I keep track of the punches that I already owned.

I use the current Idea Book and Catalog.


I punched a Pretty in Pink card stock (100459) with the punches, wrote the name of the punch and label number of the cuts, and used Snail adhesive (104332) to stick them to the current Idea Book and Catalog.  It works for me because I can just flip through the catalog and quickly see the punches I already have.

As you can see, I started by highlighting the name of the punches, but then I also highlighted the items that I wanted to buy in the future, so my catalog was mostly covered in highlights.  This is why I needed a quicker way to keep track of my punches.

If you're organizing your Stampin' Up tools and are looking for a quick way to keep track of your punches, I hope this works for you, too.

Thanks for looking, and have a great Sunday!

Saturday, February 25, 2012

Labeling Punches

Happy Saturday, everyone!

I want to share how I label my old- and new-style Stampin' Up punches, so I can keep track of their names when I'm using them on projects.

I used the Dymo LetraTag label maker and clear plastic tape to make the labels.

Here some of the punches (old-style) that I've already labeled:

 
Modern Label punch (119849)

Butterfly punch (119848)

5-Petal Flower punch (119880)

These are old-style (whale punches) from Stampin Up.  The newer style punches can be stored flat when locked (which is great), and are available for purchase here.

If you're looking for a way to label your punches, I hope you'll find this useful.

Thanks for looking, and have a great weekend!