Showing posts with label masculine. Show all posts

Friday, January 14, 2022

Watercolor Background

 I wanted to try my hand at creating a "watercolor background" but only on a portion of the card -- to create a focal point or to highlight a sentiment.  Here I used a painted 3 colors of ink using a water brush on watercolor paper.

From black cardstock, I die-cut 4 layers of the sentiment, "Happy" and adhered them together for dimension.  After making sure that the background is dry, I heat embossed the "Birthday" sentiment using black embossing powder and embossing ink.  

I used a black card base for a dramatic effect.

I am entering this card to the CAS Colours and Sketches Challenge.  The challenge this week is to focus on a central sentiment.

I used the following supplies (these are affiliate links -- if you purchase through my links, I earn a small commission to support my blog at no cost to you):


Thanks for looking, and have a great day!

Tuesday, February 17, 2015

Dinosaur Birthday Card

Hi, everyone!  I can't believe I finished this card, and just in time, too, for the Simon Says Stamp Wednesday Challenge.  The challenge this week is "All Creatures Great and Small," featuring Paper Smooches products.

I was excited when I saw the challenge, because I just ordered some Paper Smooches stamps, and I needed an excuse to break them out of their packaging and use them!

Today's card is a birthday card:


I recently discovered watercoloring using distress inks, and I'm really loving this technique.  The dinosaur and the images are stamped on watercolor paper, which I've matted with black cardstock over the turqouise card base.


I cheated a little bit on the sentiment (it's not a Paper Smooches product, but I think it fit perfectly with my card).

I used these products for my card (with links to where you can get them, if you're interested):
Black and turqouise card stock (my stash)
Watercolor paper (Strathmore)
Cuteasaurus stamp set (Paper Smooches)
Chit Chat stamp set (Lawn Fawn) - I bought the coordinating dies with the stamp set
Salty Ocean, Tumbled Glass, Stormy Sky, Brushed Curduroy, Mowed Lawn Distress inks (Ranger) - I bought 10 of the 12 mini sets (so cute!), and I'm waiting for the other 2 to become available again
Versamark watermark stamp pad (Tsukineko)
Black embossing powder (Stampin' Up!)
Foam tape (Scotch)
Big Shot (Sizzix)

Thanks for looking, and have a great day!

Wednesday, February 11, 2015

Class Valentines and Teacher Gifts

Valentine's day is 4 days away, and I've already finished r's Valentines for his classmates, and for his teachers.

I'm sharing them with you today, because I'm proud of the fact that I did not have to wait until the last minute to work on them.

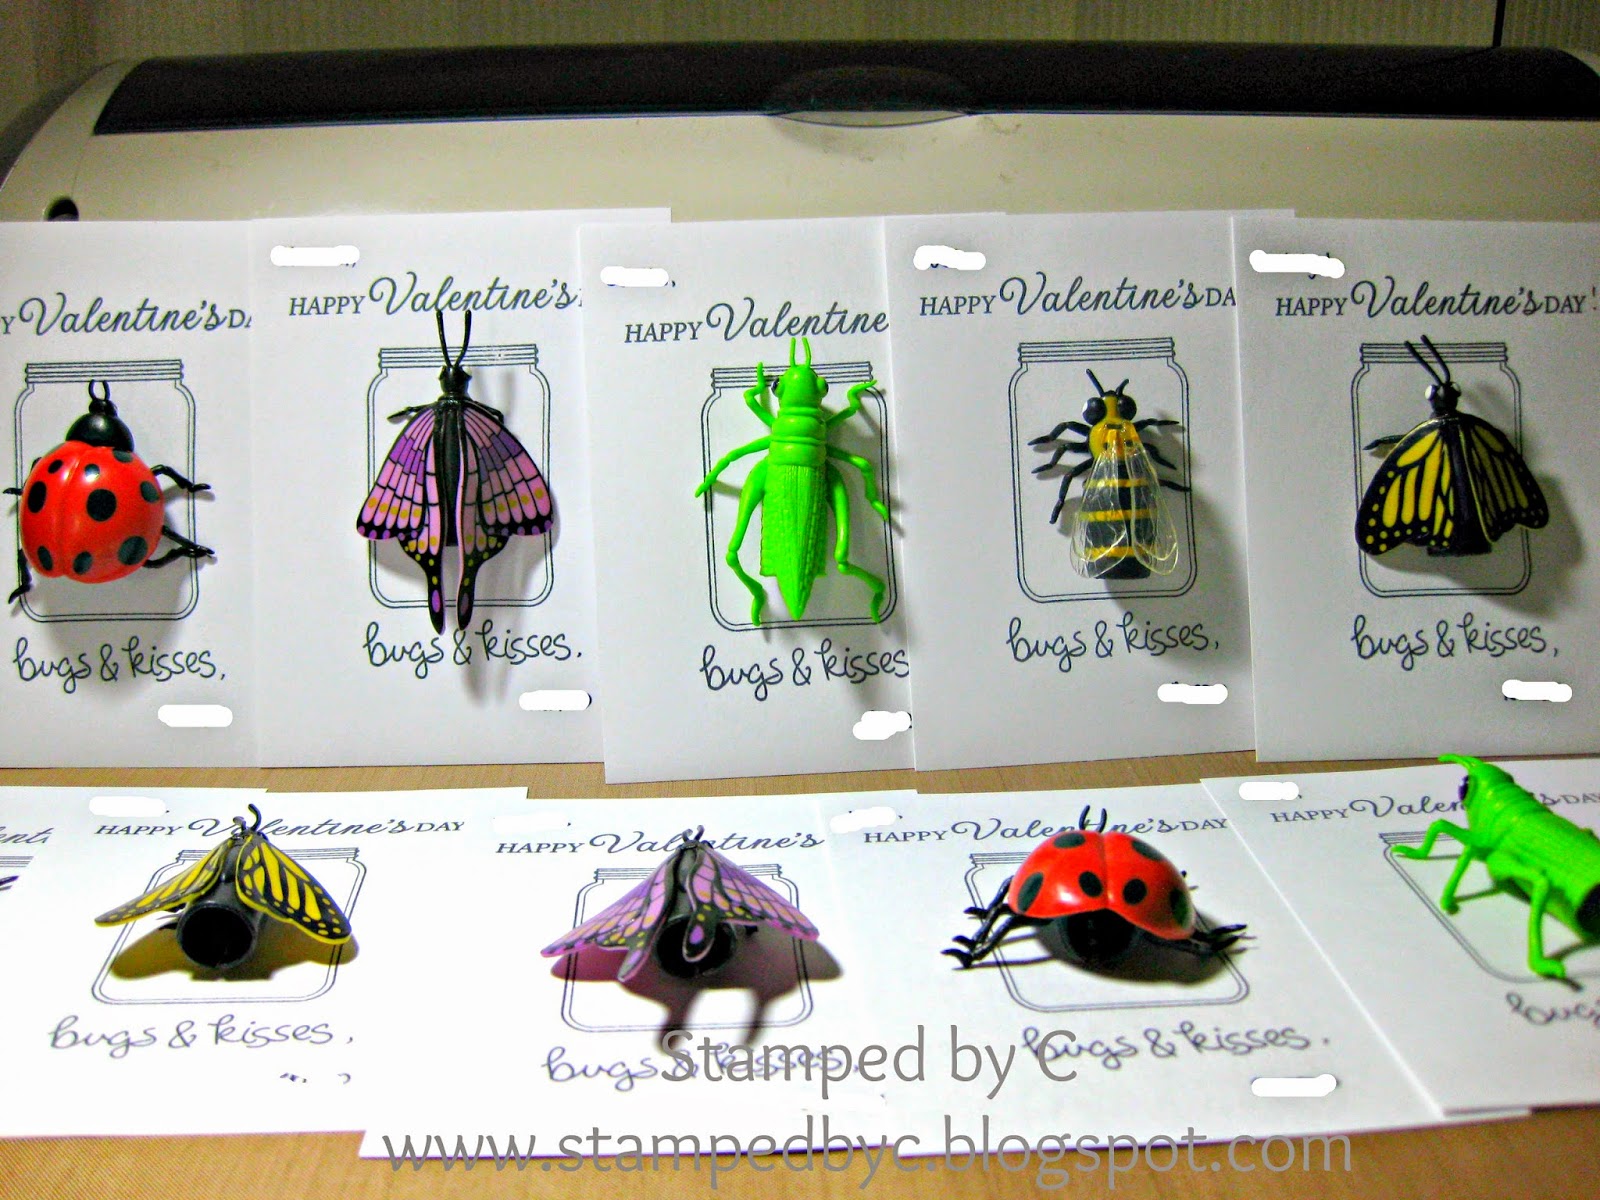
I got this idea here, but modified it so that I can use the stamps that have on hand (and have been dying to use).


I ordered my bugs online.  You can get them here or here (it comes in packs of 12).  I love that they are finger puppets.  r is actually loving bugs right now, so I hope his classmates are, too.  I hope none of them will get scared by the bugs (gulp).

I stamped the jar stamp on a sheet of white cardstock, stamped "Happy Valentine's Day" and "Bugs and Kisses," wrote each child's name, and signed r's name at the bottom.  I then stuck each bug with a glue dot.  Easy-peasy.

r's class is smaller this year, just 11 kids (including r), so I made 11 of these cards.  I always make one for r, and sign it as "From Mommy and Daddy."


Of course, we wanted to give a small gift to r's teachers, too.  They work with him and his classmates tirelessly throughout the year.

I bought a huge bag of Swiss Delice dark chocolates, and put them in these boxes, that I made with my Cricut.


I used the Artiste cartridge, which is available at Close to My Heart through a consultant.  I cut a 2.5 inch box (that's the biggest box that I can cut out of a 12x12 cardstock, using the "Fit to Page" option).  I used clear acetate under the window, and then used the shape that was cut out of the lid's window as my tag.  I used some twine to hold the box together, and to attach the tag.

If you can't find the Artiste cartridge, you can also try Tags, Bags, Boxes and More 2.  They have a lot of boxes in that cartridge that will work just fine.


Each box held 24 chocolate pieces.

They are so cute!  I can't believe I haven't tried to make these small boxes using my Cricut before!

I am entering this project at the Fantabulous Cricut challenge blog.  The challenge this week is to create something with a Valentine theme using any Cricut cartridge.

I used these supplies for r's Valentine cards for his classmates (as well as links to where you can find them):
White cardstock (Georgia Pacific)
Filled with Love stamp set (Simon Says Stamp/Mama Elephant) - it also comes as a set (with coordinating dies)
Celebrate Everyday stamp set (Hero Arts)
Bugs and Kisses stamp set (Lawn Fawn) - also available as a set (with coordinating dies)
Tuxedo Black ink (Memento)
Glue Dots

I used these supplies for the Valentine teacher gift boxes (as well as links to where you can find them):
Dark and light pink cardstock (my stash)
Cricut Artiste cartridge (Provocraft) - for the box
Cricut Expression (Provocraft)
Acetate sheet - for the window
Quick Dry Adhesive (Scotch) - I used this for gluing down the sides of the boxes
ATG adhesive (Scotch) - I used this to attach the acetate sheet to the window on the box lid
Twine
Crop-a-dile (We R Memory Keepers) - I used this to punch a small hole on the tag to slide the twine through

Thanks for looking, and have a great, fun-filled, love-filled Valentine's day!

Saturday, February 7, 2015

Beer Birthday Card

I can't believe it's February already!!!

This Saturday, my sister-in-law's boyfriend will be celebrating his birthday, so I made him -- a cake!!!

Just kidding.  Of course, I made him a card.

I typically struggle with masculine cards (I lack inspiration!!!), but I think I got this down pat.  He likes to drink beer, so I thought this the perfect card for him:


I cut the mug twice, once in acetate, and once in medium yellow cardstock, to give the illusion of glass.  It's hard to see in the photo, but you can sort of see the outline of the "glass" mug here:


I covered the beer froth in Stickles, to mimic the bubbles.  I know, it looks kind of glittery rather than frothy, but I think he will get a kick out of it.


I used these materials/supplies for this card:
Cricut Expression (I'm tempted to upgrade to an Explore, but I just can't let go of my very first E!)
Everyday Pop-up Cards (Cricut cartridge)
Bright yellow, medium yellow, and light yellow cardstock (my stash)
Black and white cardstock (my stash)
Sentiment (Happy Hour stamp set, Stampin' Up!)
Memento Tuxedo Black Ink - love, love, love this ink pad
Spots and Dots (Cuttlebug embossing folder)
Stickles
Sizzix Big Shot
Foam tape
ATG gun

Thanks for looking, and have a great day!  Cheers! ;p

Wednesday, January 21, 2015

Watercoloring with Distress Inks

Hi, everyone!

Today I'll share with you a card I made using disress inks.  I bought some distress inks two years ago, so I could ink my scrapbook/mini-album pages.  I bought the full pads (the mini's were not available at the time), but did not get to complete the "collection."

I saw some YouTube videos of other papercrafters using the distress inks to watercolor, and I was itching to try it out, so I broke out my distress inks and started watercoloring:


I stamped the image in watercolor paper, die cut it, and then embossed using Versamark and black embossing powder.

Then I got carried away, and decided to try my hand at blending with the blending tool, too:


I used the blending tool for the sky.  First, I made mask for the buildings in the background, then blended the blue (Salty Ocean) around them.  Then, I stamped the buildings (sorry, as you can see, they were not spot-on) in black ink, and colored in the windows with a marker.

I'm entering this card to the Simon Says Stamp Wednesday Challenge.  They are highlighting Tim Holtz's products this week, and the challenge is to make a masculine card.  I hope my card fits the bill!

I don't think I did an awesome job with watercoloring or blending, but I think it was not too bad -- especially since this is my first time to try out both techniques.  I definitely need to work on them, but I love how well the inks flowed into the watercolor paper.  I will definitely be purchasing more of this distress inks in the future.

I used these products for this card:
Black cardstock (Recollections)
Black embossing powder (Stampin' Up!)

Thanks for looking, and have a great day!

Tuesday, December 30, 2014

Masculine Star Birthday Card

I hope everyone had a great Christmas/holiday.

New Year's Day is around the corner, and I'm starting the new year right by replenishing my stash of cards.

I have little inspiration when it comes to masculine cards, which is a shame since I live with two boys (my husband, R, and my son, r).  So what happens when you hit crafter's block? Pinterest to the rescue!

I saw a similar card, and decided to CASE (copy and share everything) it, since it's a great masculine card:


And since I was making one, it was easy enough to make three:


It's not visible in the photos, but I popped up a few stars to give the cards some dimension.  
Again, this was not my original idea.  The original card can be found here.

I used the following for these cards (you can click on the links below to buy):
Word Play stamp set (Stampin' Up!)
Solid cardstock, different colors (my stash/scraps)
Rhinestones (my stash)

Thanks for looking, and have a great day!

Wednesday, January 1, 2014

Gamer Birthday Card

Happy new year, everyone!

What better way to start the year than making cards and participating in challenges?

I made this card for my nephew, who just turned twenty-one.  Like most males in my family, he loves video games, so I know this stamp set from Papertrey Ink is just perfect for his card (and for other cards that I will make for my other male family members, of course).  I struggle with masculine cards, mostly because I find myself out of ideas/inspiration for them, but I'm glad I did not have too much trouble with this one.  The right stamp set does help sometimes. :)


Yup, it's a video game controller.  And I love, love, love the sentiment.

Here is the actual card.

I'm entering this card to the Less is More challenge for the end of the year, which is to repeat any challenge from the past year.  I am repeating Week 7's challenge:  Masculine Cards.

I used the following products for my card:
Blue cardstock (Coredinations)
White cardstock (Recollections)
Midnight Black chalk ink (Versamagic)
Aegean Blue chalk ink (Versamagic)
Game On stamp set (Papertrey Ink)

Thanks for looking, and have a great day (and a fantastic new year)!

Sunday, November 24, 2013

Shoe Birthday Card

My husband comes from a big family, and on some months it feels like we're celebrating someone's birthday every week.

Not in November, though.  With 18+ people in the family (parents, siblings, and nieces/nephews), the honor of celebrating the only birthday in November belongs to my brother-in-law (he's really my husband's brother in-law, but for simplicity's sake, I will claim him as mine.  Lol.).

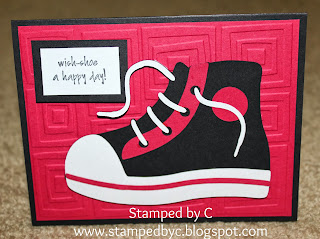
My brother-in-law, A, loves basketball shoes.  He loves the sport, but he loves the shoes more, so I made him this card:


Okay, it really is more of a sneaker than a basketball shoe card, but I'm sure he'll get a kick out of this, card, anyway.  Get it, "kick"? :p  Awful, I know.  Sorry, I can't help it.


I used the following products to make the card:
White, red, and black cardstock (Recollections)
Embossed red card mat using Cuttlebug embossing folder (Traffic Jam)
Shoe cut with Cricut cartridge (Boys Will be Boys)
Stampin' Up's Celebrate in Style stamp set for the sentiment (I love this sentiment -- and this stamp set is one of the first Stampin' Up sets I owned)
Memento ink (Tuxedo Black)
Stampin' Dimensionals to pop up the shoe and the sentiment

Actually, now that I've thought about it, I think he loves Michael Jordan the most, but I really can't put Michael Jordan in a card, right?

Thanks for looking, and have a great day!

Tuesday, March 6, 2012

Mojo Monday 231

I am so excited to share with you my card for Mojo Monday this week.  I am new to Mojo Monday -- I just started playing along around 3 weeks ago, and I just found out from the Mojo Monday blog that there is a contest that is held every first Monday of the month.  You can check it out here.

There is another reason why I'm so excited about this card.  I wanted to try to make a masculine birthday card, but I wanted to incorporate a butterfly in the card (I just can't resist the Stampin' Up Butterfly punch).  I think the card is still masculine enough (because of the colors that I used), even if I included a butterfly.  What do you think?


This card is based on this Mojo Monday sketch by Julee:


I used these products from Stampin' Up to make my card:
Outlined Occasions stamp set (Wood:  127140; Clear:  127135) - from Sale-a-bration 2012
Basic Black classic ink pad (101179)
Pool Party classic ink pad (122938) to stamp the dots on the ribbon and to ink the edges of the card stock
Whisper White card stock (100730)
Pool Party card stock (122924)
Cherry Cobbler card stock (119685)
Basic Gray card stock (121044)
Basic Black card stock (121045)
Whisper White 5/8" satin ribbon (114616)
Sponge Daubers (102892) to stamp the ribbon -- cool trick, huh? :)
Butterfly punch (119848)
2-1/2" Circle punch (120906)
3/4" Circle punch (119873) to punch black card stock to make the faux scallops
1" Square punch (124094) - this was carried over from the Holidays mini catalog, and is still available for purchase 
Stripes Textured Impressions embossing folder (123128)
Regals Collection brads (119737) - I used the Cherry Cobbler ones
Basic Rhinestones (119246)
Snail adhesive (104332)
Stampin' Dimensionals (104430)

All these products can be purchased at my Stampin' Up website.  Click "Shop Now" on the top right corner of my Stampin' Up website to get started.

Techniques:
1.  Faux Scallops -  I made them by punching the Basic Black card stock with the 3/4" circle punch and adhering them around the 2-1/2" inch circle Cherry Cobbler punch cut
2.  Faux Polka Dots - I stamped the Pool Party dots on the Whisper White 5/8" satin ribbon using Sponge Daubers
3.  Fish Tail - I cut the fish tail using the corner of the 1" square punch (you can also use scissors, of course)

Thanks for looking!