Tuesday, January 11, 2022

CAS Floral Card

Happy new year!

I'm starting the new year with this clean and simple card that I made using pink, light violet, and red:

I diet cut the flowers and leaves from pink, light violet, and red cardstock.  I die cut a circle in my card front made of kraft card stock and used a black cardstock to mat that thin space between the 2 to create an outline.  I used liquid adhesive to adhere the small die cuts on the paper because it is more forgiving. I can move it around a little bit before it sets, which gives me a little bit more time to arrange the die cuts just the way I want. :)

I used my dry adhesive (tape runner) to adhere the larger pieces to the kraft card base.

I love the how card turned out!  Here's a close-up view: 


This was supposed to be entered into the CAS Colours and Sketches Challenge Blog.  Challenge #451 is to create a card using colors similar to Highland Heather, Petal Pink, and Poppy Parade, but I didn't get to create this post and link it in time.  I figured I'd share it with all of you anyway.

I used the following supplies to create my card:

Die set (flowers and leaves) - the one I used is discontinued, but this is a link to something that is similar

Circle die - you can also use this die if you want to take advantage of your Amazon Prime or use your Amazon account.  Just cut a smaller and a bigger circle and use the smaller circle to mat the flowers and leaves die cuts

Stitched die for card mat - you can also use this die if you want to take advantage of your Amazon Prime or use your Amazon account.

Thinking of You sentiment

Black ink

Die cut machine

Liquid adhesive 

Dry adhesive (tape runner)

Thanks for looking, and have a great day!

Sunday, December 26, 2021

It's a Party!

To me, nothing says "Party!" like glitters.  Tons and tons of glitters.  So I made this sparkly shaker birthday card using Pinkfresh Studio's Pop Out Sunburst stamp for double the fun.  As soon as I saw this stamp, I was intrigued by the possibilities!  I can create a rainbow sun ray background, or do alternating colors.  In this case, I stamped every other sun ray with Versamark and then used embossing glitter for the shine!

The sentiment is from this gorgeous Waffle Flower stamp and die set, first stamped using Tsukineko Tuxedo Black ink, then in Catherine Pooler Something Borrowed ink.  Coincidentally, it's from Catherine Pooler's "Life of the Party" collection. ;)  

I am entering this in the Simon Says Stamp Monday Challenge Blog, where the theme this week is "Let's Party!!!"

I used the following supplies:

Pinkfresh Studio Pop Out Sunburst

Waffle Flower Oversized Happy stamp and die set

The above are affiliate links, and I get a small commission at no cost to you if you purchase the supplies through my links.

Thanks for looking, and have a great and festive day!

From Our Home to Yours...

...belated Merry Christmas!  

I made this holiday card before Christmas, but the hustle and bustle of holiday preparations pushed posting this to the back burner for a bit.

First, I created dots for the background using Hero Arts Chevrons stencil.  This is a pack of 2 stencils, and I love those dots! I can definitely see myself using these in many cards in the future!  I used Catherine Pooler inks and pounced them through the stencil.  Then I cut the die from gold foil cardstock, and heat embossed the sentiment using gold embossing powder.

The die is actually a set of three dies from Hero Arts, but I used just one of the dies instead.

I'm entering this card into the Hero Arts Stay Crafty Challenge #30.  The challenge this month is to use circles in the card.  I hope the stenciled big dots in the background meet the criteria.

The supply list is below:

Hero Arts Tri-fold Village Fancy Die - this is on sale right now for $5 off!

Hero Arts Chevron Stencils 2-Pack

The above are affiliate links and I get a small commission when you purchase through my links, at no cost to you.

I hope that you spent your holidays surrounded by love and happiness, with loved ones, friends, and anyone/anything that makes you happy. :)

Thanks for looking, and have a great day!

Saturday, December 18, 2021

Cards from DIY Stencils

As promised, here are some cards I made using the DIY stencils I shared in my previous post.

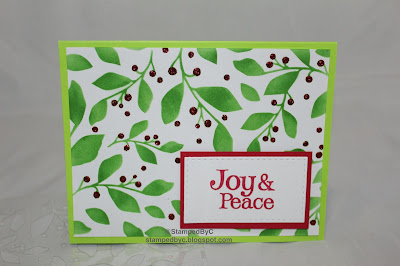
First up is this stenciled green Christmas card:


I used a brush to apply Catherine Pooler's Grass Skirt on white cardstock die cut with Simon Says Stamp Stitched Rectangles die using the leaf and berry stencil that I made.  I applied Red Stickles on the berries and gave it time to dry.  This was the hardest part -- you can tell patience is not my strongest point.  However, I've ruined many cards by smearing wet Stickles, so I definitely gave it my best.

While waiting, I stamped the "Joy and Peace" sentiment on white cardstock using Catherine Pooler's Rockin' Red, which I mounted on red cardstock.  The sentiment came from an old Hero Arts set called December.

Once the Stickles was dry, I popped up the sentiment on foam tape.


This is not the traditional Christmas colors (or leaves and berries, for that matter), but once the sentiment and red Stickles were on the card, it looked really cheery and festive. :)

My second card is another Christmas card:


I used the DIY stencil I made to emboss a snowy background for my snowman.  I pressed the Versamark ink pad through the stencil and embossed it with white embossing powder.

I stamped and colored by snowman using the Lawn Fawn Frosty Friends stamp set and cut it out using the coordinating die.  I cut out some snowy hillside using Lawn Fawn Sitched Hillside Borders out of white cardstock for my snowman to stand on.

I colored the images with Copic markers.

So what do you think?  Not too shabby for DIY stencils, right?

I hope you give making your own stencils a try and share with me what you've created in the comments below.

Thanks for looking, and have a great day!
Tuesday, December 14, 2021

Ribbon Christmas Card

Can you believe that there are only 11 days to go before Christmas?  It crept up on me!

I've been looking for an excuse to play with these Lawn Fawn die.  I cut a few of these bows in different sizes in red checkered paper from Die Cuts with a View, arranged them into a tree shape, and voila!  Instant Christmas tree.


I cut the star out of gold cardstock.  I used the same gold cardstock for the bow "tails" as the trunk of my ribbon tree.

Does it look like a Christmas tree made out of bows?

I used the following products:


The above are affiliate links, and I get a small commission if you purchase them through my links, at no cost to you.

Thanks for looking, and have a great day!

Sunday, December 12, 2021

Striped 2-in-1 Birthday Card

I recently got an order from The Stamp Market, and it included this amazing Birthday Cover Plate die.  It's perfect for making quick cards, while still looking very polished and pretty.

I decided to step it up by cutting strips of different colored cardstock and sticking them on a background, then run the sandwich with the Birthday cover plate die through my Big Shot.

Now I have a 2-for-1 card!


I love, love, love monochromatic cards!!!

Thanks for looking, and have a great day!

Friday, December 10, 2021

Celebrating 40 Years with Stampendous

In honor of Stampendous' 40th anniversary, I'm sharing this card that I made from one of my old (but loved) Stampendous stamp sets.  Happy Messages and Bold Blossoms were one of my first photopolymer stamp sets, more than 10 years ago, when I was just getting into stamping.  Yes, these stamps are THAT old, but they still stamp beautifully.  It's no wonder Stampendous has been in business for this long -- their stamps are really of good quality.


During that time, coordinating dies for stamp sets were not as popular, so I fussy-cut the red flower in the middle to give the impression of a die-cut image.  A card-maker's gotta do what a card-maker's gotta do. ;)

As a bonus, I also used the Stampendous embossing powders (Ruby Red and Lapiz Pearl) for this card.


Thank you, Stampendous, for 40 wonderful years!  I wish you 100 times more stampendous years of excellent quality products and stamping fun.

Thanks for looking, and have a great day!