Wednesday, February 11, 2015

Class Valentines and Teacher Gifts

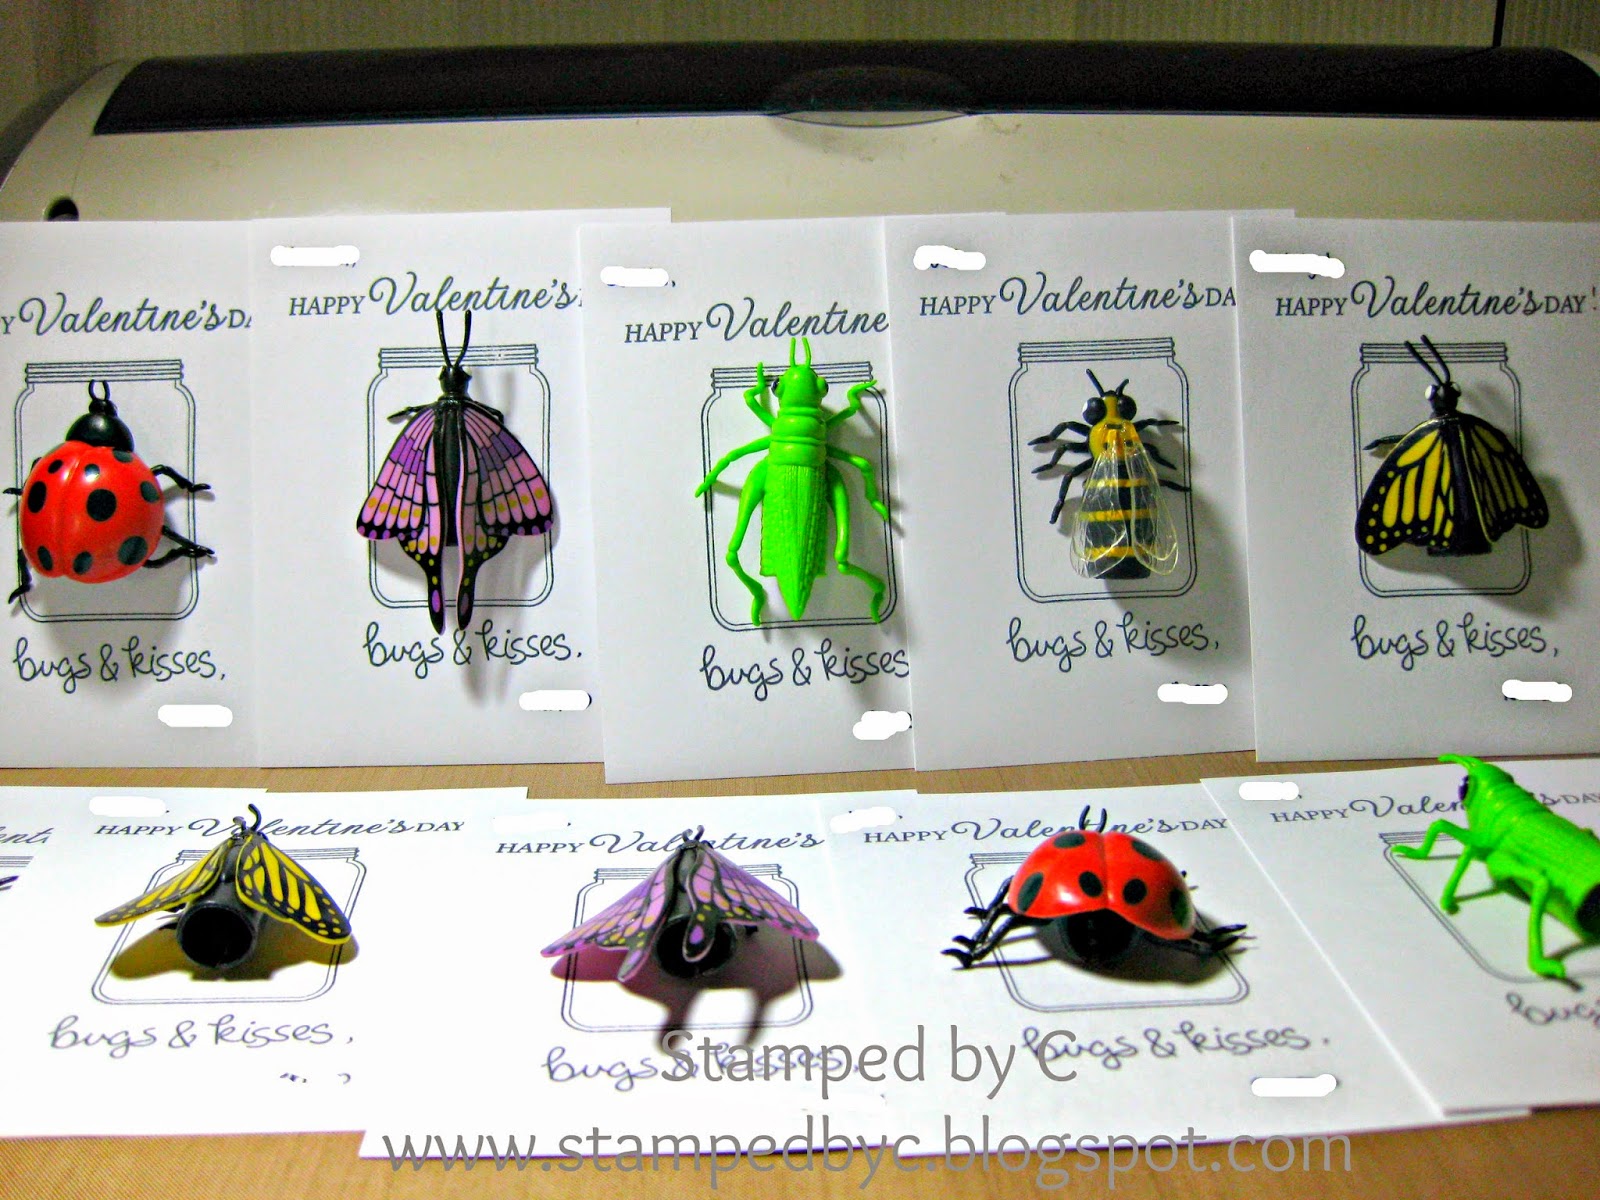
Valentine's day is 4 days away, and I've already finished r's Valentines for his classmates, and for his teachers.

I'm sharing them with you today, because I'm proud of the fact that I did not have to wait until the last minute to work on them.

I got this idea here, but modified it so that I can use the stamps that have on hand (and have been dying to use).


I ordered my bugs online.  You can get them here or here (it comes in packs of 12).  I love that they are finger puppets.  r is actually loving bugs right now, so I hope his classmates are, too.  I hope none of them will get scared by the bugs (gulp).

I stamped the jar stamp on a sheet of white cardstock, stamped "Happy Valentine's Day" and "Bugs and Kisses," wrote each child's name, and signed r's name at the bottom.  I then stuck each bug with a glue dot.  Easy-peasy.

r's class is smaller this year, just 11 kids (including r), so I made 11 of these cards.  I always make one for r, and sign it as "From Mommy and Daddy."

Of course, we wanted to give a small gift to r's teachers, too.  They work with him and his classmates tirelessly throughout the year.

I bought a huge bag of Swiss Delice dark chocolates, and put them in these boxes, that I made with my Cricut.


I used the Artiste cartridge, which is available at Close to My Heart through a consultant.  I cut a 2.5 inch box (that's the biggest box that I can cut out of a 12x12 cardstock, using the "Fit to Page" option).  I used clear acetate under the window, and then used the shape that was cut out of the lid's window as my tag.  I used some twine to hold the box together, and to attach the tag.

If you can't find the Artiste cartridge, you can also try Tags, Bags, Boxes and More 2.  They have a lot of boxes in that cartridge that will work just fine.


Each box held 24 chocolate pieces.

They are so cute!  I can't believe I haven't tried to make these small boxes using my Cricut before!

I am entering this project at the Fantabulous Cricut challenge blog.  The challenge this week is to create something with a Valentine theme using any Cricut cartridge.

I used these supplies for r's Valentine cards for his classmates (as well as links to where you can find them):
White cardstock (Georgia Pacific)
Filled with Love stamp set (Simon Says Stamp/Mama Elephant) - it also comes as a set (with coordinating dies)
Celebrate Everyday stamp set (Hero Arts)
Bugs and Kisses stamp set (Lawn Fawn) - also available as a set (with coordinating dies)
Tuxedo Black ink (Memento)
Glue Dots

I used these supplies for the Valentine teacher gift boxes (as well as links to where you can find them):
Dark and light pink cardstock (my stash)
Cricut Artiste cartridge (Provocraft) - for the box
Cricut Expression (Provocraft)
Acetate sheet - for the window
Quick Dry Adhesive (Scotch) - I used this for gluing down the sides of the boxes
ATG adhesive (Scotch) - I used this to attach the acetate sheet to the window on the box lid
Twine
Crop-a-dile (We R Memory Keepers) - I used this to punch a small hole on the tag to slide the twine through

Thanks for looking, and have a great, fun-filled, love-filled Valentine's day!

Tuesday, February 10, 2015

Bright Pink and Gray Card

It's been a while since I joined challenges, but I just couldn't pass up this challenge from Less Is More and Simon Says Stamp.

The Less Is More blog is celebrating its 4th anniversary, and the challenge this week is to make a card with pink and gray.

Meanwhile, the challenge at the Simon Says Stamp Wednesday challenge blog is "All things bright and beautiful," highlighting Hero Arts products.

I am excited for this challenge, because I have a lot of Hero Arts stamps.  They were one of the first stamps I bought when I first started stamping five years ago.

Here is my card:


I used this Hero Arts stamp set for the different splashes of pink.


The image and the sentiment came from two different stamp sets.  The bicycle was from this set.


The sentiment was from this set.  I love how the two stamps complemented each other perfectly.  I embossed both the bicycle and the sentiment using silver/gray embossing powder.

I love how this card turned out.  I am working on having a stash of handmade cards that I can readily pull out for different occasions, and this card definitely fits the bill.

Here is a complete list of products (and links to where you can find them):
White cardstock (Georgia Pacific)
Dark and light gray cardstock (my stash)
Brush Strokes (Hero Arts)
Joy Ride stamp set (Hero Arts)
Friendship Messages stamp set (Hero Arts)
Rose Bud ink (Memento)
Angel Pink ink (Memento)
Pixie Dust ink (Versamagic)
Pink Petunia ink (Versamagic)
Versamark ink pad (Tsukineko)
Heat gun (Nicole)
Embossing powder (Stampin' Up!)
Embossing powder tool (Inkadinkado)
ATG gun (Scotch)

Thanks for looking, and have a bright and cheery day!

Sunday, February 8, 2015

Love Bug Valentine's Day Card

To me, February means Valentine's Day, and Valentine's Day means Valentine cards.

This is pretty uncharacteristic of me, but this year, I already finished working on my husband's Valentine card.


I'm loving this clean and simple card.  I love the cute images from Lawn Fawn, too.  I'm loving coloring, lately, although I still have to take the leap into Copics.  I used my Stampin' Write markers to color these images.


See what I mean?  So, so cute.  It's such a great builder set.  There are so many more images in the stamp set, and I bought the coordinating dies.  When popped up with one layer of foam tape, the die cut images add such nice dimension to the card.  See?

I'm going to tell you a secret.  I actually stamped the branch twice, to make it long enough so there's room for the two love bugs.  I hid the "joint" between the two branches behind one of the leaves.

And the sentiment!  I'm super-loving how well it stamps with my favorite Memento ink.


I think this card will make my husband smile.  I can't wait to give him his card on Valentine's day.

I used these supplies to make this card:
Stamp set (Bugs and Kisses, Lawn Fawn) - I bought it with the coordinating dies, although I believe they are also available separately
Stampin' Write markers (Stampin' Up!)
Big Shot Magnetic Platform (Sizzix) - this is a life changer!!!  It helps keep the dies in place while die cutting.

Thanks for looking, and have a great day!

Saturday, February 7, 2015

Beer Birthday Card

I can't believe it's February already!!!

This Saturday, my sister-in-law's boyfriend will be celebrating his birthday, so I made him -- a cake!!!

Just kidding.  Of course, I made him a card.

I typically struggle with masculine cards (I lack inspiration!!!), but I think I got this down pat.  He likes to drink beer, so I thought this the perfect card for him:


I cut the mug twice, once in acetate, and once in medium yellow cardstock, to give the illusion of glass.  It's hard to see in the photo, but you can sort of see the outline of the "glass" mug here:


I covered the beer froth in Stickles, to mimic the bubbles.  I know, it looks kind of glittery rather than frothy, but I think he will get a kick out of it.


I used these materials/supplies for this card:
Cricut Expression (I'm tempted to upgrade to an Explore, but I just can't let go of my very first E!)
Everyday Pop-up Cards (Cricut cartridge)
Bright yellow, medium yellow, and light yellow cardstock (my stash)
Black and white cardstock (my stash)
Sentiment (Happy Hour stamp set, Stampin' Up!)
Memento Tuxedo Black Ink - love, love, love this ink pad
Spots and Dots (Cuttlebug embossing folder)
Stickles
Sizzix Big Shot
Foam tape
ATG gun

Thanks for looking, and have a great day!  Cheers! ;p

Wednesday, January 21, 2015

Watercoloring with Distress Inks

Hi, everyone!

Today I'll share with you a card I made using disress inks.  I bought some distress inks two years ago, so I could ink my scrapbook/mini-album pages.  I bought the full pads (the mini's were not available at the time), but did not get to complete the "collection."

I saw some YouTube videos of other papercrafters using the distress inks to watercolor, and I was itching to try it out, so I broke out my distress inks and started watercoloring:


I stamped the image in watercolor paper, die cut it, and then embossed using Versamark and black embossing powder.

Then I got carried away, and decided to try my hand at blending with the blending tool, too:


I used the blending tool for the sky.  First, I made mask for the buildings in the background, then blended the blue (Salty Ocean) around them.  Then, I stamped the buildings (sorry, as you can see, they were not spot-on) in black ink, and colored in the windows with a marker.

I'm entering this card to the Simon Says Stamp Wednesday Challenge.  They are highlighting Tim Holtz's products this week, and the challenge is to make a masculine card.  I hope my card fits the bill!

I don't think I did an awesome job with watercoloring or blending, but I think it was not too bad -- especially since this is my first time to try out both techniques.  I definitely need to work on them, but I love how well the inks flowed into the watercolor paper.  I will definitely be purchasing more of this distress inks in the future.

I used these products for this card:
Black cardstock (Recollections)
Black embossing powder (Stampin' Up!)

Thanks for looking, and have a great day!

Sunday, January 4, 2015

Organization: Planner Pages

As promised, I'm sharing with you today what's inside my planners.  I use the Junior size Arc planner that I got from Staples.

My Work Planner
I keep my work planner fairly simple, because I need to be able to find things in it quickly.  I also carry it with me always.

On the left, I have the 2015 calendar.  On the right, I have my birthday and anniversary list.


Then I have the monthly calendar (or the month-at-a glance).  If you notice, the months are left blank, because these were from the Unplan pages that I was talking about in my last post.  I had previously printed out a several of these pages, so I am going to use them up before I switch to the monthly pages from the 2015 bundle.


I use the monthly calendar to jot down meetings, appointments, projects and deadlines, as well as days off (or days that I've called in sick).  I never used to track my vacation and sick days (I've always just trusted on the fact that our unused vacation days roll over to the next year, but our work decided to stop the "roll over" recently -- boo!).  

For specifics on scheduled meetings/appointments/projects and deadlines, as well as for daily goal-setting (to-do lists), I use the week on two pages spread:


I only keep around three months of weekly pages at a time, so as not to overfill my planner.

For any notes that I have to write, and for my brain-dump, I use these pages that came with the planner when I bought it:


Lastly, I keep my work contacts on these pages:


So, there you have it -- my work planner.  Let's take a look at my personal planner now.

My Personal Planner
I use my personal planner mostly track finances, and to write out lists.

My first page is a 2015 calendar:


I use these monthly pages to write down bill payments (amount and due dates).  Once I've paid off a bill, I check it off with a pen (it gives me satisfaction to do that ;p).  I also write down reminders for me to put some money to my savings account every month.  I know it's easy to set up recurring electronic transfers, but I think it's more fun for me to actually transfer the money (makes me more excited to save).  As weird as that may sound, it does work for me.


There are mortage payment and car payment printables as well, and I use that for those purposes, but I had forgotten to take a photo.  For the other debts that I had to pay down (financing from the furniture store, student loan, etc), I use this page:


Also, shortly after Thanksgiving, I decided to do 52-week savings challenge.  That means that I put aside the equivalent of the week in dollar amount to a savings account.  For example, for Week 1, I put $1, for Week 2, $2, for week 3, $3, and so on (so the savings add up).  I reversed it, though, and started putting $52 on the first week, then $51 on the second week, and so on.  That is to take advantage of this "motivation" that I'm still feeling early in the challenge.  However I do it, I still end up with $1,378 (or somewhere in the ballpark of it) by the week of Thanksgiving in 2015.  And what will I do with the money?  Black Friday shopping for crafty stuff, of course!

But I digress (sort of).  I use this to stay on track with the 52-week (reverse) challenge:


Okay, on to fun stuff: I list down books that I want to read on this page:


Then, to reward myself on days when the going gets tough, I buy one or two books for my Kindle reader (for iPhone and iPad) from Amazon.

And then I list the books that I've read on this page.  I rate the books by shading the hearts.


Lastly, I use this page for my craft wish list:


There is also a page for "Things I Need" but I chose not to use it, because, if you can't already tell, I lose all objectivity when it comes to craft-related purchases.  Meaning, I always feel that I need everything that I want to purchase.

If you notice, I don't have a specific cleaning list, grocery list, and meal planning pages, although those are also included in the bundles that I purchased.  It's because I haven't decided on whether I'll be using them, or using a different planning system altogether (more about it in a future post).

Again, I bought these pages here.

So there you have it -- my work and personal planners.

Thanks for looking, and have a great day!

Organization: Sharing My Planner

When I was a student, I carried a planner with me everywhere.  It was nothing fancy -- just a monthly calendar, and a weekly calendar -- so I can keep track of my homework, projects due, and upcoming exams.

When I graduated from school, I kissed my planner goodbye.  It was taking too much real estate in my purse.  Besides, I had a smart phone, and I could keep track of everything there.  For the most part, though, I only kept meetings and appointments in my phone.  I kept track of my bills and payments, etc. in my memory.

Fast forward several years later, and here I am,   Relying on my mental capacity worked for me for a little bit, and then I had r, and all of a sudden, I was trying to remember my personal and work schedules, and R's and r's schedules as well.  I needed a more systematic approach to keeping track of everything, especially as I took on more responsibilities at work, too.

I searched high and low for a planning system that I could work with, and finally chose these Arc planners (both in Junior size) from Staples:

My work planner

My personal planner

I chose the discbound system mainly because of its flexibility.  I can switch out the discs to accommodate more (or less) pages in my "planner," as my needs change.  My work planner has the 1.25-inch discs, and my personal planner has the 2-inch discs:


I also chose to print my own planner inserts/pages, instead of buying the ready-made ones at the store.  I bought my planner inserts here.  I purchased both the Unplan pages, and the 2015 bundle.  The Unplan pages had no dates in them, so I could definitely just keep printing more forever (well, in theory, I could).  The 2015 bundle were more structured, had pre-printed pages, and had more "categories."  Both sets of pages complemented each other nicely, although the monthly and weekly pages (if I remembered correctly) were pretty similar.  It was well worth it, though.  I loved the pretty colors, it made me more excited to actually use my planner.

I'll share more about what's inside these planners in a future post.

Thanks for looking, and have a great day!