Thursday, October 31, 2013

Halloween Treat "Pumpkins"

Halloween is finally here!

I've been planning and planning for Halloween for weeks -- nothing major, just costumes, and treat bags.  As much as I would love to host a party to have an excuse to make cute and yummy Halloween treats, I couldn't because of time and health issues.  R had been fighting off this awful cough and cold for the past two months, and his doctor believes it's a bug.  Well, the bug jumped ship to r and me, and he has croup, and I have the adult version of it (if there is such a thing).

Since r's classmates are under 18 months old, I had to be creative with their treat bags.  The bag should be visually appealing, and the treats should be what they can safely eat (read:  store-bought, nut-free).

Take a look.

Inside each treat bag is a pack of goldfish crackers (cheese), goldfish crackers (vanilla, fudge brownie, or s'mores), vanilla wafers, and a cereal bar.  I wanted to include a small bottle of 100% fruit juice for babies, but it won't fit in the bag.  Boo.


The pumpkins are orange paper bags from Michael's.  I stamped a jack-o-lantern face in black ink on the front of the bag.


The green leaves were made with 4x5 pieces of green cardstock folded in half, and punched with a Fiskars punch.


I taped this to the bag, and attached a green ribbon for the handle.  I attached a tag saying "Trick or Treat" and then "To/From."


All the stamps I used were from Papertrey Ink.

All parents/families are invited to r's school's Halloween parade, and then to the class party later.  We're bringing these treat bags for r's classmates.


I hope they like these.  And I hope you do, too.
Happy Halloween!
Monday, October 14, 2013

My First Sewing Project

I have never sewn anything before, and I can't explain why I decided to make my first sewing project a big one.

To celebrate our niece's first birthday, my sister-in-law hosted a costume party last Saturday.  All the guests were asked to come in costume (including the adults).  So, in true Stamped by C fashion, I decided to take a big bite of the sewing bug, by sewing our costumes.  

Yup.  Costumes for me, R, and r.  Go big or go broke, right? :p

Coming up with the idea for the costumes was the easy part.  r is in that fun, exploring age, when he's enjoying lugging around his bigger toys, and laughing over them making that big "THUD" when he drops them.  The Flintstones -- or specifically, the Rubbles family -- were our natural choice.

Here are our costumes:


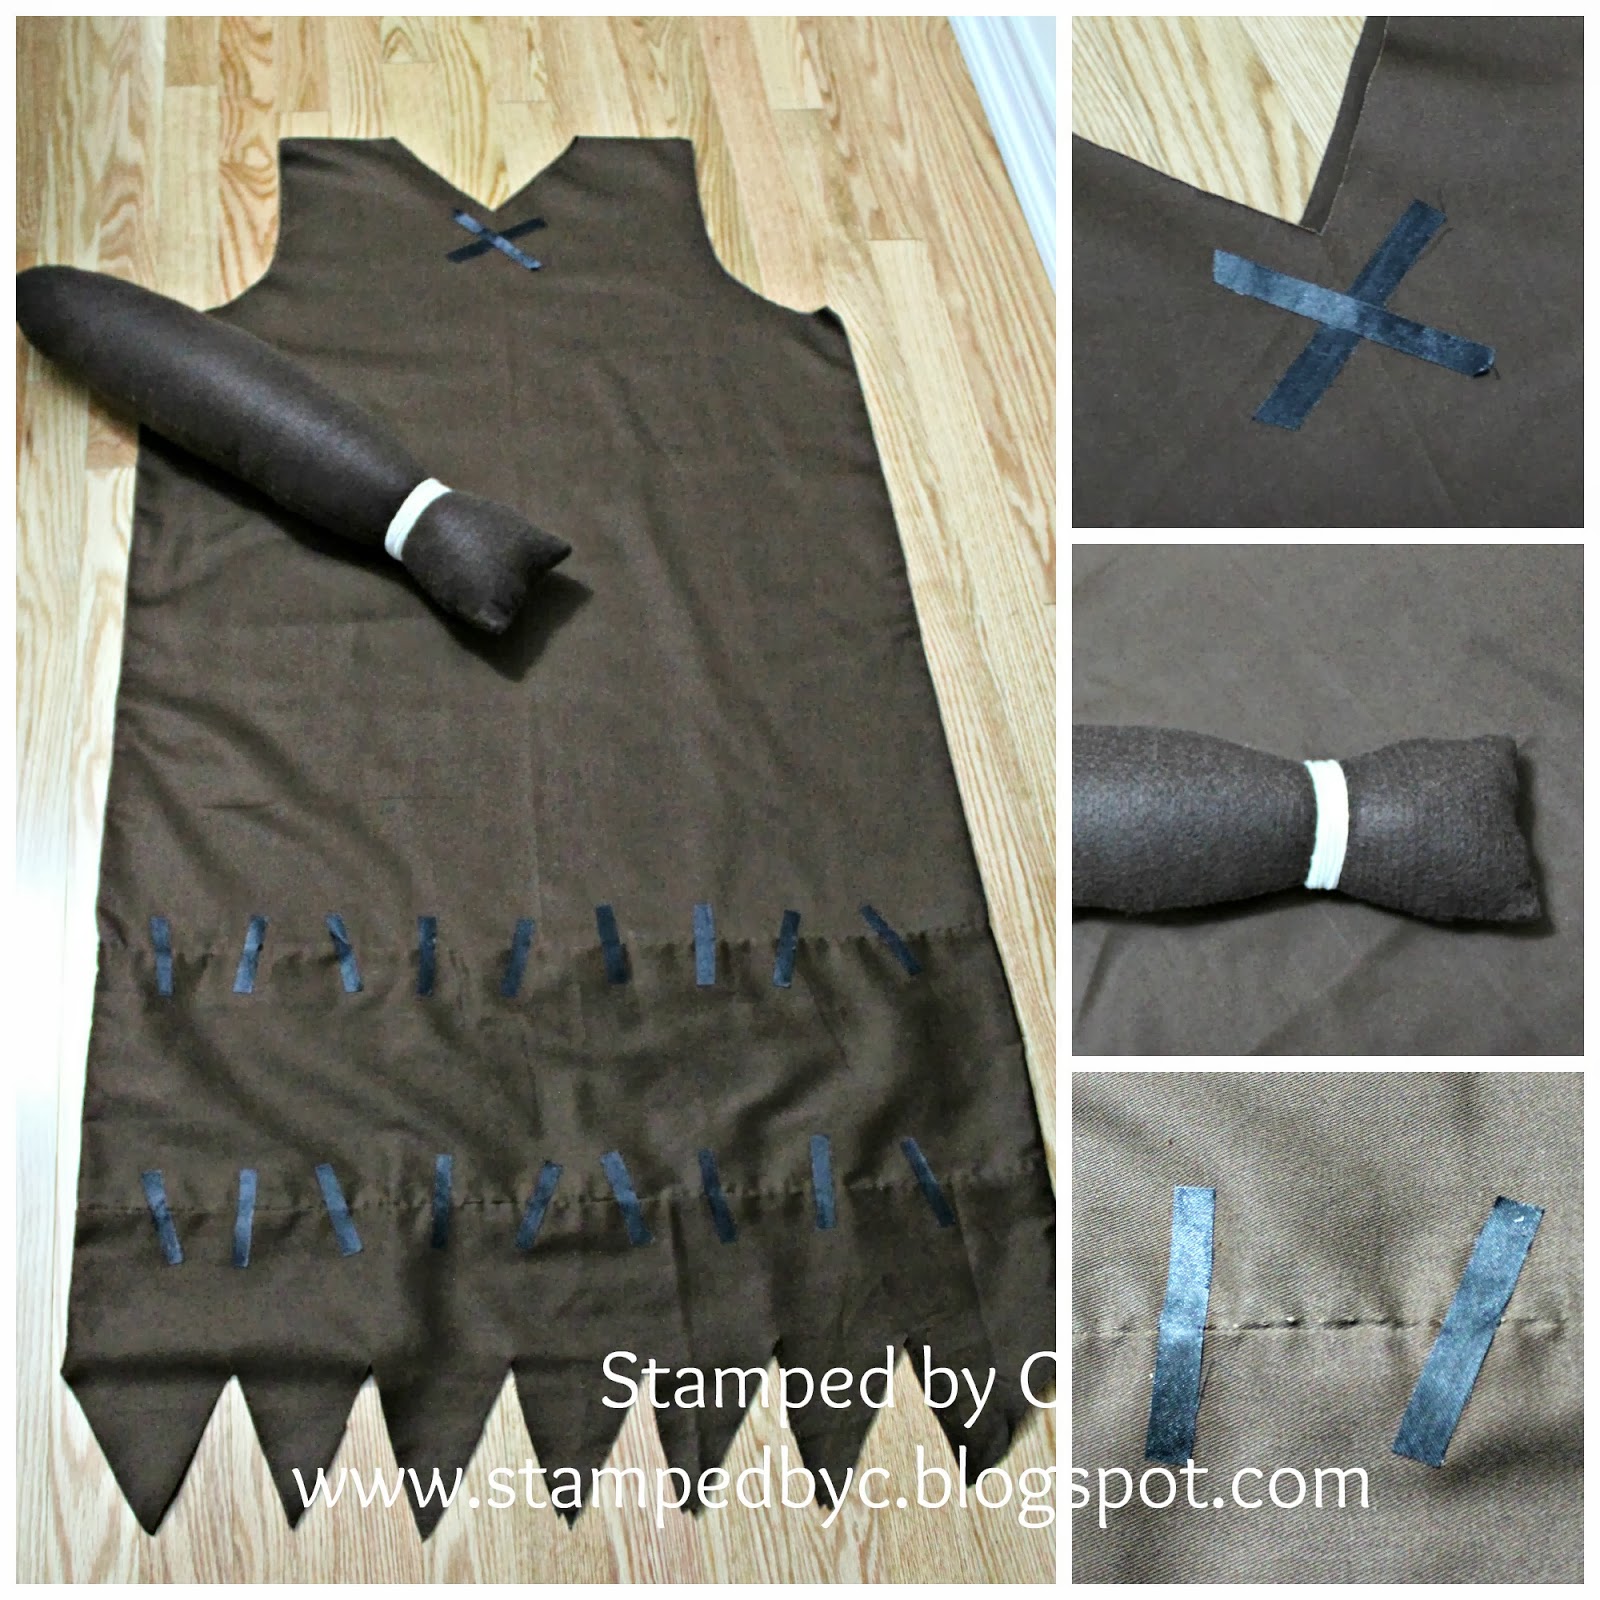
This is R's costume, who is of course, Barney Rubble.  I made his costume out of brown twill fabric.  I used his t-shirt for my pattern, chopped off the sleeves, and extended then cut the hem to make his costume.  For the "X," I used black ribbon.  I used the same black ribbon to accent the costume.  I attached the ribbons to the twill using fabric glue.  For his club, I drew a rough pattern on felt, and stuffed it with Polyfil.  I accented the handle of the club using kitchen twine.


This is my costume, as Betty Rubble.  I made it out of cotton interlock.  I made a simple tube dress, laced black ribbon through the neckline.  The white "shell" was made out of polymer clay (another first for me).


Lastly, this is r's Bamm Bamm costume.  I cheated a little bit with this, since I chose to use his white onesie, and orange pants and hat, which I bought from the store.  I modified the pants and the hat by gluing black spots made out of black ribbon that I cut up.  The brown sash was made with a strip of felt.  His club was made out of felt, also stuffed with Polyfil, and accented the handle with kitchen twine.  The bone was made out of polymer clay, too.

I chose to make our costumes instead of buying them, because r will be running around at the party, and we all wanted to be comfortable while chasing him around.

Thanks for looking, and have a great day!

Friday, August 9, 2013

My First Digital Stamp!

Hi, everyone!

Today I wanted to try something different.  I've been hearing about digital stamps for a while now, but I haven't really tried to look into it.  Until Scrappy Moms Stamps announced that for their Terrific Tuesday Challenge, we need to use a digital element in our card to play along.

What an awesome excuse to try something new!

I picked out a free digital stamp from Digital Delights by Louby Loo, Rowena the Fish.  She was perfect, because one of my cousins got engaged, and I wanted to make her an engagement card.

Before I share my card, I do want to say the following:
1.  This is my first digital stamp (I was not sure how to use it, but Digital Delights by Louby Loo actually had instructions on their site, so that was really helpful for a newbie like me)
2.  I was never good at coloring when I was younger (and the skill did not improve with age, as you can see)
3.  I wanted to use a circle framelit, but I do not own one (boo!), so now I have an excuse to hoard buy more tools/supplies.
4.  I used Stampin' Write Markers, which are the best quality markers I own currently.  The faults in coloring are mine, and is not a reflection of the markers (I love my Stampin' Writes!).  Do I hear anyone say Copics?  Please see #3 above. :p

In short, please be gentle with me when looking at my card.  Comments are of course always welcome, and very appreciated.  Tips/tricks/suggestions, as well. :)

My card:


And because I'm a glutton for punishment all about sharing with you what I make, here is the digital stamp up close:


I used the following to make my card:
Digital stamp:  Rowena the Fish (Digital Delights by Louby Loo)
Sentiment stamp:  My Pink Stamper (now retired)
Paper:  Light blue, light green, and white card stock from my stash
Ink:  Jet Black StazOn
Embellishment:  Blue-green rhinestones from my stash
Tools:  Scalloped Squares Nestabilities; Seeing Spots embossing folder (Cuttlebug), Big Shot, Stampin' Write Markers

Thanks for looking, and have a great day!

Monday, August 5, 2013

When Things Don't Go Your Way

What do you do?

Several weeks ago, I took a big risk.  Sadly, it did not pay off.

It took me several weeks and several drafts before I can even blog about it.

Now, I'm glad I took the time before I hit "Publish," because it gave me time to put things in perspective.  When we don't get what we want, when we fail at something, when things don't go the way we planned, it's natural to feel sad, disappointed, devastated, and discouraged.  But after the initial shock had worn off, we still need to figure out what to do next, how to pick up the pieces and move on.  I think that was the hardest part for me -- getting up after I've been knocked down.

So I took stock of my blessings:
1.  My family -- my husband and my son, my parents, sisters, and in-laws, who love me unconditionally and support me fully

2.  My work, which is fulfilling, despite being a great source of stress; for being a source of financial security for me and my family, and for being my excuse allowing me to have my papercrafting/scrapbooking/cardmaking/hobby-baking hobby

3.  My hobby, and this blog, which are sources of joy and calm when things are swirling out of control; for the quiet time I get when indulging in my creative pursuits that lets take a step back and evaluate what really matters

4.  My readers, who view and read my blog to see what I've shared.  I hope what I share and what I create gives you inspiration.  Please know that you inspire me to blog, and to keep creating (every chance I can).

And I realized that I have all that I need to try again, to take more risks, the same risks, different risks, to face challenges, and to overcome them.

I'm writing this post and sharing this, first for myself, because I know that there will be many, many more times in the future when things will not go the way I planned, and I need to remember all these so I can get up and try again.  I am also sharing this to maybe inspire someone who is trying to overcome a hurdle that life threw their way.


I don't know if you can tell from the picture below, but the card stock has this beautiful sheen to it.  It makes a very pretty card.  Making this card definitely lifted my spirits, and I hope that whoever receives this card will feel the same way.


And lastly, the sentiment, which I felt was very appropriate:


I really don't know what the "end" is for me and my "risk," but I am hopeful that everything will work out for the best for me and my family.

Thank you all for looking, and I hope you have an encouraging day!

Tuesday, July 30, 2013

2 for 1 card

I needed to make two cards for two friends.  I needed to thank a friend for doing me a HUGE favor (and she didn't have to), and one for a friend who is recovering from a car accident (awful, I know, but she got through the whole thing like a champ).

Usually, I'll make two different cards, but I had the idea for the card design in my head, and I wanted to see if I can make it work for two cards -- 2 for 1.


The sentiments are from my all-time favorite, the very versatile Delightful Dozen.  It has 12 different sentiments for different occasions.  It's one of my first sentiment stamps from Stampin' Up!, and I love it!

I admit, I was a little stumped on the color combination.  I wanted to use a cheery yellow card base (Stampin' Up Daffodil Delight cardstock).  Since I know purple goes pretty well with yellow, I took a chance.  I'm pretty happy with it.

I cut out a window on my card front using my Big Shot and a Framelit for the "watercolored" flower to peek through and I placed 4 purple rhinestones on each corner of the "window" for accent.

Oh, and the flower is from Stampin' Up!'s Simply Soft stamp set.  It's a two-step stamping set, which gave a beautiful, watercolored effect.  I stamped it on a Very Vanilla cardtstock from Stampin' Up! for my mat.  I wanted a light colored cardstock so that I can write my message on the inside of the card with any pen/ink I want.  I used a Ticket corner punch for the corners, to mirror the corners on the "window" and to give it a more finished look.


Thank you for looking, and have a great day!

Friday, June 21, 2013

Mojo Monday 298 - Baby Shower Card

I'm attending my cousin's wife's baby shower (my cousin-in-law?) on Saturday, and while I do have her gift ready to be wrapped, I did not have a card made.  Yet.

I was drawing a blank in terms of inspiration, so I looked at the Mojo Monday sketch for this week:

Julee's sketch did not disappoint!  As soon as I saw the sketch, my mind started thinking of a perfect card for my cousin's wife.  Here is what I came up with:


Here is a photo of the stamped image, up close:


I kept the inside of the card plain, but I did stamp the corresponding sentiment from One in A Million in Tempting Turquoise.

I used the following products for my card:
Stampin' Up:  One in A Million stamp set, card stock (Pool Party, Whisper White, Soft Suede, and DSP), inks (Tempting Turquoise, Soft Suede); Chevron embossing folder, Big Shot, Stampamajig
Non-Stampin' Up:  Footprint stamp

Thanks for looking, and have a great day!

Thursday, June 20, 2013

Owl Anniversary Card

This month, R and I celebrated our fourth wedding anniversary.  Can you believe we've been married for four years already?  Time definitely flew by.

For our anniversary, I made a simple window card for R.


I finally got to pull out my Stampin' Up! owl punch.  It's one of the first punches that caught my eye, when I was new to Stampin' Up.  I just think the owl is so darn cute.  And two owls are even cuter, so I made two. One for C, one for R (R's owl looked a bit googly-eyed, but that's the point :p).

I cut them out of Soft Suede card stock, and then their bellies in Marina Mist and Regal Rose card stocks.  The eyes are made of Basic Black card stock with googly eyes from my stash.  The Real Red heart was cut from the retired Heart to Heart punch.  The sentiment was from Teeny Tiny Wishes stamp set, on Whisper White card stock, and punched out with the Word Window punch (another one of my favorites).

I cut the "window" on both the Soft Suede card base and the Early Espresso mat using the 2-1/2 circle punch.  Then I ran the Early Espresso mat on the Big Shot, with the Woodgrain embossing folder -- and voila! -- instant tree bark!


The owls were laid on another Early Espresso mat on the inside of the card, with the sentiment, to make them stand out..


I really like my owls -- I think they're super cute!

Thanks for looking, and have a great day!

P. S.  Photos are again taken with my iPhone5.  I should get my camera back this weekend (hopefully).