Christmas is only two weeks away, and I wanted to show my co-workers how much I appreciate all the nice things they did for me all year with a little gift.
I made little treat tubes using 1x8 cellophane bags (124134) and filled them with candy. I then sealed the tops of the bags using toppers made using the 25 and Counting stamp set (Wood: 123792; Clear: 123794). I stamped the images using Cherry Cobbler (126966), Riding Hood Red (126968), Garden Green (126973), and Always Artichoke (126972) classic ink pads on scraps of Whisper White cardstock (100730). I used my 1 inch square punch (124094) to punch out the images and then adhered them on a base of Cherry Cobbler (119685), Riding Hood Red (111348), Garden Green (102584), and Always Artichoke (105119) cardstock.
Here's a closer look at the treat tubes and their toppers:
I will put these treat tubes on tall clear vases and leave them at each co-worker's desk on Dec. 20th (I am off on Dec. 21st). I think these treat tubes will make nice presents, and I hope my co-workers will like them!
All of the products I used for these treat tubes (except for the clear vases and the candy) are available at my Stampin' Up! store.
Thank you for looking, and have a great day! :)
P. S. While I was making these tubes, I was thinking of my 2-1/2 year old niece, who is just learning to say what Santa says on Christmas. When prompted, she will say, "Ho! Ho! Ho! Merry Christmas!" and then giggle, and that puts a smile on my face. :)
Tuesday, December 11, 2012
Monday, December 10, 2012
C is for Celebrate!
The holidays are coming, and I'm in a festive mood. I'm also in the mood to make a monogram card.
I wanted to make a purple card, so I used Wisteria Wonder cardstock (122922) as my base. I layered over that a mat of First Edition Specialty DSP (121878).
I created the "window" for my monogram by punching a 1-3/8 circle on the First Edition Specialty DSP using the 1-3/8 circle punch (119860), adhering the mat on the card base using Snail adhesive (104332), and then punching a slightly smaller circle on the Wisteria Wonder using the 1-1/4 inch circle punch (119861). This creates a nice border of Wisteria Wonder around my monogram "window."
I stamped "C" using the Broadsheet Alphabet stamp set (Wood: 118724; Clear: 127796) in Elegant Eggplant (126969) on Whisper White cardstock (100730), which I also punched out using the 1-1/4 inch circle punch (119861). I adhered the circle on the inside of my card for a nice contrast.
Here's a closer look at the monogram.
I stamped the "celebrate" sentiment using the Fabulous Phrases stamp set (Wood: 117002; Clear: 120501) on a scrap of Whisper White cardstock (100730), also in Elegant Eggplant (126969). I placed an Elegant Eggplant brad (from the 3/16 Regals brads, 119737) and then trimmed one end of the cardstock to create interest. I then popped it up using Stampin' Dimensionals (104430).
All of these products are available for purchase at my Stampin' Up! store.
Thanks for looking, and have a great day!
Mojo Monday 270
I am back to playing at Mojo Monday -- and I just realized that I missed the deadline to upload my photo via their linky by 2 whole hours. I did have my card made and ready by Friday, but I just did not get to a computer until now.
Last Friday, my mom and I took my son to his pediatrician for a well-baby visit, and he got 3 of his shots done. I've never liked needles, and I'm scared of shots myself so it's always tough for me to take him to his doctor's appointments. I have to tough it out each time, though, because I want to support him and be there for him. Boy, being a mommy is not easy. :)
He napped on Friday after the doctor's, so I managed to make this card.
This is based on the sketch here:
I had gone through my stash of cards several days ago, and I realized that I was running low on everyday cards. I love this sketch because it was perfect for the "Hello" sentiment from Lacy and Lovely (Wood: 122885; Clear: 122887), stamped in Marina Mist (126962) on a scrap of Whisper White cardstock (100730).
I used the Festival of Prints DSP (126904). This paper stack is certainly awesome for holiday cards, but I'm happy to say that it works out well for an everyday card, too. I placed a late order for this baby, and I wanted to be able to use the DSP long after the holidays. I punched one edge of the DSP using the Scallop Trim border punch (118402). It's one of my favorite punches.
I used Marina Mist cardstock (119682) for the base, and Early Espresso cardstock (119686) for the mat. For a nice pop of color, I made flowers using Daffodil Delight cardstock (119683), cut using the Floral Fusion Sizzlits (115969) and the Big Shot (113439). The flowers were held together using Early Espresso brad (3/16 Neutrals brads, 119737). I ran a Daffodil Delight 1/4 inch Stitched Grosgrain ribbon (126872) over the DSP.
All of the products I used for this card is available for purchase at my Stampin' Up! store.
Thanks for looking, and have a great day!
P. S. A new Mojo Monday sketch will be up tomorrow, and I hope I can get my card in before the linky closes next Sunday. :)
Last Friday, my mom and I took my son to his pediatrician for a well-baby visit, and he got 3 of his shots done. I've never liked needles, and I'm scared of shots myself so it's always tough for me to take him to his doctor's appointments. I have to tough it out each time, though, because I want to support him and be there for him. Boy, being a mommy is not easy. :)
He napped on Friday after the doctor's, so I managed to make this card.
This is based on the sketch here:
I had gone through my stash of cards several days ago, and I realized that I was running low on everyday cards. I love this sketch because it was perfect for the "Hello" sentiment from Lacy and Lovely (Wood: 122885; Clear: 122887), stamped in Marina Mist (126962) on a scrap of Whisper White cardstock (100730).
I used the Festival of Prints DSP (126904). This paper stack is certainly awesome for holiday cards, but I'm happy to say that it works out well for an everyday card, too. I placed a late order for this baby, and I wanted to be able to use the DSP long after the holidays. I punched one edge of the DSP using the Scallop Trim border punch (118402). It's one of my favorite punches.
I used Marina Mist cardstock (119682) for the base, and Early Espresso cardstock (119686) for the mat. For a nice pop of color, I made flowers using Daffodil Delight cardstock (119683), cut using the Floral Fusion Sizzlits (115969) and the Big Shot (113439). The flowers were held together using Early Espresso brad (3/16 Neutrals brads, 119737). I ran a Daffodil Delight 1/4 inch Stitched Grosgrain ribbon (126872) over the DSP.
All of the products I used for this card is available for purchase at my Stampin' Up! store.
Thanks for looking, and have a great day!
P. S. A new Mojo Monday sketch will be up tomorrow, and I hope I can get my card in before the linky closes next Sunday. :)
Labels:
big shot,
card,
hello,
mojo monday,
stampin up
Sunday, December 2, 2012
With Sympathy (SCS 409)
Several weeks ago, when I decided to return to blogging and paper-crafting, I decided that I will try to be more active in card-making by joining challenges.
I picked the SCS Card Sketch challenge, and I used this sketch (SCS 409):
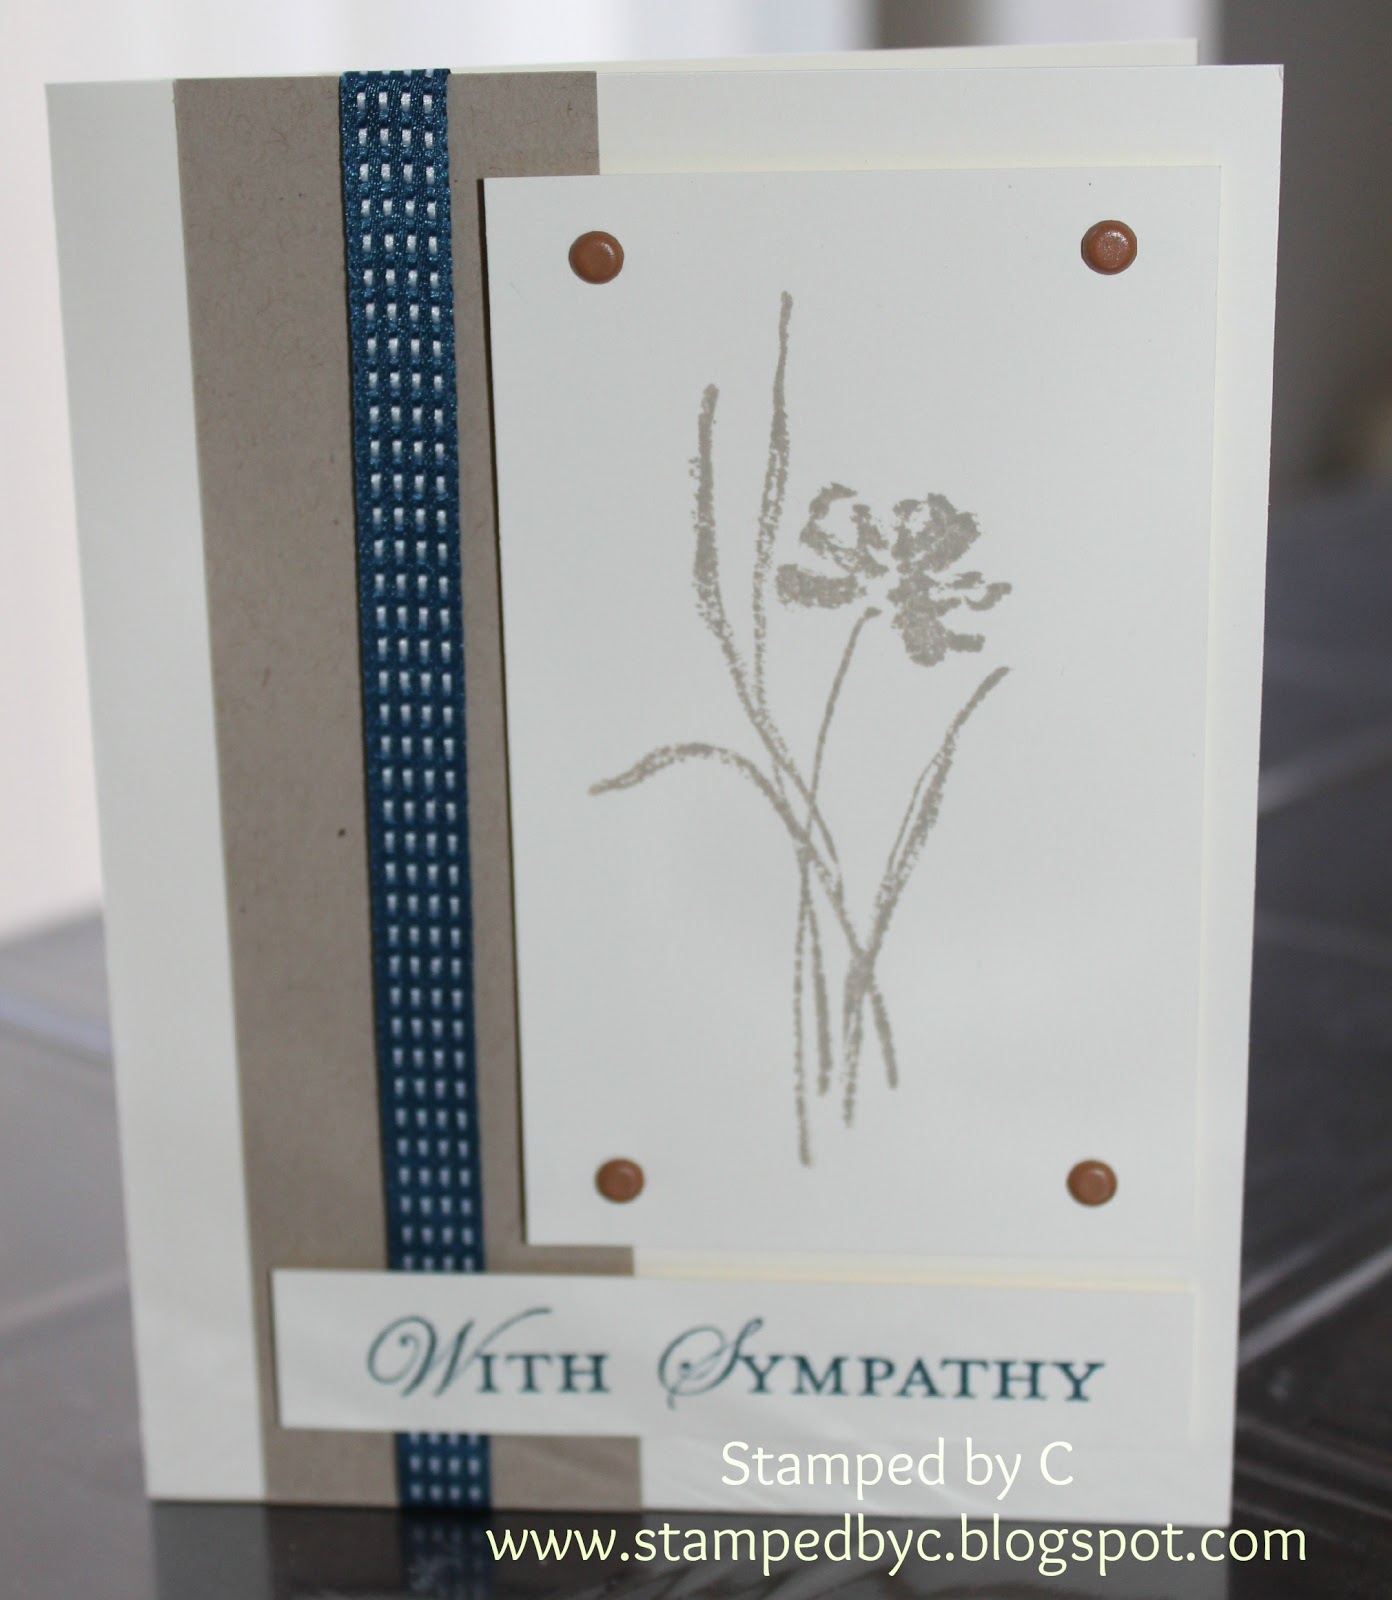
This is my take on the sketch:
Unfortunately, I needed a sympathy card for a colleague who lost his parent. I hope I'll need fewer of this card in the future.
The card was made with Very Vanilla cardstock (101650) base, layered with a strip of Crumb Cake cardstock (120953), layered with Midnight Muse 3/8" Stitched Satin ribbon (126847). I used the Love and Sympathy stamp set (Wood: 122795; Clear: 122797) for the image, inked using Crumb Cake Classic Stampin' pad (126975). The sentiment "With Sympathy" was from the Loving Thoughts stamp set (Wood: 125843; Clear: 125845) using Midnight Muse Classic Stampin' pad (126860).
All these products are available for purchase at my Stampin' Up! store.
Thanks for looking, and have a great day!
Friday, November 30, 2012
Thank You Cards
Our son received presents from family and friends for his baptism, and so I whipped up this quick and simple Thank You card for everyone's thoughtfulness.
The card base is made from Pool Party cardstock (122924). Whisper White cardstock (100730) was used as a mat. I scored the Whisper White with three lines above the sentiment to create a subtle texture using the Simply Scored Scoring Tool (122334).
I used my Circle Circus stamp set (Wood: 115778; Clear: 127784) to stamp 4 circle images in Pacific Point (126951) and Early Espresso (126974) Classic stamp pads. The images were punched using 1-1/4 circle punch (119861) and popped up with Stampin' Dimensionals (104430). The sentiment "Thank You", which was stamped in Pacific Point (126951), is from the Lacy and Lovely stamp set (Wood: 122885; Clear: 122887).
I have to say, I loved Circle Circus and Lacy and Lovely! I can't believe I waited almost a year before I got the Circle Circus (I'm glad it carried over from last year's catalog), and how I was on the fence with the Lacy and Lovely. I'm so happy I finally gave in and bought these two sets. They are so versatile. I can use them for masculine and feminine cards for all occasions.
These products are available for purchase at my Stampin' Up! store.
Thanks for looking, and have a great day! :)
The card base is made from Pool Party cardstock (122924). Whisper White cardstock (100730) was used as a mat. I scored the Whisper White with three lines above the sentiment to create a subtle texture using the Simply Scored Scoring Tool (122334).
I used my Circle Circus stamp set (Wood: 115778; Clear: 127784) to stamp 4 circle images in Pacific Point (126951) and Early Espresso (126974) Classic stamp pads. The images were punched using 1-1/4 circle punch (119861) and popped up with Stampin' Dimensionals (104430). The sentiment "Thank You", which was stamped in Pacific Point (126951), is from the Lacy and Lovely stamp set (Wood: 122885; Clear: 122887).
I have to say, I loved Circle Circus and Lacy and Lovely! I can't believe I waited almost a year before I got the Circle Circus (I'm glad it carried over from last year's catalog), and how I was on the fence with the Lacy and Lovely. I'm so happy I finally gave in and bought these two sets. They are so versatile. I can use them for masculine and feminine cards for all occasions.
These products are available for purchase at my Stampin' Up! store.
Thanks for looking, and have a great day! :)
Thursday, November 29, 2012
Baptism Favors
My son is now 6 months old, and we just got him baptized a few weeks ago, when my Dad was visiting us. After the ceremony, we celebrated his baptism with a luncheon at a restaurant with family and friends.
Everything (except for the candy inside the box) was handmade by me. I made 91 of these favors especially for the event.
What? 91??? Was I crazy? Not really. :) I wanted to make sure I had enough favors for each guest. I did not want them to miss out on the yummy treats, and I wanted to thank them for coming to the baptism.
The favors were very easy to make. I used my Big Shot (113439) and Stampin' Up!'s Pillow Box die (retired) to cut Window Sheets (114323). I assembled the pillow box and held it securely with Sticky Strip (104294).
The belly band was made with 3/4 inch Marina Mist cardstock (119682), which was crimped using the Paper Crimper (retired) and trimmed to fit snugly around the middle of the box. I stamped "thanks" from the very versatile Fabulous Phrases stamp set (Wood: 117002; Clear: 120501) using Early Espresso ink pad (126974) on Whisper White cardstock (100730). I punched out the sentiment with the Large Oval punch (119855) and layered it over Early Espresso cardstock (119686) that was punched out using the Scallop Oval punch (119856). The ovals were popped up using Stampin' Dimensionals (104430).
Quick tips on making a lot favor boxes:
1. Have all the "components" pre-cut and ready to go.
2. Assemble each "component" step-by-step. I finished all the boxes first (left one flap open so I could fill them with the goodies). I crimped all the belly bands, stamped all the sentiments, and layered my ovals.
3. I used a measuring spoon to get equal amounts of each color into the box, and laid it carefully flat after I've sealed the flap to prevent the treats from mixing into each other (and ruining the effect I was aiming for).
I really enjoyed making these favor boxes. All products (except for the retired items) are available for purchase from my Stampin' Up store. Please click on the link on the top right corner of the page to shop now.
Thanks for looking, and have a great day! :)
The belly band was made with 3/4 inch Marina Mist cardstock (119682), which was crimped using the Paper Crimper (retired) and trimmed to fit snugly around the middle of the box. I stamped "thanks" from the very versatile Fabulous Phrases stamp set (Wood: 117002; Clear: 120501) using Early Espresso ink pad (126974) on Whisper White cardstock (100730). I punched out the sentiment with the Large Oval punch (119855) and layered it over Early Espresso cardstock (119686) that was punched out using the Scallop Oval punch (119856). The ovals were popped up using Stampin' Dimensionals (104430).
Quick tips on making a lot favor boxes:
1. Have all the "components" pre-cut and ready to go.
2. Assemble each "component" step-by-step. I finished all the boxes first (left one flap open so I could fill them with the goodies). I crimped all the belly bands, stamped all the sentiments, and layered my ovals.
3. I used a measuring spoon to get equal amounts of each color into the box, and laid it carefully flat after I've sealed the flap to prevent the treats from mixing into each other (and ruining the effect I was aiming for).
I really enjoyed making these favor boxes. All products (except for the retired items) are available for purchase from my Stampin' Up store. Please click on the link on the top right corner of the page to shop now.
Thanks for looking, and have a great day! :)
Friday, November 16, 2012
Stampin' Up Does It Again!
Doesn't it seem like it was only yesterday that Stampin' Up! offered all of their stamps for 15% off? (Yes, I'm sorry, I did not get to post that on my blog...but I did remind all of my customers, and most of them took advantage of the sale, with my FREE shipping promotion. Whew.).
I know I ordered several stamp sets...and I'm just now "playing" with them*. :)
And now, Stampin' Up! announces Online Extravaganza, where from November 19-28, popular items are 20 to 50% off! Yup -- you read it right -- 50% off!!!
And there are even 24-hour "doorbusters" -- including a Big Shot, the doctors' bag, and the clear block bundle! The sale prices for these doorbusters are good for 24 hours only!
Details here.
There is no minimum purchase for this sale. That means buy 1, or all, and you get the sale price!
It can't get any better than that...or wait a minute! It can! Combined with my exclusive FREE SHIPPING for the month of November offer -- and you got yourself an awesome deal!
-----
*P. S. I've been making some cards and will be sharing them on my blog hopefully sometime next week. Thanks for your patience, and thanks for looking! :)
I know I ordered several stamp sets...and I'm just now "playing" with them*. :)
And now, Stampin' Up! announces Online Extravaganza, where from November 19-28, popular items are 20 to 50% off! Yup -- you read it right -- 50% off!!!
And there are even 24-hour "doorbusters" -- including a Big Shot, the doctors' bag, and the clear block bundle! The sale prices for these doorbusters are good for 24 hours only!
Details here.
There is no minimum purchase for this sale. That means buy 1, or all, and you get the sale price!
It can't get any better than that...or wait a minute! It can! Combined with my exclusive FREE SHIPPING for the month of November offer -- and you got yourself an awesome deal!
-----
*P. S. I've been making some cards and will be sharing them on my blog hopefully sometime next week. Thanks for your patience, and thanks for looking! :)
Subscribe to:
Posts (Atom)