Showing posts with label stampin up. Show all posts

Wednesday, December 8, 2021

Embossed Purple Flower Birthday Card

I always find myself needing birthday cards.  With a big family and many friends whom I don't see as often as we typically would, birthdays always come up sooner than I expect.

Going through my old stamp sets, I found this beautiful Stampin' Up set (Flower Fest).  The images were just begging to be embossed, and embossed them, I did.

Using Versamark ink, I stamped the images and then embossed them using Stampendous embossing powder in Violet and Olive.  I punched the flower image using the coordinating scalloped circle punch, and popped it up on some foam tape.

The sentiment was from Stampendous (Happy Messages) and was stamped in beautiful Grape Crush ink by Catherine Pooler.  I just love how vibrant it looks in real life.  The photo really does not do it justice.


What do you do with your old stamp sets?  Do you purge your sets or do you continue to use them?  I love that I'm still able to use my old sets.

Thanks for looking, and have a great day!

Tuesday, December 7, 2021

Candy Cane Tags

My 9-year old wanted to give candy canes to all of his classmates for Christmas.  I am generally averse to all these sugar, but it's the holidays and I figured we can all use some candy canes this time of the year.

We got 2 boxes of candy canes from Michael's (Sour Patch flavored, of course).

Then, I got started with making these tags.  I cut out 23 tags using a Hero Arts Nesting Tags die out of kraft cardstock, and white stitched labels using a Simon Says Stamp Stitched Rectangles die.

I stamped a green (Catherine Pooler Grass Skirt) Christmas tree using an image from Stampin' Up's Scentsational Season.  I think this is a retired stamp set. :(

The "Season's Greetings" sentiment again came from "More Merry Messages," also from Stampin' Up.

The "To" and "From" were from an old Papertrey Ink stamp set (Boxes, Bags, and Tags), and they were the perfect size for my white stitched labels.

My son will write his classmates's names on the label, then we will use the sparkly red ribbon to tie the tags on the candy canes.

Thanks for looking, and I hope your day is as sweet as a candy cane!

Monday, December 6, 2021

Red, White, and Green Christmas Card

So excited to share this card with everyone today.

I'm a little late to the holiday card-making party, but I thought I can still make some cards to get back into the swing of things.  Starting with this one. :)

While waiting for my new stamps to arrive, I used my good old Stampin' Up stamp sets:  Ornament Keepsakes and More Merry Messages.

I stamped these on white cardstock using my new awesome Catherine Pooler inks:  Spruce, Eucalyptus, and Rockin' Red.  It was my first time trying out these inks (needed to update my ink pads, too), and I was blown away!  Super crisp images, and all you need is a little tap.  

I embossed the ornaments with Versamark ink and Stampin' Up Clear embossing powder, then cut them out using the coordinating Framelits dies.

I looped some black and white twine around the ornaments, popped them up with some foam tape, and and mounted these on dark green card base.

The sentiment was stamped with my go-to black ink (Memento Tuxedo Black), and I'm glad it has not let me down.

I'm entering this card to Sunday Stamps Winter Wonder Challenge, using 3 colors from their palette and a neutral of our choice.

Thanks for looking and have a great day!

Saturday, February 7, 2015

Beer Birthday Card

I can't believe it's February already!!!

This Saturday, my sister-in-law's boyfriend will be celebrating his birthday, so I made him -- a cake!!!

Just kidding.  Of course, I made him a card.

I typically struggle with masculine cards (I lack inspiration!!!), but I think I got this down pat.  He likes to drink beer, so I thought this the perfect card for him:


I cut the mug twice, once in acetate, and once in medium yellow cardstock, to give the illusion of glass.  It's hard to see in the photo, but you can sort of see the outline of the "glass" mug here:


I covered the beer froth in Stickles, to mimic the bubbles.  I know, it looks kind of glittery rather than frothy, but I think he will get a kick out of it.


I used these materials/supplies for this card:
Cricut Expression (I'm tempted to upgrade to an Explore, but I just can't let go of my very first E!)
Everyday Pop-up Cards (Cricut cartridge)
Bright yellow, medium yellow, and light yellow cardstock (my stash)
Black and white cardstock (my stash)
Sentiment (Happy Hour stamp set, Stampin' Up!)
Memento Tuxedo Black Ink - love, love, love this ink pad
Spots and Dots (Cuttlebug embossing folder)
Stickles
Sizzix Big Shot
Foam tape
ATG gun

Thanks for looking, and have a great day!  Cheers! ;p

Wednesday, December 31, 2014

Flower Note Cards

Still in line with keeping my stash of cards well-stocked for the new year, I CASE'd these note cards from Pinterest (see the original cards here).  As soon as I saw these, I knew I wanted to re-create them.


They were so cute, and so simple, and so easy to make.  Making these 6 note cards took me around 15 minutes.


Each note card is 3 inches x 3 inches, which is the perfect size for a quick note, or for enclosing with a gift.

I purposefully left the note cards without a sentiment, so that I will have more versatility in using them.  I figured I can easily stamp and add a sentiment (to fit my needs) later on.

What about envelopes, you ask?  Please check out my quick tutorial here.

I used these supplies and products (please click on the link to buy):
Posy Punch stamp set (Stampin' Up!)
Rich Cocoa ink pad (Memento)
Tangelo ink pad (Memento)
Mini brad (my stash)
Kraft cardstock (Recollections)
White card stock (Georgia Pacific)
Patterned paper (my stash/scraps)
Fancy Flower punch (Stampin' Up!)
3/4 circle punch (EK Success)

I love, love, love these 3x3 note cards!

Thanks for looking, and have a great day!

Monday, December 22, 2014

Christmas Cards and Tags

I'm interrupting the organization theme of my posts to share with you my Christmas card this year.  I know, I can't believe I'm posting it just three measly days before Christmas.  I also can't believe I've forgotten to post it before.

Anyway, here it is:


This year, I decided that I wanted to simplify my card-making process, so I chose to mass-produce a single card design (see last year's card, gift card holders for teachers and coworkers, and tags).  This will serve as our Christmas card and our gift card holder this year.

This card is my interpretation of a card I saw at the crop I attended.  I only saw a peek of it (the lady next to me was mass-producing them) because I was busy making my own project, but I'm fairly satisfied with how it turned out.

Here is a closer view of the ribbon, the snowflake (it was so hard to capture it well on camera, since it's shiny surface was reflecting light like crazy) and the embossing:


And here is the inside of the card:


I also made some tags for my husband's and my presents to our coworkers.  Again, I decided to simplify by using and coloring a single stamp for our tags:


Please excuse the smear of ink on the bottom of this photo.  I saw this while I'm posting this photo.  I was able to change the tag before giving it to the recipient, but I didn't have time to take a photo).

Products Used:
Snow Swirled (Stampin' Up!)
Tags Til Christmas (Stampin' Up!)
Greetings of the Season (Stampin' Up!)
Stampin' Write Markers (Stampin' Up!)
Black embossing powder (Stampin' Up!)
Snowflake embellishment (Jo-ann's)
Black and white twine (my stash)
Red, white, shimmer, kraft, black cardstock (my stash)

Thanks for looking, and have a great day!

Organization: Punches

I guess I am in an organizing kick lately.  After sharing with you how I organized and stored my Cricut cartridges, handbooks, and overlays, I am now sharing with you how I organize my punches.

I own a variety of punches (old Stampin' Up! whale style and the new Stampin' Up! locking punches), and storing them in a way that still makes them really accessible has been the bane of my crafting existence.  I really wanted to use the Ikea Bygel rails that most crafters have been using to keep their punches, but my hubby is not very keen on the idea of me drilling holes on my craft room's wall.

After a lot of thought, I came up with this:


I purchased an Ikea table top and drilled holes on the underside of the table for the shorter Bygel rails.  Then I propped the whole table top against the wall, and -- voila! -- instant "wall" storage for my punch.  I was tempted to use the longer table top for this project, but I thought about how heavy it might get, and it may topple over.  

I keep my punch storage behind the door of my craft room, where it's out of the way, but still accessible when I need it.  I've also been very careful to lock the door to the craft room so r cannot get inside and get hurt if the punches fall over.

It's been working great so far, but if I outgrow this system, I just have to talk my husband into letting me drill holes on the wall.  And then I can use the table top as another desk in the craft room!

Thanks for looking, and have a great day!  

Wednesday, June 11, 2014

Flower Birthday Card

I'm baaaccck!!!  I've been gone for a while (wow, really?), and I'm pleasantly surprised that readers are still stopping by my blog.  I really, really appreciate that, so thank you very much.

My mother-in-law will be celebrating her birthday this Saturday with a picnic for the whole family, and I forced by husband to let me my husband asked me to make her a card. :p

She loves flowers and her garden, so I pulled out my Cricut and Walk in My Garden cartridge, and made her this:


Here is a closer view of the sentiment and the flowers.

I used the following to make the card:
Walk in My Garden Cricut cartridge
Turqouise and kraft cardstock (Recollections)
Yellow, orange, green cardstock (my scraps)
D'vine Swirls embossing folder (Cuttlebug)
Teeny Tiny Wishes stamp set for sentiment (Stampin' Up)
Word Window punch (Stampin' Up)
Stampin' Dimensionals (Stampin' Up)

I'm pretty happy with the card, and I hope my mother-in-law likes it, too. :)

Thanks for looking, and have a great day!

Friday, December 20, 2013

More Christmas Gift Card Holders!

All of you must think I'm a lousy gift-giver, since I'm giving out gift cards instead of a more personal, thoughtful gift.  But, my "giftees" (is there such a word?) all asked for gift cards for Christmas, so I'm more than happy to oblige.  After all, there are cute ways to give out gift cards, too, right?


Again, this is not my original idea -- I CASE'd (copied and shared everything) this card from this blog.  When I saw the photos of her gift card holders, I just thought they were so cute.  I'm glad she posted instructions on how to recreate them.


The outer pocket that holds the gift card and it's holder is cut out of red cardstock.  I used patterned paper as a mat on the front, to jazz it up a bit.  I'm not sure if you can see it on the photos, but the Christmas trees have glitter on them, which I thought was so pretty.

The actual gift card holder is made of green cardstock, and it slides into the outer pocket.  I cut it out with my Big Shot.


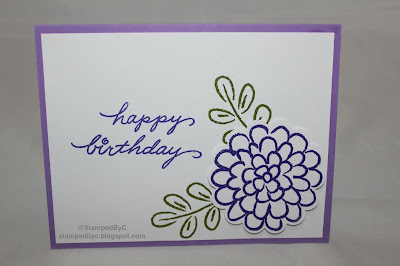
I then stamped my image on white cardstock, punched it out with a circle punch, layered it over a red scallop circle, and finally popped it over the green cardstock gift card holder.  I think the white, red, and green made a nice contrast.


Here are the products that I used to make these gift card holders:
Red and green cardstock (Recollections)
White cardstock (Georgia Pacific)
Patterned paper (DCWV)
Cottage Ivy ink (Memento)
Oh, Dear! stamp set for the Christmas tree (Stampin' Up)
Two Tags Die (Stampin' Up)
1-3/8" circle punch (Stampin' Up)
1-3/4" scallop circle punch (Stampin' Up)

Thanks for looking, and have a great day!

Santa Gift Card Holder Tutorial

While I was browsing through cards online for inspiration, I saw a cute Santa card that I wanted to recreate.  Unfortunately, I could not find the photo again.  So, this is not my original idea, but I wanted to share my take on it.


It's cute, and simple, and is perfect to hold a gift card for each of r's daycare teachers.

These are what you need to get started:


White, yellow, red, black cardstock (Recollections)
1-3/8" square punch (Stampin' Up)
1/2" circle punch (Stampin Up)

I intially wanted to use a smaller square punch for the inside of Santa's buckle, but it looked small around the "waist" so I used this instead:


I cut my card base (red) at 4-1/4" x 5-1/2" for an A2 sized card.  I cut a 2"x2" square out of yellow cardstock for the buckle.  I cut a 1-1/2" x 4-1/4" black strip of cardstock for the belt, and punched the inside of the buckle in black cardstock, using Stampin' Up's 1-3/8" square punch.  I then punched out 1/2" circles out of black cardstock for the buttons.


To assemble the card:
1.  Attach the black square to the yellow square of cardstock, making sure that the black square is more or less centered, for the belt buckle.
2.  Attach the black strip of cardstock to the red card base.
3.  Attach the belt buckle (see Step 1) to the belt, again making sure that the buckle is more or less centered.
4.  Attach two black circles for the buttons.

Ta-da!


See how nicely a gift card fits on the inside of the card.  I adhered a white card mat to the other half of my card for the message.


Quick, simple, easy, and cute!  I hope you try this.

Thanks for looking, and have a great day!

Thursday, December 19, 2013

Candy Cane Holder

Six days before Christmas!!!

For R's and my co-workers, and for r's classmates, I decided to give candy canes as a little gift for Christmas.  Although I think it's perfectly okay to just hand out candy canes to everyone, the papercrafter in me could just not pass up the chance to make something cute and papercraft-y to hold the little treats.


I made these candy cane holders out of the folded ornament card from Joys of the Season Cricut cartridge, at 3 inches.  I cut the actual card, and also the shadow of the card, to create a red border around the candy cane holder.


I stamped the image from Tags Til Christmas stamp set (Stampin' Up) in navy blue ink.  I think it's perfect for my ornament.


I punched the hole for the ribbon using my Crop-a-dile.

I used the following products for this project:
White and red cardstock (The Paper Comapany)
Night of Navy ink (Stampin' Up!)
Tags Til Christmas stamp set (Stampin' Up!)
Crop-a-dile
Silver ribbon (my stash)

I'm entering this project to this week's Fantabulous Cricut challenge, which is to make anything but a card (holiday edition).

Thanks for looking, and please stay tuned for more quick and easy Christmas projects.  Have a great day!

Friday, December 13, 2013

Angel Holiday Card

I am on a cardmaking roll this week -- but would you believe me if I told you that I just finished my Christmas cards this week?  Gasp.

In any case, I finished them, and I'm dashing to the post office today to mail them.

I chose this card to mass-produce, because I thought the angel was relatively simple to piece together, and I love window cards.


Again, the angel was pretty simple to put together.  I think. :p


I know it's not conventional holiday colors, but the message was definitely in the spirit of the holiday.


Here is the list of products I used:
Kraft cardstock (Recollection)
Shimmery white cardstock (Jo-ann's -- I don't know if they still sell it in the stores; I got mine 5 years ago)
Cricut cartridge (Joys of the Season)
Tsukineko Brilliance Moonlight White pigment ink
Stampin Up Oval Framelits (for the "window" of my card)
Stampin Up stamp (Snow Swirled)
Gold Stickles for the trumpet
Stampin Dimensionals

I'm entering this card to this week's Fantabulous Cricut Challenge.  The challenge this week is holiday cards.  Perfect!

Happy Winter Card

It's been snowing hard these past few days, so we can definitely feel that it's winter.  I'm not a winter person, because I get cold easily, but it doesn't stop me from watching all of the fun winter activities from inside our house.

I made this card for the Crafty Cardmakers challenge this week, which is to create a "winter fun" card, but it should not be a Christmas or New Year card.  I think it's a great challenge, and I really had to think to come up with this:


I'm not sure if you can tell from the photo, but I used shimmering white paper for my base.


This is how the card looks when it's opened (it opens at the slope):


I cut the sledding boy using my Cricut (I love his facial expression -- doesn't that say "winter fun?").  I popped him on some Stampin' Dimensionals and stuck him on the slope, so he looks like he's sledding down from it.

I cut the slope using a die from Papertrey Ink.  The sentiment is stamped in Bahama Blue ink on two layers of square cardstock (punched with two nesting Stampin' Up square punches).

The "snow" on the background is made from Stampin' Up's Dazzling Diamonds.

Here is a list of products I used:
White shimmer cardstock (JoAnn's -- I don't think they carry this anymore)
Blue, red, kraft, ecru, and black cardstock (The Paper Studio)
Cricut cartridge (Winter Frolic)
Papertrey Ink die (In the Meadow -- for the slope)
Memento Bahama Blue ink
Stampin' Up Happy Winter stamp set (for the sentiment)
Stampin' Up Dazzling Diamonds
Stampin' Dimensionals

I hope everyone has a happy and safe winter!  Thanks for looking, and have a great day!

Wednesday, December 4, 2013

Christmas Sparkle Card

Hi, everyone!  I hope you all had a great holiday.

This week's theme at the Less is More blog is "Sparkle."

Here is my interpretation of the challenge:


The sparkle elements are the Christmas trees, which I embossed in gold glitter.


The sentiment "Merry Christmas" is stamped in red ink, and then stamped offset in Versamark.  I then used clear embossing powder for that shadow effect.

Here is a list of the materials that I used for this card:
Kraft card base (Recollections)
Very Vanilla card stock (Stampin' Up)
Tree (Happy Winter, Stampin' Up)
Merry Christmas sentiment (Greetings 4 U, Stampin Up)
Versamark ink
Riding Hood Red ink (Stampin' Up)
Clear embossing powder (Stampin' Up)
Gold embossing glitter (Stampendous)

I'm entering this card to the Less is More Week 148 challenge.  The rest of the entries are here.

Edited to add:
I'm also entering this card to the Crafty Cardmakers challenge, at the suggestion of Viv, the challenge host. :) (Thanks, Viv!).  Check out the other awesome clean and simple cards here.

Thanks for looking, and have a great, and sparkling, day!

Sunday, November 24, 2013

Shoe Birthday Card

My husband comes from a big family, and on some months it feels like we're celebrating someone's birthday every week.

Not in November, though.  With 18+ people in the family (parents, siblings, and nieces/nephews), the honor of celebrating the only birthday in November belongs to my brother-in-law (he's really my husband's brother in-law, but for simplicity's sake, I will claim him as mine.  Lol.).

My brother-in-law, A, loves basketball shoes.  He loves the sport, but he loves the shoes more, so I made him this card:


Okay, it really is more of a sneaker than a basketball shoe card, but I'm sure he'll get a kick out of this, card, anyway.  Get it, "kick"? :p  Awful, I know.  Sorry, I can't help it.


I used the following products to make the card:
White, red, and black cardstock (Recollections)
Embossed red card mat using Cuttlebug embossing folder (Traffic Jam)
Shoe cut with Cricut cartridge (Boys Will be Boys)
Stampin' Up's Celebrate in Style stamp set for the sentiment (I love this sentiment -- and this stamp set is one of the first Stampin' Up sets I owned)
Memento ink (Tuxedo Black)
Stampin' Dimensionals to pop up the shoe and the sentiment

Actually, now that I've thought about it, I think he loves Michael Jordan the most, but I really can't put Michael Jordan in a card, right?

Thanks for looking, and have a great day!

Tuesday, November 19, 2013

Get Well Sooner!

When I was a student, the secretary of our program's director was very kind to me.  She let me bend her ear as I whined about my coursework, the countless exams and presentations that I had to prepare for, in addition to my regular coursework.  I talked to her about the stresses in my life as a lowly student, and she listened, offered advice and friendship, despite being busy with the demands of her own job.

I've climbed a few steps up the career ladder since then, and she still remains to be very kind to me.

I recently found out that she's been sick and is undergoing a barrage of tests in order for her doctors to arrive at a diagnosis.  I know she's a strong person, and she will rally through this, but I made her this card to let her know that she's in my thoughts, and that I wish for her to have a speedy recovery:


The three little flowers were die cut, and were adhered to the card with Stampin' Dimensionals for a little lift.


I used the following products on this card:
Turquoise card stock base (Recollections)
Whisper white card stock mat (Stampin' Up!)
Designer paper (DCWV, Nana's Nursery Baby Boy)
Background stamp (Hero Arts Shadow Stamps)
Sentiment (Stampin' Up! Sweetly Said)
Bahama Blue ink (Memento)
Sea Breeze ink (Versamagic)
Stampin' Up! Sizzlit Floral Fusion
Turquoise rhinestones

I'm entering this to the Less is More challenge this week, 146 - to use a designer paper in a clean and simple way.

I'm looking forward to checking out the other entries here.

Thursday, November 7, 2013

Less is More Bridal Shower Card

One of my cousins is getting married in the next few months, and her bridal shower will be held this Sunday.

What an awesome reason to make a card!  I've been meaning to make a card with a black background -- I think it will be so elegant.  I know black is not your typical bridal shower color, but it really makes the color pop.

See?


Here's a close-up view of the lattice die cut and the red hearts:


The sentiment is stamped in white chalk ink:


I used the following on this card:
Basic Black cardstock (Stampin' Up)
Real Red cardstock (Stampin' Up)
Whisper White cardstock (Stampin' Up)
Lattice die (Stampin' Up)
Heart to Heart Punch (Stampin' Up)
Cloud White chalk ink (Versamagic)

I'm entering this card into this week's Less Is More challenge (Week 144).  The challenge this week is to make a card with a dark background with a splash of color (or colors).

Dark background (black cardstock)?  Check.
Splash of color (red hearts)?  Check.

There are so many inspiring cards in the challenge blog.  It's a treat for the eyes.  Check them out!

Thanks for looking, and have a great day!

Friday, November 1, 2013

Sympathy Card

Like I've said before, I feel very sad whenever I need to make a sympathy card. :(

My co-worker's mother passed away, and since I could not go to the viewing, I'm sending her a card to let her know that she's in my thoughts and in prayers.

It's a very simple card, in white cardstock and Old Olive card base:


I stamped the images and the sentiment in Versamark, and embossed with black embossing powder.  The flower images are from Stampendous.  The sentiment is from Pink by Design.

Here is the inside of the card, stamped with a sentiment from Stampin' Up:


Thanks for looking.