Showing posts with label birthday. Show all posts

Sunday, January 16, 2022

Cute Lawn Fawn Birthday Card

I'm back again, this time with another mini slimline card for the Lawn Fawnatics Challenge Blog. The theme for the challenge is "Let's Celebrate!"

I decided on a birthday card because I always need a lot of birthday cards, and I think this card is a cute addition to my stash:

I created the background by die cutting the cardstock with the stitched mini slimline die from Crafty Meraki, lightly blending Tim Holtz blue distress ink, and using the Lawn Fawn confetti stencils on the background with two other shades of blue Tim Holtz distress ink.  On white cardstock, I stamped the images using Copic-safe ink, and colored them with Copic markers.  I'm still working my coloring/blending skills, but I'm sure I'll get there. :D  The smaller images from these Lawn Fawn stamp sets and coordinating dies are perfect for beginners to Copic coloring.  Also, these images are from 2 separate stamp sets -- I'll link the specific ones below.

I heat embossed the sentiment "Have a Wild Birthday" using embossing ink and black embossing powder.

I used the coordinating dies to cut out the images on my die cut machine.  I think it's really fun that the jungle animals are wearing party hats and the elephant looks like he's holding the frosting back for the cupcake.

I popped them images up with foam tape, and stuck them on the background, and then I have my "Let's Celebrate" card!

Supplies are below (affiliate links - thank you for supporting my blog at no cost to you), and thanks for looking!  Have a great day!

Friday, January 14, 2022

Watercolor Background

 I wanted to try my hand at creating a "watercolor background" but only on a portion of the card -- to create a focal point or to highlight a sentiment.  Here I used a painted 3 colors of ink using a water brush on watercolor paper.

From black cardstock, I die-cut 4 layers of the sentiment, "Happy" and adhered them together for dimension.  After making sure that the background is dry, I heat embossed the "Birthday" sentiment using black embossing powder and embossing ink.  

I used a black card base for a dramatic effect.

I am entering this card to the CAS Colours and Sketches Challenge.  The challenge this week is to focus on a central sentiment.

I used the following supplies (these are affiliate links -- if you purchase through my links, I earn a small commission to support my blog at no cost to you):


Thanks for looking, and have a great day!

Sunday, December 26, 2021

It's a Party!

To me, nothing says "Party!" like glitters.  Tons and tons of glitters.  So I made this sparkly shaker birthday card using Pinkfresh Studio's Pop Out Sunburst stamp for double the fun.  As soon as I saw this stamp, I was intrigued by the possibilities!  I can create a rainbow sun ray background, or do alternating colors.  In this case, I stamped every other sun ray with Versamark and then used embossing glitter for the shine!

The sentiment is from this gorgeous Waffle Flower stamp and die set, first stamped using Tsukineko Tuxedo Black ink, then in Catherine Pooler Something Borrowed ink.  Coincidentally, it's from Catherine Pooler's "Life of the Party" collection. ;)  

I am entering this in the Simon Says Stamp Monday Challenge Blog, where the theme this week is "Let's Party!!!"

I used the following supplies:

Pinkfresh Studio Pop Out Sunburst

Waffle Flower Oversized Happy stamp and die set

The above are affiliate links, and I get a small commission at no cost to you if you purchase the supplies through my links.

Thanks for looking, and have a great and festive day!

Sunday, December 12, 2021

Striped 2-in-1 Birthday Card

I recently got an order from The Stamp Market, and it included this amazing Birthday Cover Plate die.  It's perfect for making quick cards, while still looking very polished and pretty.

I decided to step it up by cutting strips of different colored cardstock and sticking them on a background, then run the sandwich with the Birthday cover plate die through my Big Shot.

Now I have a 2-for-1 card!


I love, love, love monochromatic cards!!!

Thanks for looking, and have a great day!

Thursday, December 9, 2021

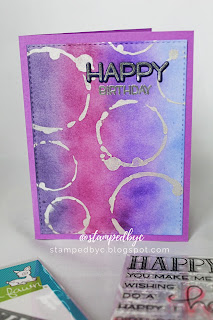
Purple and Silver Birthday Card using DIY Stencils

As promised, I'm sharing with you a birthday card I made using once of the stencils I DIY'd using my Silhouette Cameo. 

The splotches on the stencil were the perfect highlight to my card.


I used Tim Holtz Distress Inks (Dusty Concord, Wilted Violet, Seedless Preserves, and Shaded Lilac) to create my own background.  I'm not very good at blending, but I'm working on it.  You'll probably see more blended backgrounds on my next cards because I'm trying to get tons of practice, so thank you for your patience with me. :)

The white cardstock was die cut using Simon Says Stamp's Stitched Rectangles die.  I pounced Platinum Planet from Tsukineko's Brilliance ink through the stencil.  

I used Lawn Fawn's Happy, Happy, Happy stamp set and coordinating die to cut out the "Happy."  I cut it in four layers of cardstock to "pop" up the sentiment.  The words were heat embossed using Stampin' Up's Silver embossing powder.


Thanks for looking, and have a great day!

Wednesday, December 8, 2021

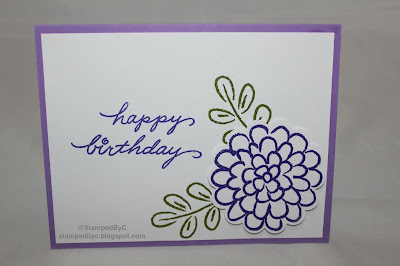
Embossed Purple Flower Birthday Card

I always find myself needing birthday cards.  With a big family and many friends whom I don't see as often as we typically would, birthdays always come up sooner than I expect.

Going through my old stamp sets, I found this beautiful Stampin' Up set (Flower Fest).  The images were just begging to be embossed, and embossed them, I did.

Using Versamark ink, I stamped the images and then embossed them using Stampendous embossing powder in Violet and Olive.  I punched the flower image using the coordinating scalloped circle punch, and popped it up on some foam tape.

The sentiment was from Stampendous (Happy Messages) and was stamped in beautiful Grape Crush ink by Catherine Pooler.  I just love how vibrant it looks in real life.  The photo really does not do it justice.


What do you do with your old stamp sets?  Do you purge your sets or do you continue to use them?  I love that I'm still able to use my old sets.

Thanks for looking, and have a great day!

Tuesday, February 17, 2015

Dinosaur Birthday Card

Hi, everyone!  I can't believe I finished this card, and just in time, too, for the Simon Says Stamp Wednesday Challenge.  The challenge this week is "All Creatures Great and Small," featuring Paper Smooches products.

I was excited when I saw the challenge, because I just ordered some Paper Smooches stamps, and I needed an excuse to break them out of their packaging and use them!

Today's card is a birthday card:


I recently discovered watercoloring using distress inks, and I'm really loving this technique.  The dinosaur and the images are stamped on watercolor paper, which I've matted with black cardstock over the turqouise card base.


I cheated a little bit on the sentiment (it's not a Paper Smooches product, but I think it fit perfectly with my card).

I used these products for my card (with links to where you can get them, if you're interested):
Black and turqouise card stock (my stash)
Watercolor paper (Strathmore)
Cuteasaurus stamp set (Paper Smooches)
Chit Chat stamp set (Lawn Fawn) - I bought the coordinating dies with the stamp set
Salty Ocean, Tumbled Glass, Stormy Sky, Brushed Curduroy, Mowed Lawn Distress inks (Ranger) - I bought 10 of the 12 mini sets (so cute!), and I'm waiting for the other 2 to become available again
Versamark watermark stamp pad (Tsukineko)
Black embossing powder (Stampin' Up!)
Foam tape (Scotch)
Big Shot (Sizzix)

Thanks for looking, and have a great day!

Tuesday, February 10, 2015

Bright Pink and Gray Card

It's been a while since I joined challenges, but I just couldn't pass up this challenge from Less Is More and Simon Says Stamp.

The Less Is More blog is celebrating its 4th anniversary, and the challenge this week is to make a card with pink and gray.

Meanwhile, the challenge at the Simon Says Stamp Wednesday challenge blog is "All things bright and beautiful," highlighting Hero Arts products.

I am excited for this challenge, because I have a lot of Hero Arts stamps.  They were one of the first stamps I bought when I first started stamping five years ago.

Here is my card:


I used this Hero Arts stamp set for the different splashes of pink.


The image and the sentiment came from two different stamp sets.  The bicycle was from this set.


The sentiment was from this set.  I love how the two stamps complemented each other perfectly.  I embossed both the bicycle and the sentiment using silver/gray embossing powder.

I love how this card turned out.  I am working on having a stash of handmade cards that I can readily pull out for different occasions, and this card definitely fits the bill.

Here is a complete list of products (and links to where you can find them):
White cardstock (Georgia Pacific)
Dark and light gray cardstock (my stash)
Brush Strokes (Hero Arts)
Joy Ride stamp set (Hero Arts)
Friendship Messages stamp set (Hero Arts)
Rose Bud ink (Memento)
Angel Pink ink (Memento)
Pixie Dust ink (Versamagic)
Pink Petunia ink (Versamagic)
Versamark ink pad (Tsukineko)
Heat gun (Nicole)
Embossing powder (Stampin' Up!)
Embossing powder tool (Inkadinkado)
ATG gun (Scotch)

Thanks for looking, and have a bright and cheery day!

Saturday, February 7, 2015

Beer Birthday Card

I can't believe it's February already!!!

This Saturday, my sister-in-law's boyfriend will be celebrating his birthday, so I made him -- a cake!!!

Just kidding.  Of course, I made him a card.

I typically struggle with masculine cards (I lack inspiration!!!), but I think I got this down pat.  He likes to drink beer, so I thought this the perfect card for him:


I cut the mug twice, once in acetate, and once in medium yellow cardstock, to give the illusion of glass.  It's hard to see in the photo, but you can sort of see the outline of the "glass" mug here:


I covered the beer froth in Stickles, to mimic the bubbles.  I know, it looks kind of glittery rather than frothy, but I think he will get a kick out of it.


I used these materials/supplies for this card:
Cricut Expression (I'm tempted to upgrade to an Explore, but I just can't let go of my very first E!)
Everyday Pop-up Cards (Cricut cartridge)
Bright yellow, medium yellow, and light yellow cardstock (my stash)
Black and white cardstock (my stash)
Sentiment (Happy Hour stamp set, Stampin' Up!)
Memento Tuxedo Black Ink - love, love, love this ink pad
Spots and Dots (Cuttlebug embossing folder)
Stickles
Sizzix Big Shot
Foam tape
ATG gun

Thanks for looking, and have a great day!  Cheers! ;p

Tuesday, December 30, 2014

Masculine Star Birthday Card

I hope everyone had a great Christmas/holiday.

New Year's Day is around the corner, and I'm starting the new year right by replenishing my stash of cards.

I have little inspiration when it comes to masculine cards, which is a shame since I live with two boys (my husband, R, and my son, r).  So what happens when you hit crafter's block? Pinterest to the rescue!

I saw a similar card, and decided to CASE (copy and share everything) it, since it's a great masculine card:


And since I was making one, it was easy enough to make three:


It's not visible in the photos, but I popped up a few stars to give the cards some dimension.  
Again, this was not my original idea.  The original card can be found here.

I used the following for these cards (you can click on the links below to buy):
Word Play stamp set (Stampin' Up!)
Solid cardstock, different colors (my stash/scraps)
Rhinestones (my stash)

Thanks for looking, and have a great day!

Thursday, June 12, 2014

r's Elmo-themed 2nd Birthday Party

r turned two last May -- hurray, we're at terrible terrific two's!

He loves Elmo, and so we decided to host an Elmo-themed birthday party for him and his friends.  Everyone had a great time!

I started brainstorming party ideas in March, so you can imagine me going crazy about party details, decorations, etc.  R, my husband, pretty much gave me all the freedom to decide on things I liked for the party, which I thought was nice of him.  He only told me to "not go too crazy," which I promised I wouldn't.  Famous last words.

Here's the invitation we sent out to r's friends:


I chose a simpler design this year, compared to last year's invitation, so it was much easier to mass produce.

And then, the party decorations.

I made this Elmo "Happy Birthday" banner using my Cricut and Silhouette Cameo cutting machines.
The banner and the letters were cut with the Cricut.  The medallions were cut with the Silhouette.  We're not allowed to hang or stick anything to the party room's walls/furniture, etc., so I planned to put this banner on the sweets table, together with letters of r's name, and the number "2."


These letters and number are 3D boxes, which I got from the Silhouette store.  I loved how they are able to stand by themselves.  After the party, I planned to use these as decor in r's bedroom.

Here's a photo of the sweets table:
r's birthday cake is not in the photo, because I was still picking it up. :p

I made these chocolate cupcakes and topped them with Elmo's icing decoration (from Wilton).

We also had Elmo chocolate lollipops, chocolate-covered Oreo's with Elmo's face, and Dorothy marshmallows.  I got the idea for the Dorothy marshmallows in Pinterest.

Unfortunately, I was not able to take close-up photos of the other treats, but you can see them a little bit (at least, I hope you can) on the photo of the sweets table.

And no, we did not just feed the guests dessert. :p  We also had Caesar salad, vegetables and dip, chips and spinach dip, cheese and crackers, Dorothy goldfish crackers, four different kinds of pizza (since half of the guests were at the picky-eater age), three-cheese tortellini, roasted chicken, and fruits.  We served water, pop, and juice for drinks.

I don't have a photo of the individual tables, but each table was covered in red table cloth, with a Dorothy the Goldfish centerpiece, again, thanks to Pinterest.

And then we had the goody bags.  I printed each guest's name on a label with an Elmo clip art, and attached it to white paper bags from Michael's.

I made these Elmo water bottles using red water bottles from Michael's, and stickers of Elmo's face (that I made myself):

I also included in the goody bags:  a small red beach ball, bubbles, and Playdoh.

And then we gave each guest a party hat.  I got this idea from Pinterest.

We also gave the guests some crayons and Elmo coloring sheets while waiting for the program to start.

And then, the guest of honor arrived, and he played and danced with r and his friends.

By the end of the party, we were all pretty tired, but so happy, since everyone had a blast!  It made all the prepations and hard work all worth it.

Thanks for looking, and have a great day!

Wednesday, June 11, 2014

Flower Birthday Card

I'm baaaccck!!!  I've been gone for a while (wow, really?), and I'm pleasantly surprised that readers are still stopping by my blog.  I really, really appreciate that, so thank you very much.

My mother-in-law will be celebrating her birthday this Saturday with a picnic for the whole family, and I forced by husband to let me my husband asked me to make her a card. :p

She loves flowers and her garden, so I pulled out my Cricut and Walk in My Garden cartridge, and made her this:


Here is a closer view of the sentiment and the flowers.

I used the following to make the card:
Walk in My Garden Cricut cartridge
Turqouise and kraft cardstock (Recollections)
Yellow, orange, green cardstock (my scraps)
D'vine Swirls embossing folder (Cuttlebug)
Teeny Tiny Wishes stamp set for sentiment (Stampin' Up)
Word Window punch (Stampin' Up)
Stampin' Dimensionals (Stampin' Up)

I'm pretty happy with the card, and I hope my mother-in-law likes it, too. :)

Thanks for looking, and have a great day!

Thursday, December 12, 2013

One is Fun Birthday Card

Hi, everyone!  I hope everyone is having a great week so far.  One more day and it's Friday!

And one more day, and it's almost my niece's birthday!  One of my nieces is turning one on Saturday, and we're going to a birthday party!  Here is the card I made for her, to come with our gift:


I'm entering this card to this week's Less is More challenge:  to use a metallic element plus one color on the card.

Since it's my niece's first birthday, I cut the number one with my Cricut in light pink cardstock, then used a darker pink cardstock for contrast.


Here is my metallic element, silver glimmer brads from Stampin' Up, on each end of my sentiment banner:


I embossed the light pink card mat using with the Happy Birthday embossing folder from Cuttlebug.

Do you think it's still a clean and simple card?  I think so, and I hope the Less is More challenge hosts agree. ;)  Check out the rest of the cards here

Here are the products I used for this card:
Light and dark pink cardstock (The Paper Company)
White cardstock (scraps)
Cricut catridge (Mini Monograms for the cirles and number)
Cuttlebug embossing folder (Happy Birthday)
Memento Rose Bud ink
Sentiment stamp from Pink by Design (Age is a Number)
Stampin' Up glimmer brads
Stampin' Dimensionals

Thanks for looking, and have a great day!


Sunday, November 24, 2013

Shoe Birthday Card

My husband comes from a big family, and on some months it feels like we're celebrating someone's birthday every week.

Not in November, though.  With 18+ people in the family (parents, siblings, and nieces/nephews), the honor of celebrating the only birthday in November belongs to my brother-in-law (he's really my husband's brother in-law, but for simplicity's sake, I will claim him as mine.  Lol.).

My brother-in-law, A, loves basketball shoes.  He loves the sport, but he loves the shoes more, so I made him this card:


Okay, it really is more of a sneaker than a basketball shoe card, but I'm sure he'll get a kick out of this, card, anyway.  Get it, "kick"? :p  Awful, I know.  Sorry, I can't help it.


I used the following products to make the card:
White, red, and black cardstock (Recollections)
Embossed red card mat using Cuttlebug embossing folder (Traffic Jam)
Shoe cut with Cricut cartridge (Boys Will be Boys)
Stampin' Up's Celebrate in Style stamp set for the sentiment (I love this sentiment -- and this stamp set is one of the first Stampin' Up sets I owned)
Memento ink (Tuxedo Black)
Stampin' Dimensionals to pop up the shoe and the sentiment

Actually, now that I've thought about it, I think he loves Michael Jordan the most, but I really can't put Michael Jordan in a card, right?

Thanks for looking, and have a great day!

Wednesday, May 15, 2013

It's a Mickey Mouse Birthday Party!

Hi, everyone!  I know I've been gone a while, and rather than explain what I've been up to, I thought I would just show you.

March and April had been hectic -- we went to my niece's Christening, my husband's goddaughter's Christening, and my sister-in-law's sister-in-law's (not a typo, she is really my sister-in-law's sister-in-law) wedding.  And then, May crept in, and DS (dear son) is almost one year old!

That is what I've been up to -- the weeks leading up to his birthday party last Sunday, Mother's Day, were spent prepping and planning.

First, DH (dear hubby) and I had to decide on a theme.  Actually, DS decided on the theme for us.  While at Toys R Us, he grabbed a Mickey Mouse toy at the store and never let go.  We took it as a sign that he would like a Mickey Mouse party. :p  He also bops his head to the Mickey Mouse Clubhouse Hot Dog song (it's quite catchy -- you should take a listen) every time we play it for him.  So, a Mickey Mouse party it is!

After drafting the guest list -- DH and I come from big families, and extended families, and we knew we wanted all of them, and our friends, to join us in celebrating DS's first year -- we had to agree on the invitation.

Ahem.  After nights of brainstorming, this is what I came up with:
Front of invitation

Inside of the invitation.  It's hard to see well on the photo, but it's a pop-up invitation.

Mickey up close

Making ~40 of these invitations took me three weekends.  I could only work on them on weekends, because of my work schedule.

Then came decorations:  I we decided to stick to Mickey Mouse's colors for the decorations (black, red, yellow, and white).  By this time, I was on a roll.  My head was spinning with ideas, and I was bouncing them off DH one on top of each other.  He made the smart decision and decided to leave the decisions about decorations (and all things party-related) to me.  He took over baby-sitting and household chores (including laundry and dishes) while I was in my birthday party planning-possessed state.

We covered tables in red, white, and yellow table covers.  I made Mickey Mouse centerpieces for each of the tables, and attached three balloons (red, white, and yellow) to each of them.
(please ignore the bottle of pop on the table)

I also made a Mickey Mouse banner from black and white cardstock to hang over the dessert table.  The banner was attached to each other using red, white, and yellow ribbons.
(in case you were wondering, there was a "Y" in "Birthday;" it was just hiding behind the balloons)

For the birthday boy's seat, we brought with us a mini-high chair (the one that you strap into a chair) and decorated it.
He didn't really stay on the seat for too long.  There was too much going on around him, and he wanted to be part of the excitement.

For our young guests, I made goody bags out of paper bags. I filled them with toys and things (stickers, tattoos, scrapbook, markers, balls, etc.) that I picked out, based on each guest's age.  I printed labels with a Mickey Mouse clip art, and a message from the birthday boy.

I also made the two larger stand-up Mickeys.  Here is a photo of one of them (the one on the goody bag table):

I did not, however, make this Mickey:
He came from Party City. ;)

I also made most of the items on the sweets table (please see the photo with the Mickey Mouse banner above).  Among the treats I made were:  chocolate covered Oreos, chocolate-dipped Rice Krispies treats, chocolate cupcakes in baby food jars, and the candy tubes (sans toppers).

All in all, it was a great party.  We all had a great time.  However, between preparing for the party for days, hauling everything from our home to the place we rented for DS's party and back, setting up and cleaning up (our families helped us out -- aren't they awesome?), and taking care DS, DH and I were exhausted.  After weeks of breathing and living Mickey, I was over-Mickeyfied.  If I see another Mickey Mouse again, it will be too soon.

The next morning, I got a phone call from my sister-in-law (whose sister-in-law got married last month, remmeber?):  "Hey, C!  Guess what?  For A (my niece)'s birthday, we're having a Minnie Mouse party!!!"