Friday, December 20, 2013

More Christmas Gift Card Holders!

All of you must think I'm a lousy gift-giver, since I'm giving out gift cards instead of a more personal, thoughtful gift.  But, my "giftees" (is there such a word?) all asked for gift cards for Christmas, so I'm more than happy to oblige.  After all, there are cute ways to give out gift cards, too, right?


Again, this is not my original idea -- I CASE'd (copied and shared everything) this card from this blog.  When I saw the photos of her gift card holders, I just thought they were so cute.  I'm glad she posted instructions on how to recreate them.


The outer pocket that holds the gift card and it's holder is cut out of red cardstock.  I used patterned paper as a mat on the front, to jazz it up a bit.  I'm not sure if you can see it on the photos, but the Christmas trees have glitter on them, which I thought was so pretty.

The actual gift card holder is made of green cardstock, and it slides into the outer pocket.  I cut it out with my Big Shot.


I then stamped my image on white cardstock, punched it out with a circle punch, layered it over a red scallop circle, and finally popped it over the green cardstock gift card holder.  I think the white, red, and green made a nice contrast.


Here are the products that I used to make these gift card holders:
Red and green cardstock (Recollections)
White cardstock (Georgia Pacific)
Patterned paper (DCWV)
Cottage Ivy ink (Memento)
Oh, Dear! stamp set for the Christmas tree (Stampin' Up)
Two Tags Die (Stampin' Up)
1-3/8" circle punch (Stampin' Up)
1-3/4" scallop circle punch (Stampin' Up)

Thanks for looking, and have a great day!

Santa Gift Card Holder Tutorial

While I was browsing through cards online for inspiration, I saw a cute Santa card that I wanted to recreate.  Unfortunately, I could not find the photo again.  So, this is not my original idea, but I wanted to share my take on it.


It's cute, and simple, and is perfect to hold a gift card for each of r's daycare teachers.

These are what you need to get started:


White, yellow, red, black cardstock (Recollections)
1-3/8" square punch (Stampin' Up)
1/2" circle punch (Stampin Up)

I intially wanted to use a smaller square punch for the inside of Santa's buckle, but it looked small around the "waist" so I used this instead:


I cut my card base (red) at 4-1/4" x 5-1/2" for an A2 sized card.  I cut a 2"x2" square out of yellow cardstock for the buckle.  I cut a 1-1/2" x 4-1/4" black strip of cardstock for the belt, and punched the inside of the buckle in black cardstock, using Stampin' Up's 1-3/8" square punch.  I then punched out 1/2" circles out of black cardstock for the buttons.


To assemble the card:
1.  Attach the black square to the yellow square of cardstock, making sure that the black square is more or less centered, for the belt buckle.
2.  Attach the black strip of cardstock to the red card base.
3.  Attach the belt buckle (see Step 1) to the belt, again making sure that the buckle is more or less centered.
4.  Attach two black circles for the buttons.

Ta-da!


See how nicely a gift card fits on the inside of the card.  I adhered a white card mat to the other half of my card for the message.


Quick, simple, easy, and cute!  I hope you try this.

Thanks for looking, and have a great day!

Thursday, December 19, 2013

Candy Cane Holder

Six days before Christmas!!!

For R's and my co-workers, and for r's classmates, I decided to give candy canes as a little gift for Christmas.  Although I think it's perfectly okay to just hand out candy canes to everyone, the papercrafter in me could just not pass up the chance to make something cute and papercraft-y to hold the little treats.


I made these candy cane holders out of the folded ornament card from Joys of the Season Cricut cartridge, at 3 inches.  I cut the actual card, and also the shadow of the card, to create a red border around the candy cane holder.


I stamped the image from Tags Til Christmas stamp set (Stampin' Up) in navy blue ink.  I think it's perfect for my ornament.


I punched the hole for the ribbon using my Crop-a-dile.

I used the following products for this project:
White and red cardstock (The Paper Comapany)
Night of Navy ink (Stampin' Up!)
Tags Til Christmas stamp set (Stampin' Up!)
Crop-a-dile
Silver ribbon (my stash)

I'm entering this project to this week's Fantabulous Cricut challenge, which is to make anything but a card (holiday edition).

Thanks for looking, and please stay tuned for more quick and easy Christmas projects.  Have a great day!

Friday, December 13, 2013

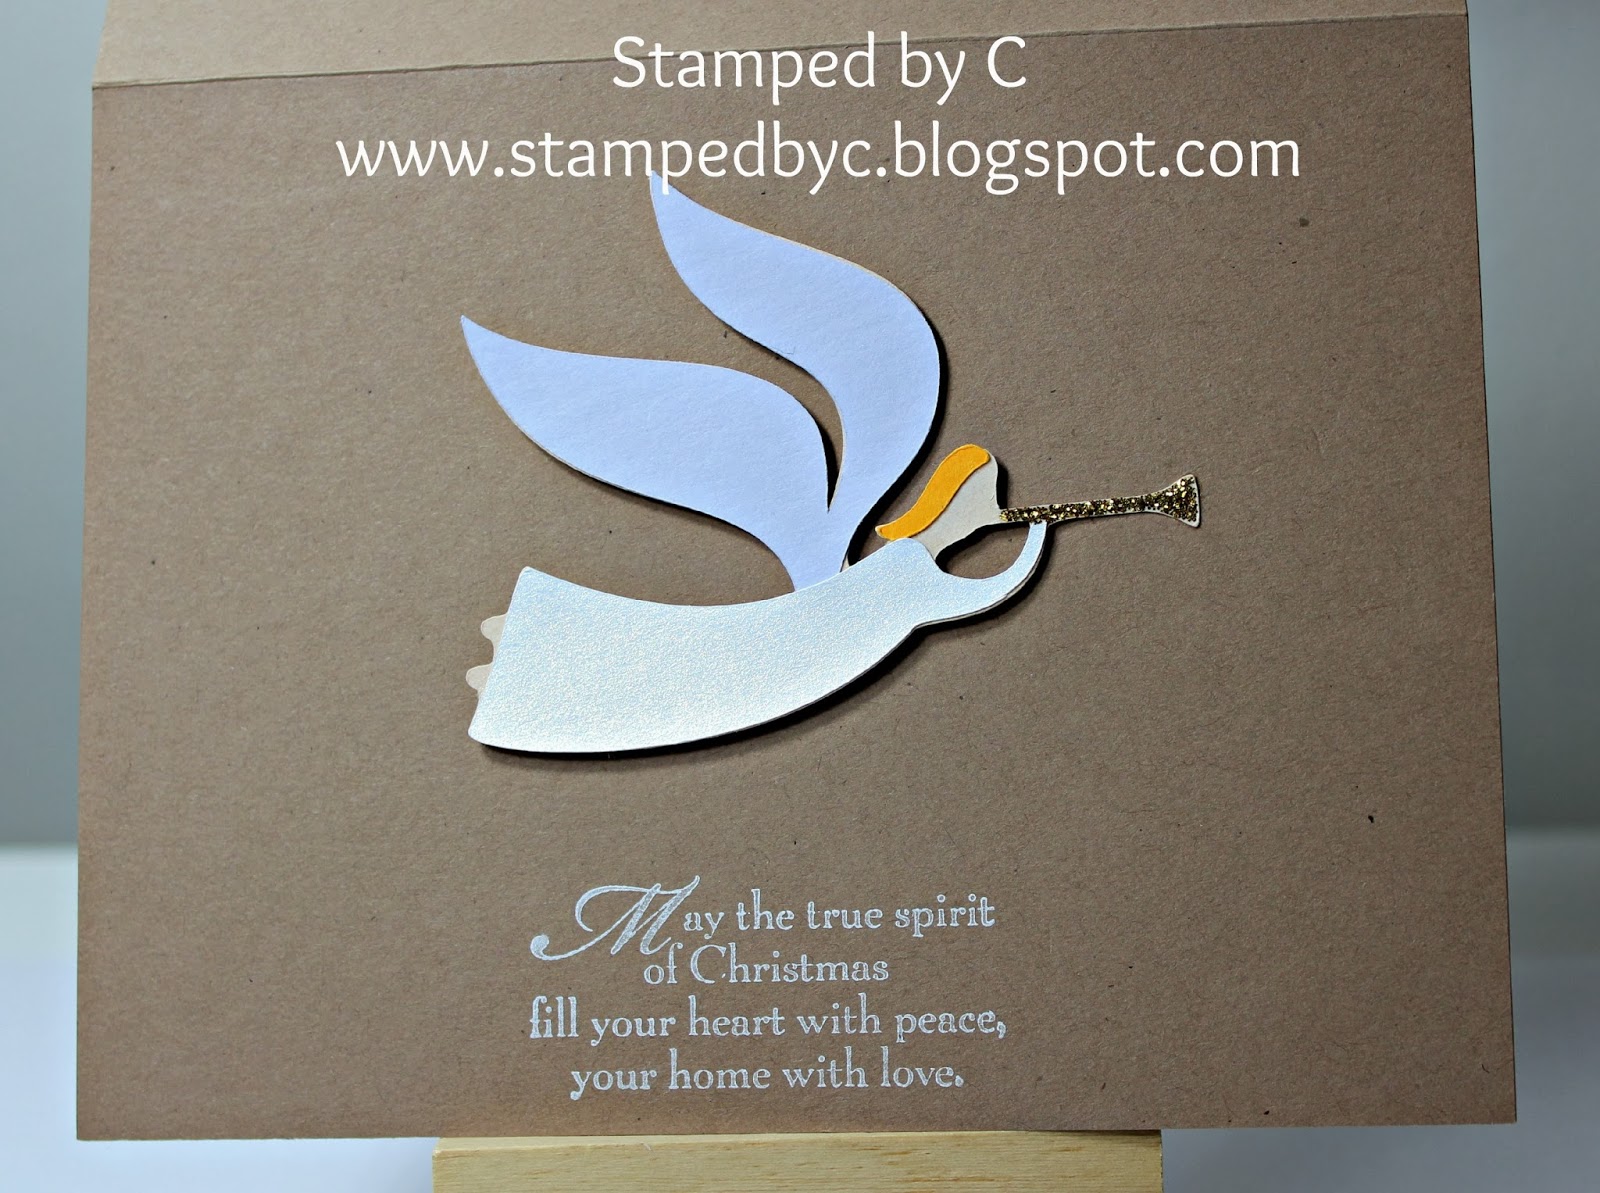
Angel Holiday Card

I am on a cardmaking roll this week -- but would you believe me if I told you that I just finished my Christmas cards this week?  Gasp.

In any case, I finished them, and I'm dashing to the post office today to mail them.

I chose this card to mass-produce, because I thought the angel was relatively simple to piece together, and I love window cards.


Again, the angel was pretty simple to put together.  I think. :p


I know it's not conventional holiday colors, but the message was definitely in the spirit of the holiday.


Here is the list of products I used:
Kraft cardstock (Recollection)
Shimmery white cardstock (Jo-ann's -- I don't know if they still sell it in the stores; I got mine 5 years ago)
Cricut cartridge (Joys of the Season)
Tsukineko Brilliance Moonlight White pigment ink
Stampin Up Oval Framelits (for the "window" of my card)
Stampin Up stamp (Snow Swirled)
Gold Stickles for the trumpet
Stampin Dimensionals

I'm entering this card to this week's Fantabulous Cricut Challenge.  The challenge this week is holiday cards.  Perfect!

Happy Winter Card

It's been snowing hard these past few days, so we can definitely feel that it's winter.  I'm not a winter person, because I get cold easily, but it doesn't stop me from watching all of the fun winter activities from inside our house.

I made this card for the Crafty Cardmakers challenge this week, which is to create a "winter fun" card, but it should not be a Christmas or New Year card.  I think it's a great challenge, and I really had to think to come up with this:


I'm not sure if you can tell from the photo, but I used shimmering white paper for my base.


This is how the card looks when it's opened (it opens at the slope):


I cut the sledding boy using my Cricut (I love his facial expression -- doesn't that say "winter fun?").  I popped him on some Stampin' Dimensionals and stuck him on the slope, so he looks like he's sledding down from it.

I cut the slope using a die from Papertrey Ink.  The sentiment is stamped in Bahama Blue ink on two layers of square cardstock (punched with two nesting Stampin' Up square punches).

The "snow" on the background is made from Stampin' Up's Dazzling Diamonds.

Here is a list of products I used:
White shimmer cardstock (JoAnn's -- I don't think they carry this anymore)
Blue, red, kraft, ecru, and black cardstock (The Paper Studio)
Cricut cartridge (Winter Frolic)
Papertrey Ink die (In the Meadow -- for the slope)
Memento Bahama Blue ink
Stampin' Up Happy Winter stamp set (for the sentiment)
Stampin' Up Dazzling Diamonds
Stampin' Dimensionals

I hope everyone has a happy and safe winter!  Thanks for looking, and have a great day!

Thursday, December 12, 2013

One is Fun Birthday Card

Hi, everyone!  I hope everyone is having a great week so far.  One more day and it's Friday!

And one more day, and it's almost my niece's birthday!  One of my nieces is turning one on Saturday, and we're going to a birthday party!  Here is the card I made for her, to come with our gift:


I'm entering this card to this week's Less is More challenge:  to use a metallic element plus one color on the card.

Since it's my niece's first birthday, I cut the number one with my Cricut in light pink cardstock, then used a darker pink cardstock for contrast.


Here is my metallic element, silver glimmer brads from Stampin' Up, on each end of my sentiment banner:


I embossed the light pink card mat using with the Happy Birthday embossing folder from Cuttlebug.

Do you think it's still a clean and simple card?  I think so, and I hope the Less is More challenge hosts agree. ;)  Check out the rest of the cards here

Here are the products I used for this card:
Light and dark pink cardstock (The Paper Company)
White cardstock (scraps)
Cricut catridge (Mini Monograms for the cirles and number)
Cuttlebug embossing folder (Happy Birthday)
Memento Rose Bud ink
Sentiment stamp from Pink by Design (Age is a Number)
Stampin' Up glimmer brads
Stampin' Dimensionals

Thanks for looking, and have a great day!


Tuesday, December 10, 2013

Crafty Cardmakers Top 5!!!


Oh, my goodness.

Quick post today, everyone.  I just checked out the Crafty Cardmakers blog, and just found out that I made the Clean and Simple Challenge Top 5!!!   Whooo-hooo!  What an awfully nice way to be welcomed to the challenge (it was my first time to join). :)  Here is my entry again.

Thank you to the challenge host, Viv, and to everyone at Crafty Cardmakers.  Thank you to everyone else who joined the challenge.  I think all the cards were so inspiring.  Congratulations to the winners and the Top 5.  I'm so honored that my card is displayed with yours at the Crafty Cardmakers blog.

Now I can add another badge to my sidebar! :) :) :)

Thursday, December 5, 2013

Blue and Silver Christmas Card

I broke out my Cricut again this week so that I can join in the fun at the Fantabulous Cricut challenge.  The challenge this week is "beyond red and green."  The challenge is to make a Christmas card using any other color, aside from red and green.

I decided to use blue and silver for my card.  I made a window card out of blue cardstock (cut from Cricut Christmas Cards cartridge -- I cut the decorated edge at the bottom of the card off so that my card base will stand flat).  I covered the window with acetate, although it may be hard to see that in the photo.


The word "Merry" is cut from Joys of the Season Cricut cartridge on dark blue cardstock.  The sentiment "Merry Christmas" is from Stampin' Up's Teeny Tiny Wishes stamp set, stamped on dark blue ink on white cardstock.  The white cardstock was punched with Stampin' Up's Word Window punch.  The same dark blue cardstock was punched using the Modern Label punch, also from Stampin' Up.

Here is the inside of the card:


I cut the tree from the Joys of the Season cartridge on white cardstock.  I inked up the edges using silver ink (Inkadinkado), and drew ornaments using silver and dark blue Stickles.  I also used the same silver Stickles to color the star and the tree trunk.  The tree was popped up using Stampin' Dimensionals.

Full supply list:
Turquoise, dark blue, and white cardstock (Recollections)
Silver and dark blue Stickles
Teeny Tiny Wishes stamp set (Stampin' Up)
Night of Navy ink (Stampin' Up)
Acetate
Word Window punch (Stampin' Up)
Modern Label punch (Stampin' Up)
Cricut cartridges (Christmas Cards, Joys of the Season)

Does the card look Christmas-y enough, even if I didn't use any red or green on it?  What do you think?

Thanks for looking, and have a great day!

Wednesday, December 4, 2013

Christmas Sparkle Card

Hi, everyone!  I hope you all had a great holiday.

This week's theme at the Less is More blog is "Sparkle."

Here is my interpretation of the challenge:


The sparkle elements are the Christmas trees, which I embossed in gold glitter.


The sentiment "Merry Christmas" is stamped in red ink, and then stamped offset in Versamark.  I then used clear embossing powder for that shadow effect.

Here is a list of the materials that I used for this card:
Kraft card base (Recollections)
Very Vanilla card stock (Stampin' Up)
Tree (Happy Winter, Stampin' Up)
Merry Christmas sentiment (Greetings 4 U, Stampin Up)
Versamark ink
Riding Hood Red ink (Stampin' Up)
Clear embossing powder (Stampin' Up)
Gold embossing glitter (Stampendous)

I'm entering this card to the Less is More Week 148 challenge.  The rest of the entries are here.

Edited to add:
I'm also entering this card to the Crafty Cardmakers challenge, at the suggestion of Viv, the challenge host. :) (Thanks, Viv!).  Check out the other awesome clean and simple cards here.

Thanks for looking, and have a great, and sparkling, day!