Wednesday, December 31, 2014

Flower Note Cards

Still in line with keeping my stash of cards well-stocked for the new year, I CASE'd these note cards from Pinterest (see the original cards here).  As soon as I saw these, I knew I wanted to re-create them.


They were so cute, and so simple, and so easy to make.  Making these 6 note cards took me around 15 minutes.


Each note card is 3 inches x 3 inches, which is the perfect size for a quick note, or for enclosing with a gift.

I purposefully left the note cards without a sentiment, so that I will have more versatility in using them.  I figured I can easily stamp and add a sentiment (to fit my needs) later on.

What about envelopes, you ask?  Please check out my quick tutorial here.

I used these supplies and products (please click on the link to buy):
Posy Punch stamp set (Stampin' Up!)
Rich Cocoa ink pad (Memento)
Tangelo ink pad (Memento)
Mini brad (my stash)
Kraft cardstock (Recollections)
White card stock (Georgia Pacific)
Patterned paper (my stash/scraps)
Fancy Flower punch (Stampin' Up!)
3/4 circle punch (EK Success)

I love, love, love these 3x3 note cards!

Thanks for looking, and have a great day!

Tuesday, December 30, 2014

Masculine Star Birthday Card

I hope everyone had a great Christmas/holiday.

New Year's Day is around the corner, and I'm starting the new year right by replenishing my stash of cards.

I have little inspiration when it comes to masculine cards, which is a shame since I live with two boys (my husband, R, and my son, r).  So what happens when you hit crafter's block? Pinterest to the rescue!

I saw a similar card, and decided to CASE (copy and share everything) it, since it's a great masculine card:


And since I was making one, it was easy enough to make three:


It's not visible in the photos, but I popped up a few stars to give the cards some dimension.  
Again, this was not my original idea.  The original card can be found here.

I used the following for these cards (you can click on the links below to buy):
Word Play stamp set (Stampin' Up!)
Solid cardstock, different colors (my stash/scraps)
Rhinestones (my stash)

Thanks for looking, and have a great day!

Tuesday, December 23, 2014

Organization: Wood Mounted Stamp Sets

After Cricut cartriges and punches, I decided it was time to organize my wood-mounted stamp sets.  I didn't think I really had lot of them, since I tend to buy the clear-mount (Stampin' Up!), or the clear photopolymer stamp sets (from other companies), but after finishing organizing them, I did have more than I thought (does this sound familiar?).

Moving on, I needed a uniform way to store my stamp sets.  I originally kept them in their Stampin' Up! clamshell, or in their original boxes (for other companies), but because the boxes have different  sizes, it was really hard to store them.

I liked the idea of the Stampin' Up! cases (for wood-mounted stamps), but I couldn't wait for the longer time it took to place an order (in my previous experience, it took maybe 7-10 working days for me to receive an order).  I needed something that was readily accessible, or at least will get here in a shorter time than that.

Enter these boxes.  They fit the bill perfectly!  They were uniform in size and accessible.  And they came in this carrying case, so I can pack up some of my wood-mounted stamps and take them to crops with me if I wanted to (and you can bet I will be going on more crops in the future, after going to my first one!):


I labeled each individual box with the stamp set's name, using my label maker and paper refills.


And if I had a larger stamp set that won't fit in one box, I just split the set into two boxes.


I really love this method.  If you're looking for a way to organize and store your wood mount stamps, please give this a try.

Thanks for looking, and have a great day!

Monday, December 22, 2014

Christmas Cards and Tags

I'm interrupting the organization theme of my posts to share with you my Christmas card this year.  I know, I can't believe I'm posting it just three measly days before Christmas.  I also can't believe I've forgotten to post it before.

Anyway, here it is:


This year, I decided that I wanted to simplify my card-making process, so I chose to mass-produce a single card design (see last year's card, gift card holders for teachers and coworkers, and tags).  This will serve as our Christmas card and our gift card holder this year.

This card is my interpretation of a card I saw at the crop I attended.  I only saw a peek of it (the lady next to me was mass-producing them) because I was busy making my own project, but I'm fairly satisfied with how it turned out.

Here is a closer view of the ribbon, the snowflake (it was so hard to capture it well on camera, since it's shiny surface was reflecting light like crazy) and the embossing:


And here is the inside of the card:


I also made some tags for my husband's and my presents to our coworkers.  Again, I decided to simplify by using and coloring a single stamp for our tags:


Please excuse the smear of ink on the bottom of this photo.  I saw this while I'm posting this photo.  I was able to change the tag before giving it to the recipient, but I didn't have time to take a photo).

Products Used:
Snow Swirled (Stampin' Up!)
Tags Til Christmas (Stampin' Up!)
Greetings of the Season (Stampin' Up!)
Stampin' Write Markers (Stampin' Up!)
Black embossing powder (Stampin' Up!)
Snowflake embellishment (Jo-ann's)
Black and white twine (my stash)
Red, white, shimmer, kraft, black cardstock (my stash)

Thanks for looking, and have a great day!

Organization: Punches

I guess I am in an organizing kick lately.  After sharing with you how I organized and stored my Cricut cartridges, handbooks, and overlays, I am now sharing with you how I organize my punches.

I own a variety of punches (old Stampin' Up! whale style and the new Stampin' Up! locking punches), and storing them in a way that still makes them really accessible has been the bane of my crafting existence.  I really wanted to use the Ikea Bygel rails that most crafters have been using to keep their punches, but my hubby is not very keen on the idea of me drilling holes on my craft room's wall.

After a lot of thought, I came up with this:


I purchased an Ikea table top and drilled holes on the underside of the table for the shorter Bygel rails.  Then I propped the whole table top against the wall, and -- voila! -- instant "wall" storage for my punch.  I was tempted to use the longer table top for this project, but I thought about how heavy it might get, and it may topple over.  

I keep my punch storage behind the door of my craft room, where it's out of the way, but still accessible when I need it.  I've also been very careful to lock the door to the craft room so r cannot get inside and get hurt if the punches fall over.

It's been working great so far, but if I outgrow this system, I just have to talk my husband into letting me drill holes on the wall.  And then I can use the table top as another desk in the craft room!

Thanks for looking, and have a great day!  

Sunday, December 21, 2014

Organization: Cricut Cartridges

I started "officially" crafting after watching a few Cricut videos on YouTube.  That was 4 years ago.  After watching many more videos in YouTube, buying a Cricut, cartridges, and other craft-related supplies, I realized that when I sit down to do a project, I spend more time trying to remember where things are, than actually creating.  Partly because I think I have too much stuff for my needs right now (gasp!!!), but also because I don't get to craft often, that I tend to forget what I do and don't have.

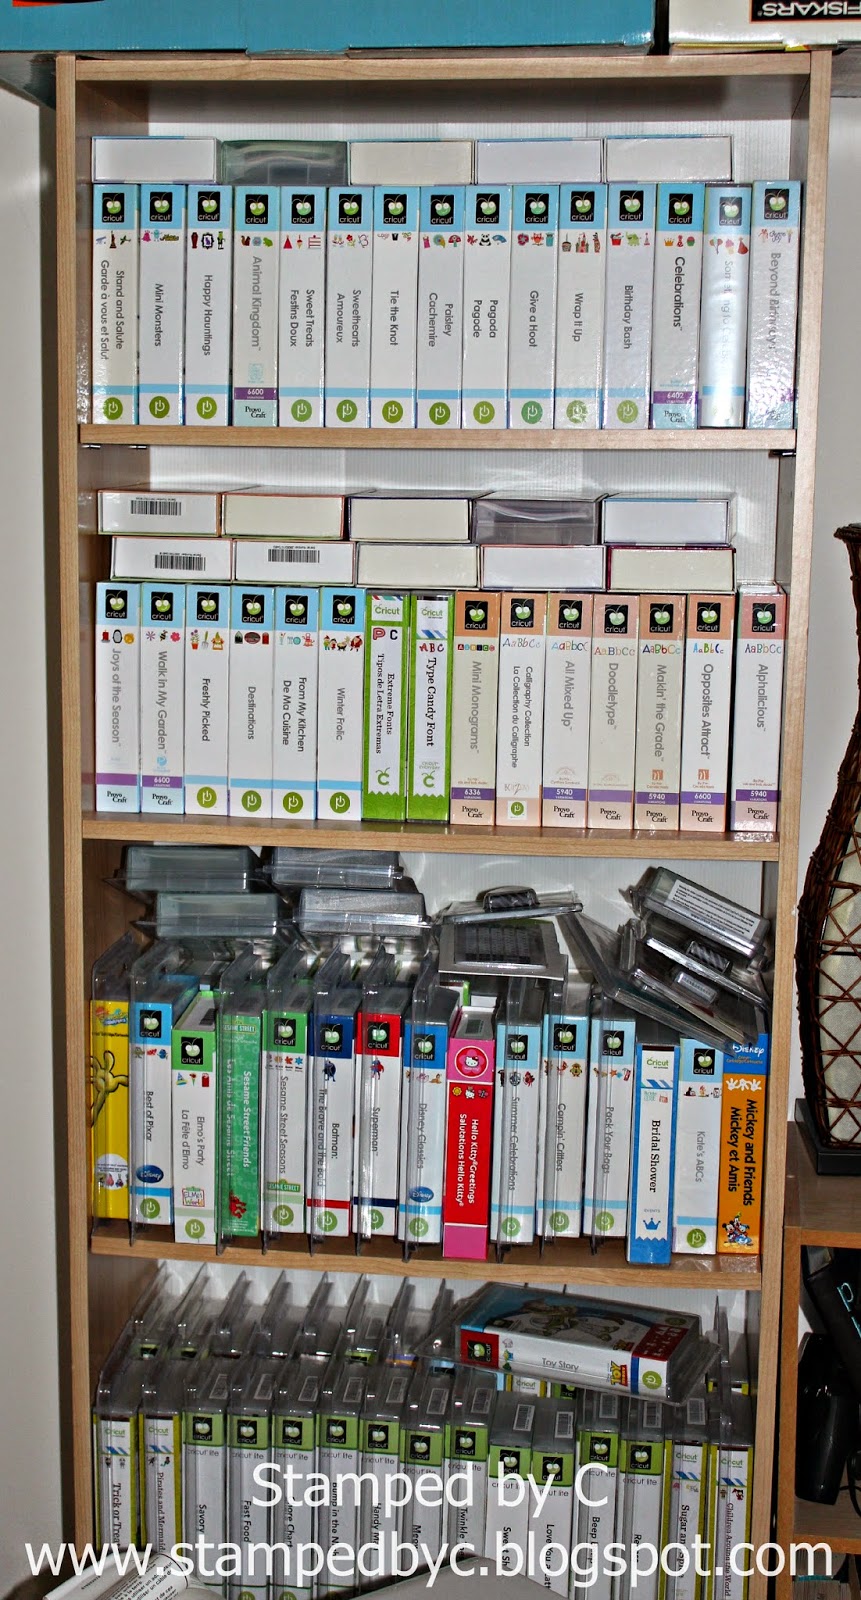
I noticed that most of my craft room "real estate" was taken up by my Cricut cartridges.  I have over 150 of them, and all of them are still in their original boxes.  And some are even unopened.  Here, take a look:


I searched the Internet for Cricut cartridge organization ideas, and stumbled upon this method.  She created little cardboard containers for each cartridge, then organized them on boxes.  You can check out her blog post and video here.  

It was genius.  I cut the SVG file of the cartridge "containers" (also on her blog) on white cardstock using my Silhouette Cameo.  It wasn't too bad -- it took me probably a whole night to finish cutting and assembling all of the "containers."  I also made labels using my label maker (font is "Small").  And I stocked up on refills, although I think I ended up using a little less than 2 label refills for this project.


The hardest part for me was throwing away the original cartridge boxes (seriously, but please don't judge).  I got over that initial hesitation, however, and the results were well worth it.  I was able to fit 84 cartridges in a box, which I got here.  From occupying a nearly a full shelf in my craft room to this:

I kept the handbooks and overlays in these boxes, which I got here.  I triedd to fit the same number of handbooks and overlays in each box (84 each).  It was great that I had a mix of different cartridges, with Lite handbooks.


And then for my active project (I am currently working on r's baby book), I'm keeping all the cartridges, handbooks, and overlays in this box.


I'm so happy that I found this method of storing cartridges.  Now I know exactly what I have, and can easily reach for what I need.

Give this method a try, and let me know what you think.

Thanks for looking, and have a great day!